
Ed Bradley’s Web: Weaving Networks, Security, Cloud, and Code.
Introduction
This post centers on deploying the first Microsoft Active Directory Domain Controller, establishing the core of a unified identity management framework for my home lab. I will eventually extend it into the cloud. The Domain Controller provides centralized authentication, DNS, and policy enforcement across all network segments, forming the backbone for secure and consistent access control. A backup Domain Controller will be deployed, on a Virtual Machine, later on in the lab build-out process.
This is a bare-metal deployment of Windows Server 2022 running Active Directory Domain Services (AD DS) on a stand-alone HPE server:
HPE DL20 Gen9 with:
- Intel® Xeon® E3-1230 v6 @ 3.50GHz
- 8 GB DDR4 ECC RAM
- 2 × 1TB SATA HDD (RAID 1 = 1TB usable)
The system includes HPE iLO for remote management, enabling secure out-of-band access via VLAN 10. iLO includes:
- Remote KVM access (keyboard, video, and mouse):
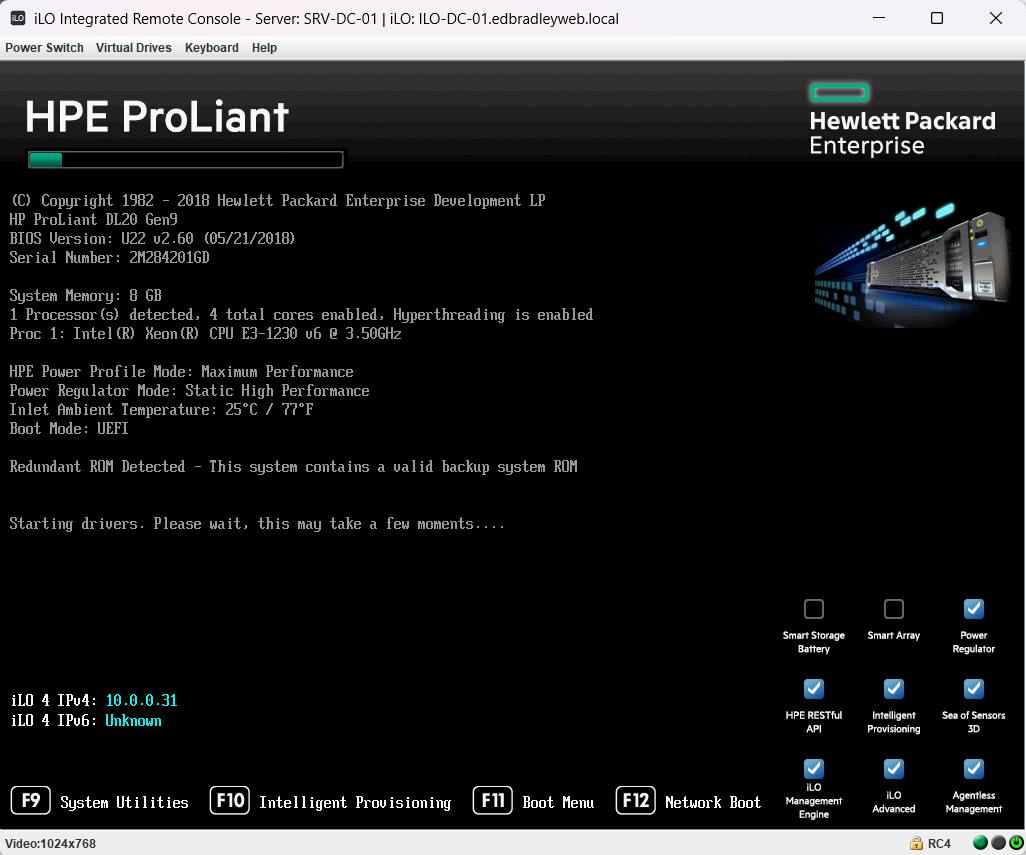
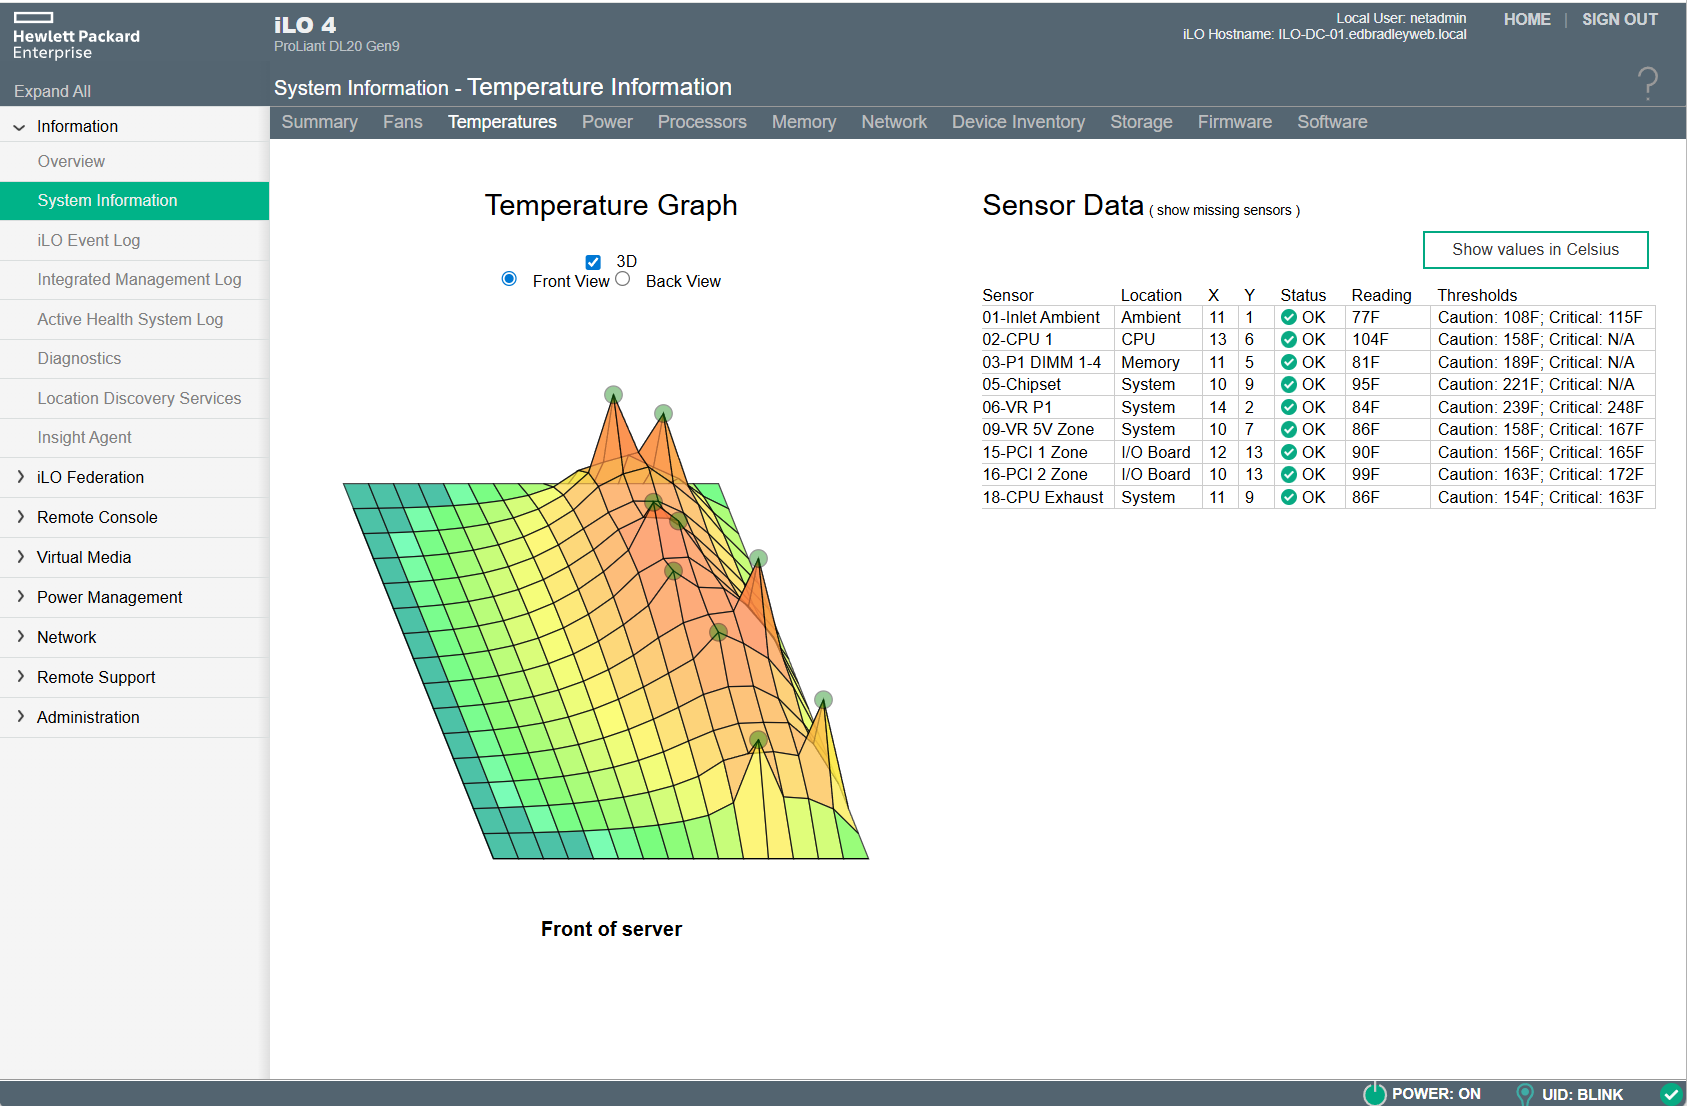
- Hardware health monitoring:
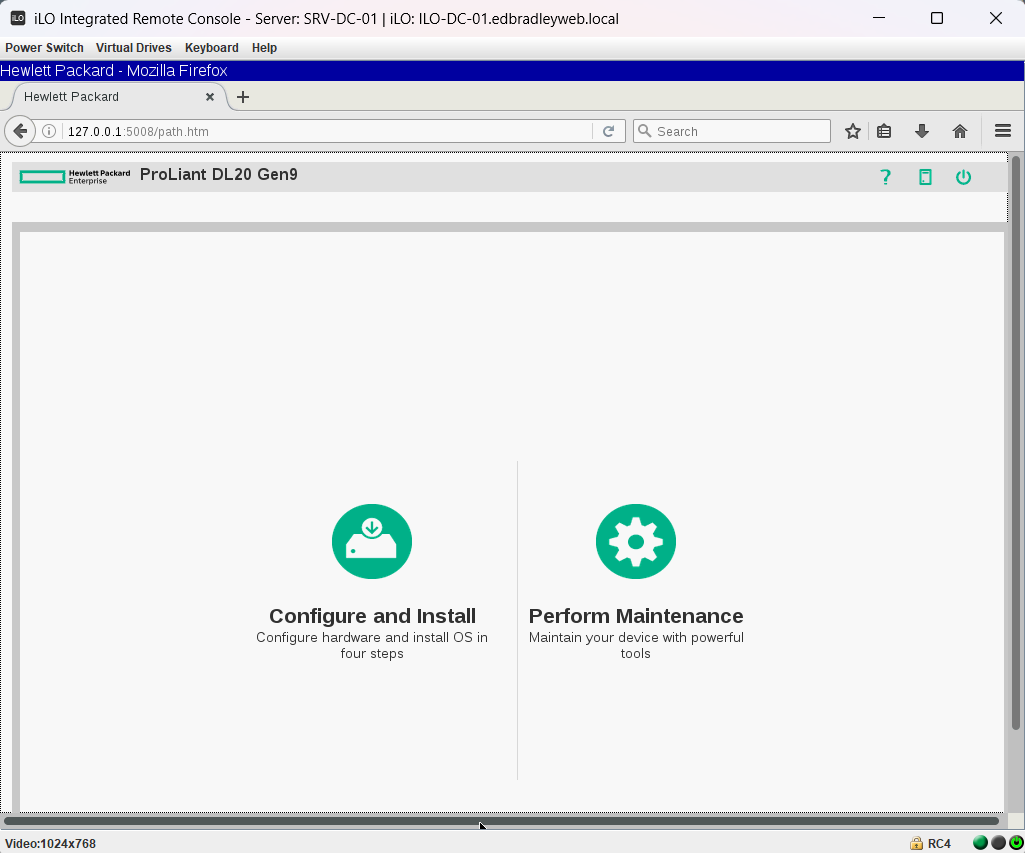
- Firmware configuration and OS provisioning (with bundled HPE drivers):
These features remain available even when the operating system is offline or the production VLAN (20) is unavailable — delivering datacenter-grade reliability and control, and closely mirroring how enterprise infrastructure is managed in professional environments.
Cross-Platform Authentication:
In my lab, wired systems — such as servers on VLAN 20 and workstations on VLAN 30 — authenticate directly against Active Directory, using Kerberos and LDAP:
- Windows machines use the traditional domain join method.
- Linux systems join via SSSD and realmd.
- Macs can join the domain directly using Apple’s built-in Directory Utility.
For wireless clients (laptops, phones, tablets, etc.) on VLAN 60, authentication will be performed through RADIUS 802.1X.
Both the Meraki MX68W and FortiWiFi 61F security appliances have built-in Wi-Fi radios and act as authenticators, securely forwarding user credentials or certificates to the Microsoft Network Policy Server (NPS), which validates them against Active Directory.
This setup creates a consistent identity model across both wired and wireless networks, supporting centralized authentication, explicit wireless VLAN assignment, and enterprise-grade security. (The full RADIUS deployment will be detailed in a future post.)
🧩 The Evolution of Microsoft Active Directory and Entra ID
Origins - Directory Services and X.500:
Active Directory (AD) debuted with Windows 2000 Server, revolutionizing how enterprises managed users, computers, and network resources.
Its design drew heavily from X.500, an international directory standard, introduced in the late 1980s. It defined how distributed directories should organize and locate information.
From X.500 came several key technologies that remain integral to AD:
- LDAP (Lightweight Directory Access Protocol) – for querying and modifying directory data
- Distinguished Names (DNs) – providing unique hierarchical identifiers
- Hierarchical Namespaces – organizing forests, trees, and domains
AD also leverages Kerberos (developed at MIT) for secure logons. DNS (which dates back to the early days of the Internet) is used for service discovery.
The combination of these standards & technologies, creates a scalable, multi-master, directory that is capable of supporting thousands of users across distributed sites.
From On-Prem to the Cloud: Enter Microsoft Entra ID:
As enterprises shifted toward cloud services, Microsoft extended AD into the cloud with Azure Active Directory (Azure AD) — rebranded as Entra ID (in 2023).
While traditional AD governs on-premises Windows resources, Entra ID delivers cloud-based Identity-as-a-Service (IDaaS) for Microsoft 365, Azure workloads, and SaaS applications.
| Feature | Active Directory | Entra ID (formerly Azure AD) |
|---|---|---|
| Location | On-premises | Cloud-based |
| Protocols | LDAP, Kerberos | OAuth 2.0, OpenID Connect, SAML |
| Authentication | Domain-joined | Federated / Cloud-native |
| Scope | Internal resources | Cloud services, external users |
| Sync | Via Entra Connect (Azure AD Connect) | Native with M365 & SaaS |
Most modern organizations now use a hybrid identity model, synchronizing their on-prem AD with Entra ID for single sign-on (SSO), and unified identity governance across environments.
Core Technologies Behind AD and Entra ID:
Both Active Directory and Entra ID share the same conceptual roots and principles:
Active Directory was built on open standards and Microsoft extensions:
- X.500 Schema – defines object classes and attributes
- LDAP – handles directory queries and updates
- Kerberos – authenticates users via secure tickets
- DNS Integration – supports service location (SRV records)
- Group Policy Objects (GPOs) – enforce configuration and security baselines
- Replication & Multi-Master Design – ensures redundancy and consistency
Entra ID reinterprets these principles for the modern cloud, using:
- Token-based authentication
- REST APIs
- Zero Trust access models.
Competing and Complementary Identity Platforms:
While Microsoft remains dominant, several competing and complementary identity systems exist:
- OpenLDAP – Lightweight, open-source directory service used in Linux environments
- FreeIPA – Red Hat’s integrated LDAP + Kerberos + PKI solution
- Okta Universal Directory – Cloud-native identity and SSO platform
- JumpCloud Directory Platform – Hybrid AD alternative with LDAP, RADIUS, and SAML
- Google Cloud Identity – Google’s counterpart for Workspace environments
- AWS Directory Service – Managed AD and Simple AD options for AWS workloads
Each of these solutions share the same heritage of directory-based authentication, but differ in their deployment model and ecosystem focus.
Summary:
Active Directory transformed enterprise identity management by unifying X.500, LDAP, and Kerberos into a single, secure Windows-integrated system. Microsoft Entra ID builds on that foundation — extending it to the cloud era with token-based access, adaptive authentication, and global scalability.
Together, AD and Entra ID form Microsoft’s hybrid identity vision: bridging decades of on-premises reliability with the flexibility, reach, and security of modern cloud identity management.
More IP Address Planning
Before diving into the Active Directory Server deployment, I took a step back to revisit my high-level IP addressing plan and refine it, now that I’m starting to add servers and workstations to the network.
At this stage, VLANs 10, 20, and 30 are in use, supporting the initial infrastructure. Using NetBox, I mapped out and documented the addressing scheme for each /24 block (254 addresses per VLAN). This gives me a clear, structured reference when assigning IPs to devices across these VLANs:
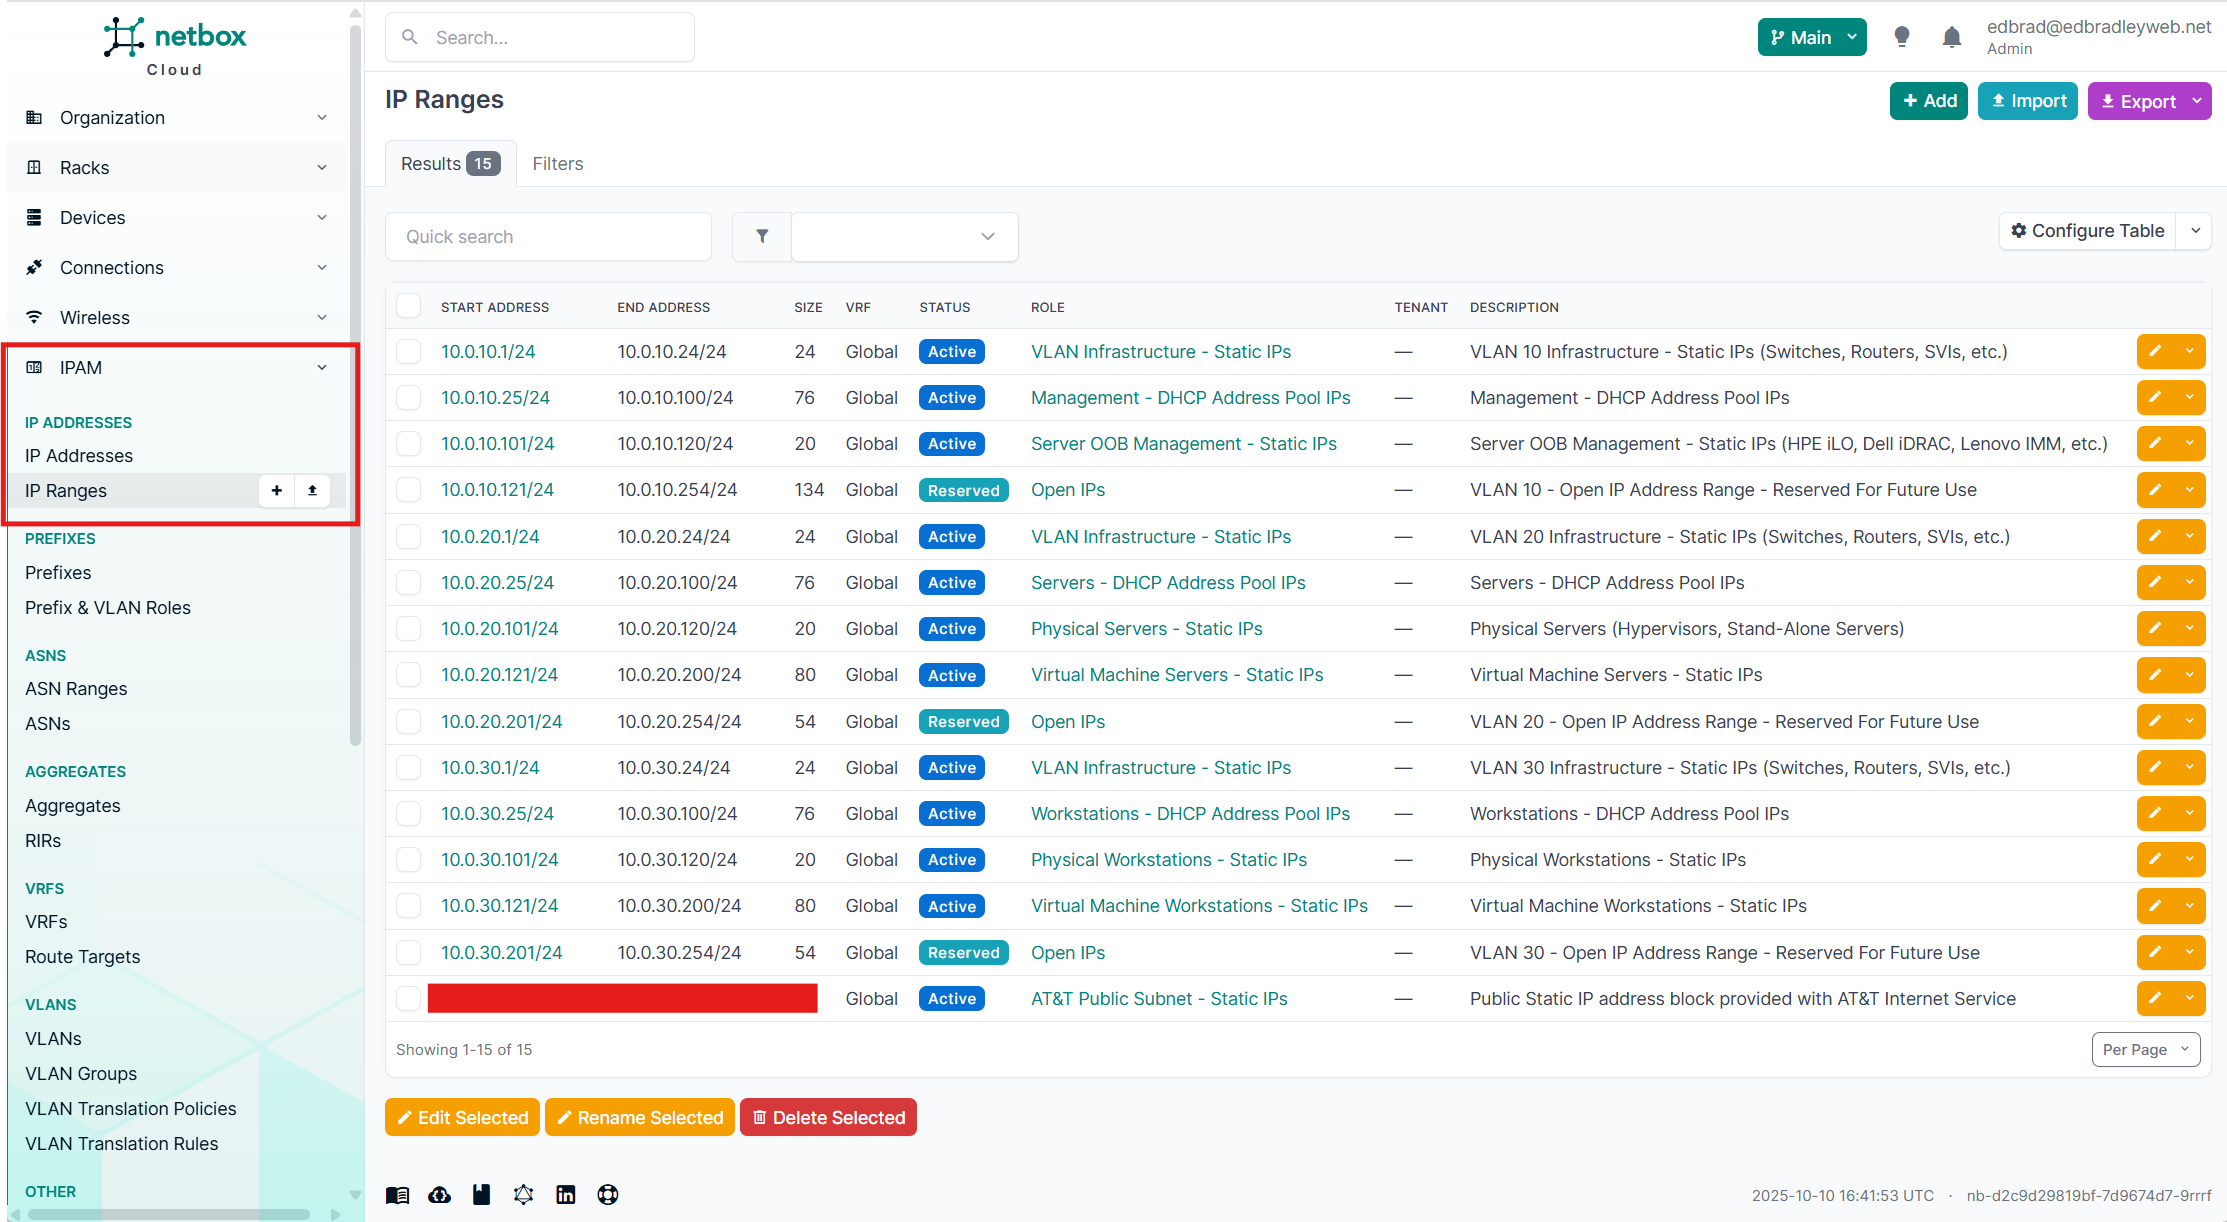
Since NetBox stores this information in a relational database, IP address utilization can also be easily tracked — an invaluable feature for both troubleshooting and capacity planning:
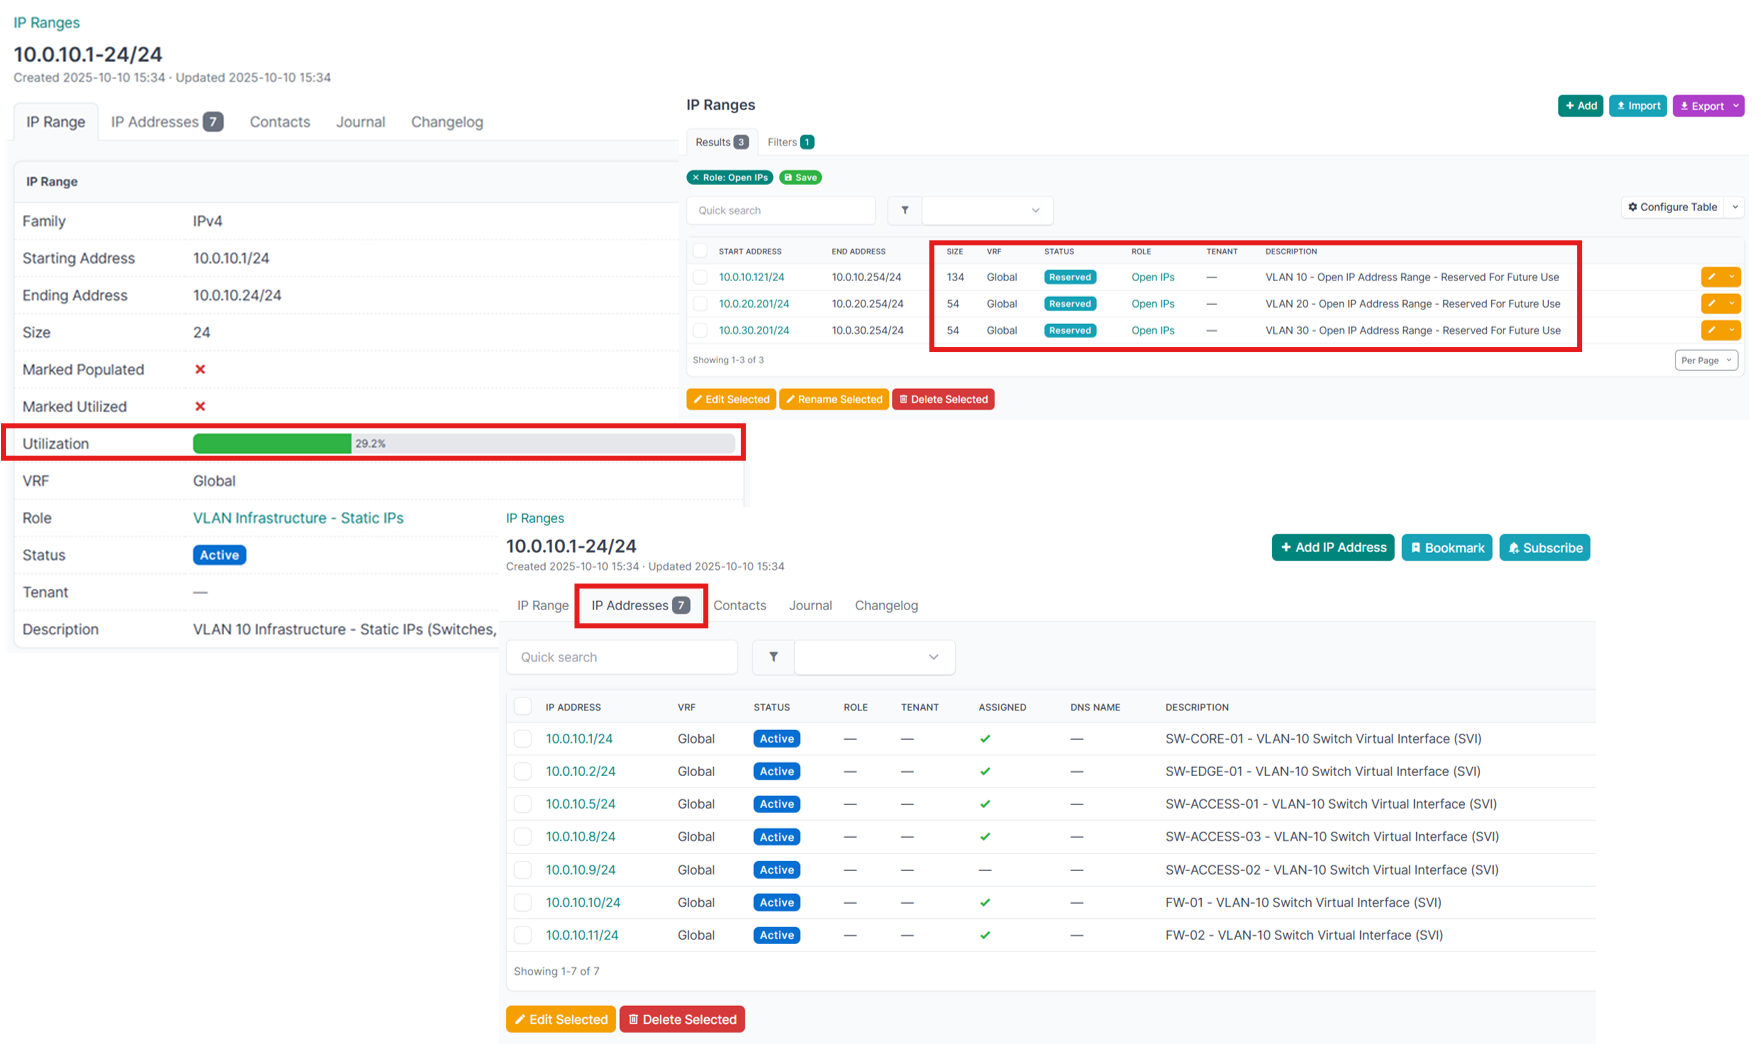
Beyond serving as a “source of truth” for documentation, I’ve found NetBox to be an excellent planning and design tool. It forces me to think through each implementation step before execution — allowing me to visualize the layout, identify potential issues early, and refine the design. This proactive approach saves time, reduces errors, and ensures the deployment process is far more deliberate and efficient. With this taken care of, I've assigned the following IP addresses to the new server:
- HPE iLO (ILO-DC-01): 10.0.10.101/24
- Windows Server 2022 (SRV-DC-01): 10.0.20.101/24
Installing Windows Server (2022)
I configured a RAID 1 array and installed Windows Server using the built-in provisioning tools available in the HPE pre-boot environment.
HPE Intelligent Provisioning is a built-in deployment utility in ProLiant servers that automates the installation of operating systems such as Windows Server, along with all necessary HPE-specific drivers and management tools. When launched (typically by pressing F10 during boot or via iLO), it boots into a lightweight Linux environment stored in the server’s firmware. From there, it inventories the system hardware, allows you to configure storage arrays, and prepares the OS installation by staging the Windows setup files from a local ISO, USB drive, or network share.
Rather than using traditional PXE booting like Windows Deployment Services, Intelligent Provisioning performs the installation locally. It identifies the server model and automatically injects the correct driver packages — such as chipset, network, storage, and iLO drivers — into the Windows setup process. This ensures that all hardware is fully supported right after installation, without the need for manual driver loading.
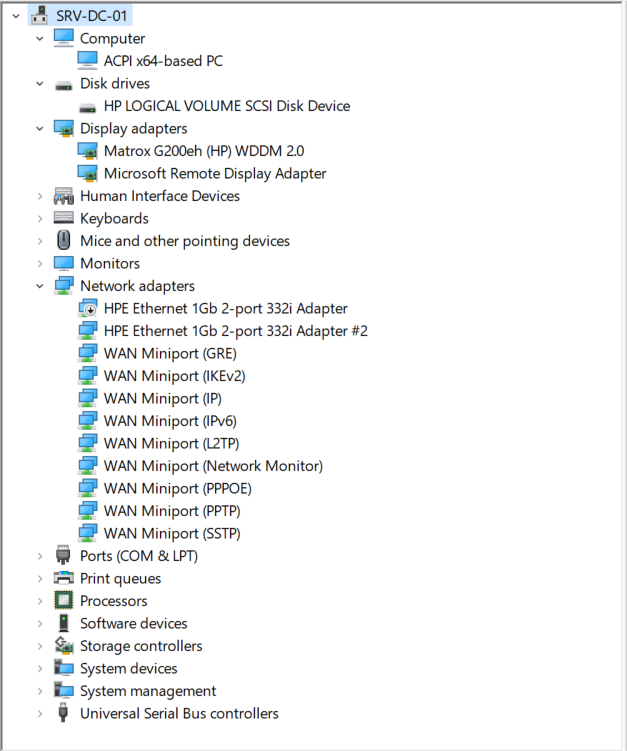
Given the age of the machine and its built-in provisioning utility (from 2018), and the newer release year of the operating system I was installing (2022), I had to install Windows Server 2019 first and then perform an in-place upgrade to Windows Server 2022. The upgrade completed without any driver issues —Device Manager confirmed that all hardware components were functioning properly:
Network Time
Now that the new network is beginning to take shape, it’s important to ensure that all devices maintain accurate and synchronized time. Consistent timekeeping is more than a convenience — it’s a foundational requirement for many core network functions. Authentication mechanisms like Kerberos depend on precise clock alignment between servers and clients, while security tools, logs, and monitoring systems rely on accurate timestamps to correlate events and detect anomalies. Even domain joins, SSL certificate validation, and scheduled tasks can fail or behave unpredictably if system clocks drift too far out of sync. Establishing a reliable, centralized time synchronization strategy early on will help keep the network stable, secure, and easier to troubleshoot as it grows.
Before promoting SRV-DC-01 to the first Domain Controller (and eventual PDC Emulator), I configured it to be the Network's Time Server and synchronize its time with reliable Internet NTP servers. This ensures that the server’s clock is accurate and stable before Active Directory is established, preventing potential replication and authentication issues later on:
1.) Set Windows Time Service to be both a Client and a Server:
w32tm /config /reliable:yes /update
reg add HKLM\SYSTEM\CurrentControlSet\Services\W32Time\TimeProviders\NtpServer /v Enabled /t REG_DWORD /d 1 /f
reg add HKLM\SYSTEM\CurrentControlSet\Services\W32Time\TimeProviders\NtpClient /v Enabled /t REG_DWORD /d 1 /f
2.) Add multiple external (Internet) peers, for redundancy:
w32tm /config /syncfromflags:manual /manualpeerlist:"0.us.pool.ntp.org,0x9 1.us.pool.ntp.org,0x9 time.google.com,0x9" /update
3.) Harden time sync settings for better security and accuracy:
reg add HKLM\SYSTEM\CurrentControlSet\Services\W32Time\Config /v AnnounceFlags /t REG_DWORD /d 5 /f
reg add HKLM\SYSTEM\CurrentControlSet\Services\W32Time\Config /v LocalClockDispersion /t REG_DWORD /d 0 /f
4.) Restart the Time service:
net stop w32time
net start w32time
5.) Force a resync:
w32tm /resync
By setting this up in advance, I ensure that once SRV-DC-01 is promoted and becomes the authoritative time source for the domain, it will already be maintaining precise, externally validated time for all domain-joined systems.
After restarting the Windows Time service, I verified the configuration and status:
PS C:\Users\Administrator> w32tm /query /configuration
[Configuration]

EventLogFlags: 2 (Local)
AnnounceFlags: 5 (Local)
TimeJumpAuditOffset: 28800 (Local)
MinPollInterval: 6 (Local)
MaxPollInterval: 10 (Local)
MaxNegPhaseCorrection: 54000 (Local)
MaxPosPhaseCorrection: 54000 (Local)
MaxAllowedPhaseOffset: 1 (Local)

FrequencyCorrectRate: 4 (Local)
PollAdjustFactor: 5 (Local)
LargePhaseOffset: 50000000 (Local)
SpikeWatchPeriod: 900 (Local)
LocalClockDispersion: 0 (Local)
HoldPeriod: 5 (Local)
PhaseCorrectRate: 1 (Local)
UpdateInterval: 100 (Local)


[TimeProviders]

NtpClient (Local)
DllName: C:\WINDOWS\system32\w32time.dll (Local)
Enabled: 1 (Local)
InputProvider: 1 (Local)
AllowNonstandardModeCombinations: 1 (Local)
ResolvePeerBackoffMinutes: 15 (Local)
ResolvePeerBackoffMaxTimes: 7 (Local)
CompatibilityFlags: 2147483648 (Local)
EventLogFlags: 1 (Local)
LargeSampleSkew: 3 (Local)
SpecialPollInterval: 1024 (Local)
Type: NTP (Local)
NtpServer: 0.us.pool.ntp.org,0x9 1.us.pool.ntp.org,0x9 time.google.com,0x9 time.cloudflare.com,0x9 (Local)

NtpServer (Local)
DllName: C:\WINDOWS\system32\w32time.dll (Local)
Enabled: 1 (Local)
InputProvider: 0 (Local)
AllowNonstandardModeCombinations: 1 (Local)


PS C:\Users\Administrator> w32tm /query /status
Leap Indicator: 0(no warning)
Stratum: 2 (secondary reference - syncd by (S)NTP)
Precision: -23 (119.209ns per tick)
Root Delay: 0.0131775s
Root Dispersion: 7.7616997s
ReferenceId: 0xD8EF230C (source IP:  216.239.35.12)
Last Successful Sync Time: 10/11/2025 9:00:25 PM
Source: time.google.com,0x9
Poll Interval: 6 (64s)

PS C:\Users\Administrator>
Using PowerShell, I added a Windows Firewall Rule to allow the NTP (Network Time Protocol) queries from the LAN to the new server:
PS C:\Users\Administrator> New-NetFirewallRule
-DisplayName "Allow NTP from LAN" >>
-Direction Inbound >> -Protocol UDP >>
-LocalPort 123 >>
-Action Allow >>
-Profile Domain,Private >>
-RemoteAddress 10.0.0.0/16 >>
-Description "Allows inbound NTP (UDP 123) traffic from the internal LAN"

Name : {20f57428-1407-4af9-af23-4946e2334966}
DisplayName : Allow NTP from LAN
Description : Allows inbound NTP (UDP 123) traffic from the internal LAN DisplayGroup :
Group :
Enabled : True
Profile : Domain, Private
Platform : {}
Direction :
Inbound Action : Allow
EdgeTraversalPolicy : Block
LooseSourceMapping : False
LocalOnlyMapping : False
Owner :
PrimaryStatus : OK
Status : The rule was parsed successfully from the store. (65536) EnforcementStatus : NotApplicable
PolicyStoreSource : PersistentStore
PolicyStoreSourceType : Local
RemoteDynamicKeywordAddresses : {}
PolicyAppId :

PS C:\Users\Administrator>
I also took the opportunity to point all the switches at the new domain controller server for network-wide time synchronization:
SW-CORE-01 (CLI):
configure terminal
clock timezone CST -6
clock summer-time CDT recurring usa
sntp unicast client enable
sntp server 10.0.20.101
exit
write memory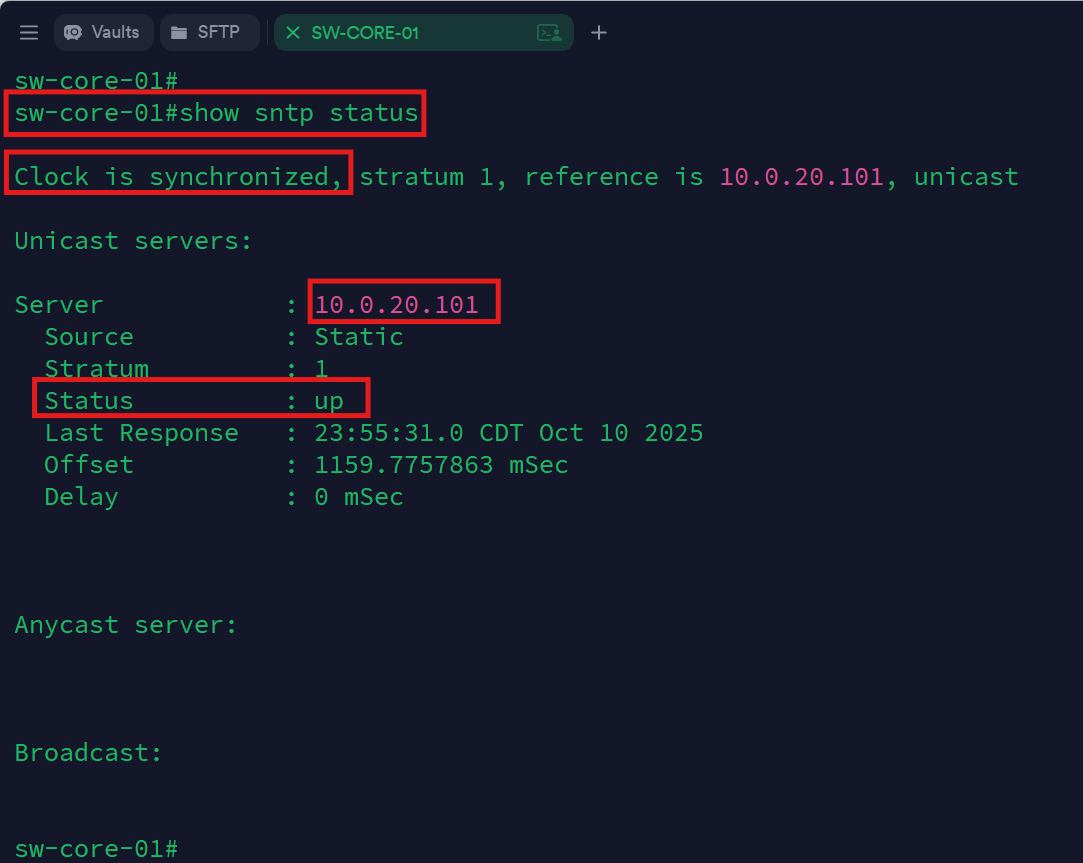
SW-ACCESS-01 (CLI):
onfigure terminal
clock timezone CST -6
clock summer-time CDT recurring
ntp server 10.0.20.101 prefer
ntp update-calendar
end
write memory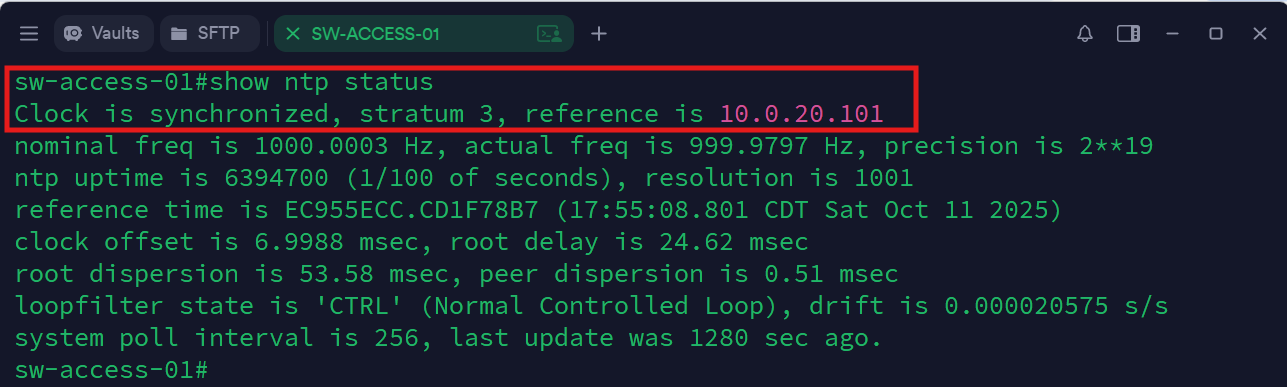
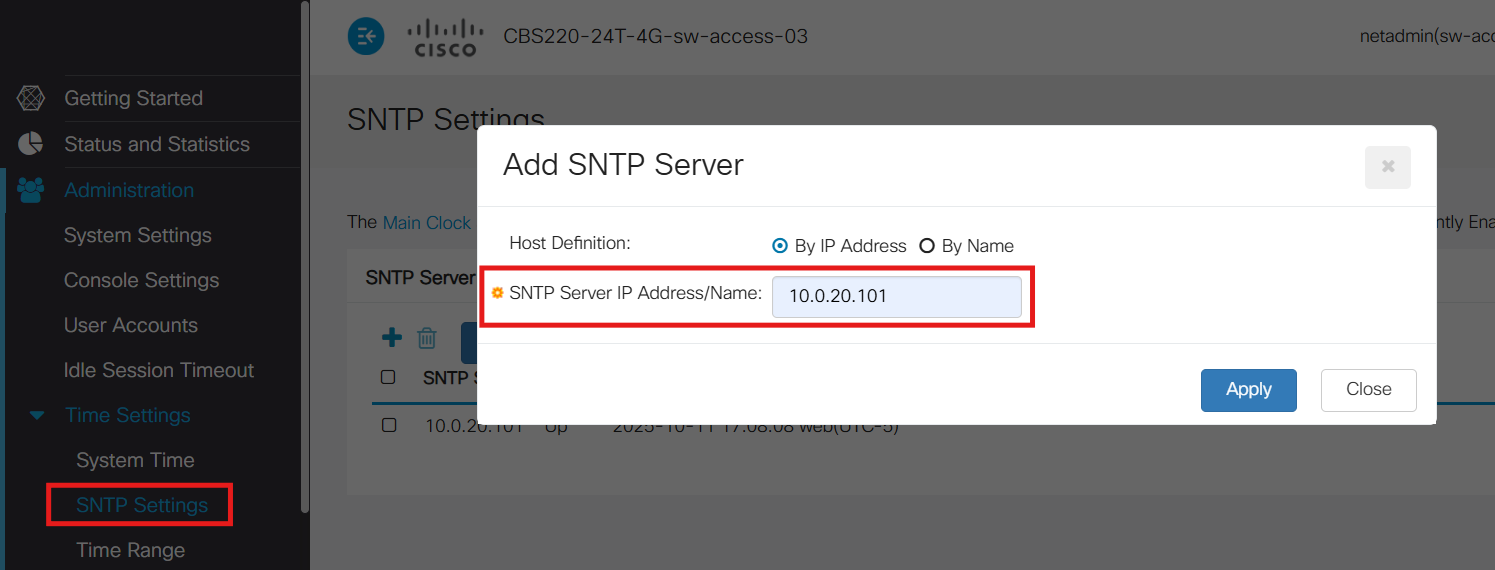
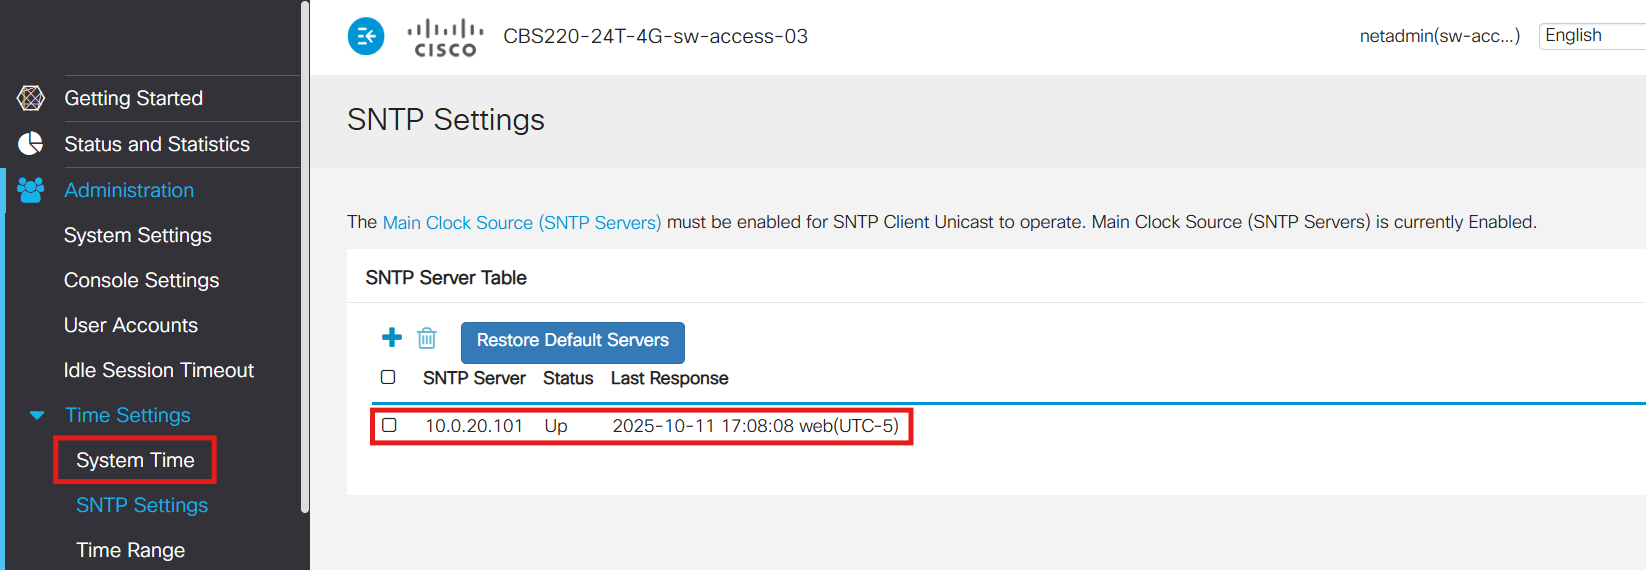
SW-ACCESS-03 (GUI):
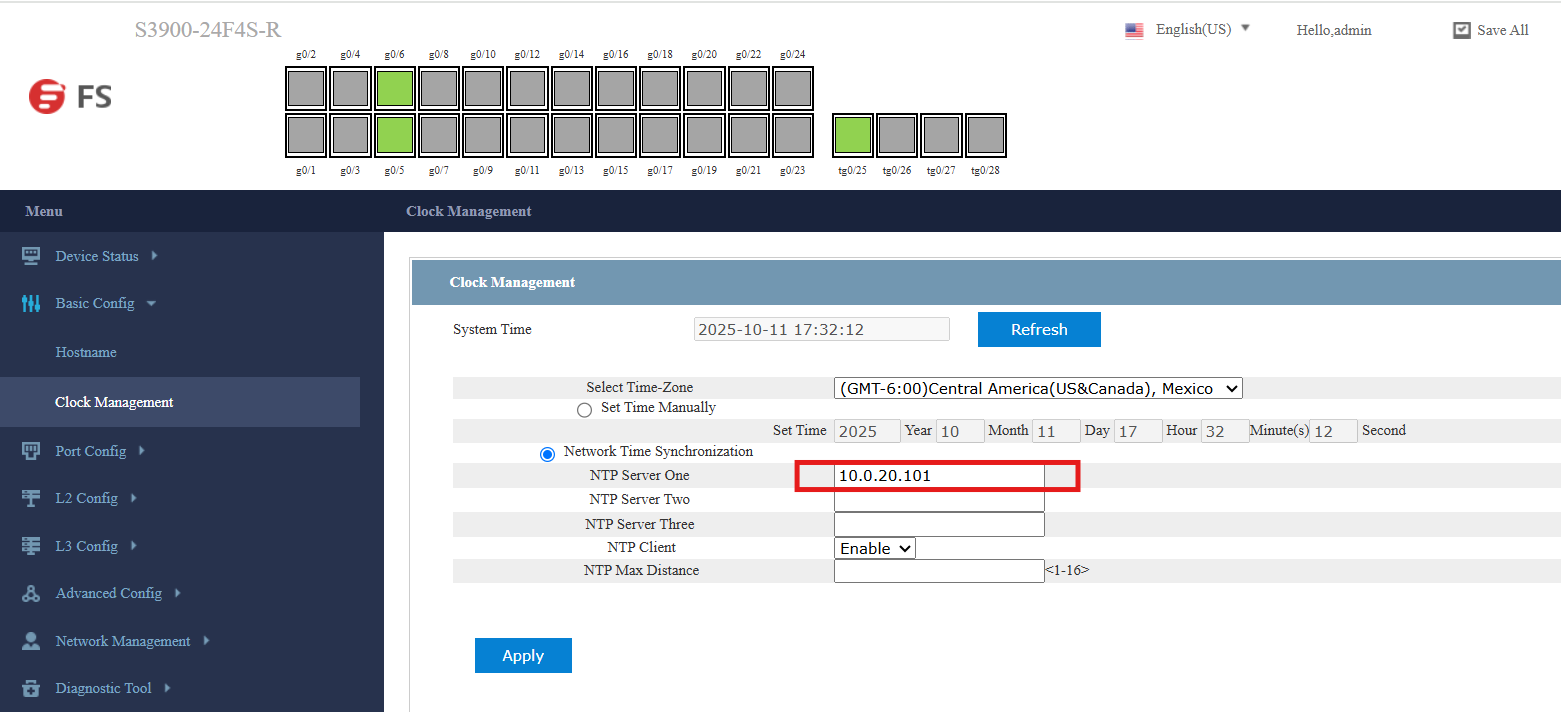
SW-EDGE-01 (GUI):
FW-01 (CLI):
config system ntp
    set ntpsync enable
    set type custom
    config ntpserver
        edit 1
            set server "10.0.20.101"
        next
    end
end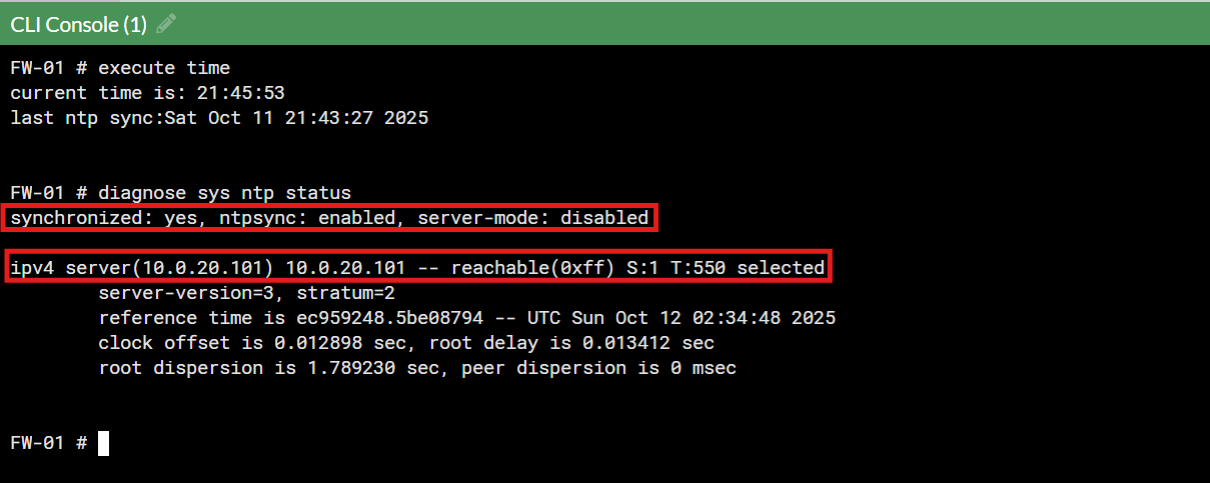
SW-ACCESS-02 & FW-02 (N/A):
Cisco Meraki devices don’t allow administrators to manually configure NTP servers. Instead, they synchronize time automatically through Meraki’s own cloud infrastructure via the secure management tunnel (m-tunnel). This design ensures consistent timekeeping across all Meraki hardware without local configuration, but it also means I can’t point Meraki gear to an internal NTP source.
The Meraki Dashboard only allows the time zone to be set, not the actual time source. All time synchronization occurs behind the scenes using Meraki’s internal time services:
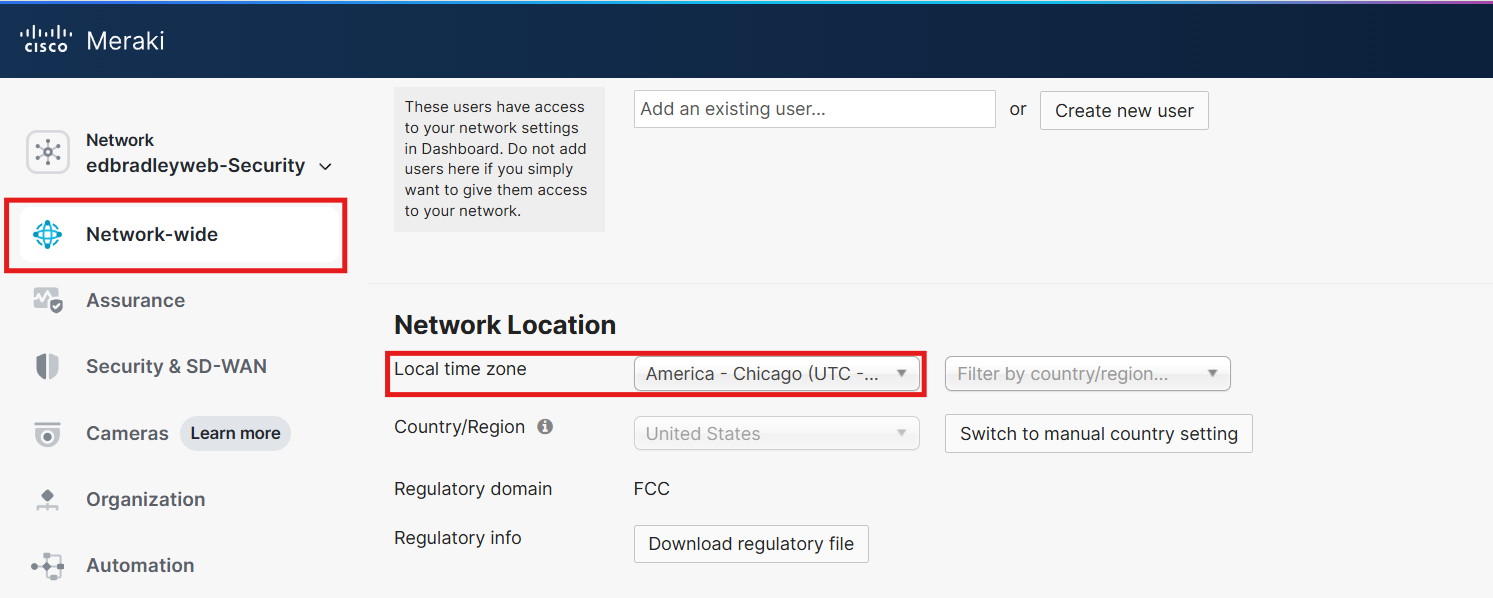
While this approach simplifies management and ensures accurate cloud-aligned time, it can lead to minor discrepancies when compared to on-premises systems that use local NTP servers. For most environments, the difference is negligible, and won't be an issue for the lab network.
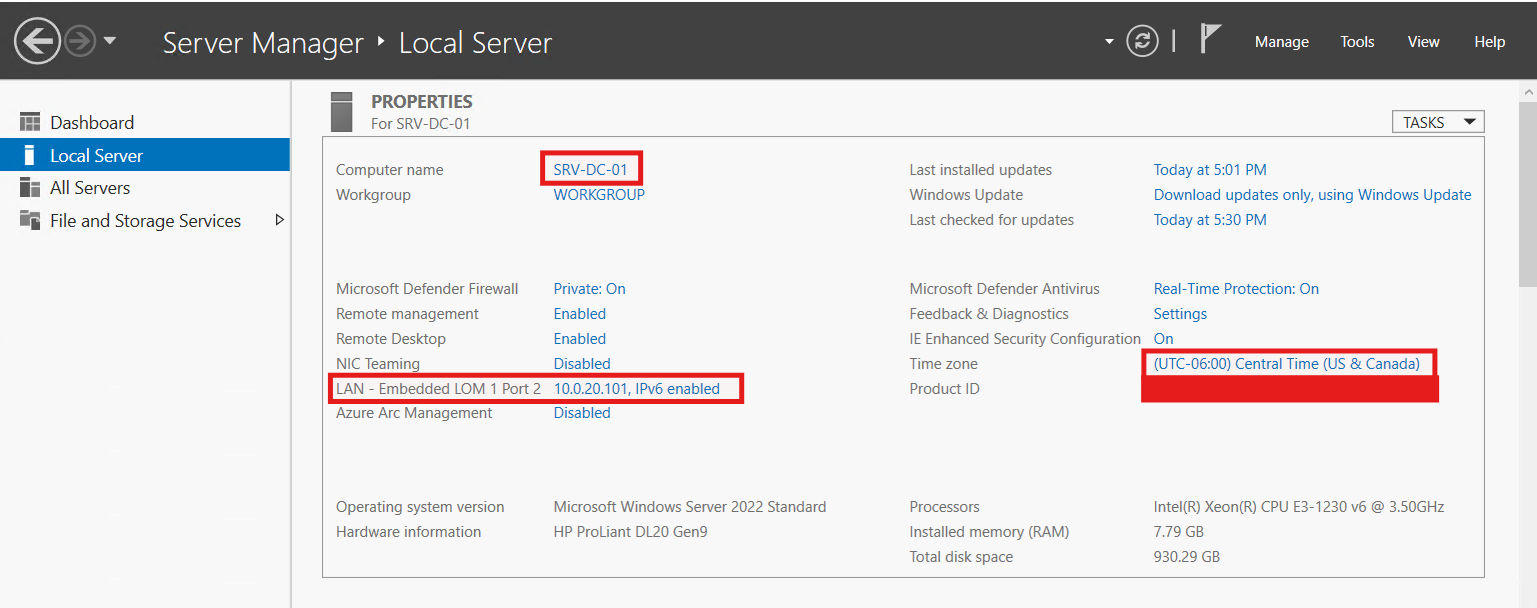
After getting the latest OS updates downloaded and installed, I configured and verified the computer name (SRV-DC-01), set the static IP addresses for both iLO (10.0.10.101/24 - done in the Pre-boot environment) and Windows Server (10.0.20.101/24). Now the server is ready to become the first Domain Controller for edbradleyweb.local!
Establishing the edbradleyweb.local Active Directory Domain
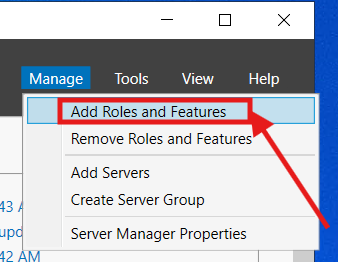
I opened Server Manager → Manage (top-right) → Add Roles and Features:
In the wizard, I clicked Next on the Before You Begin page.
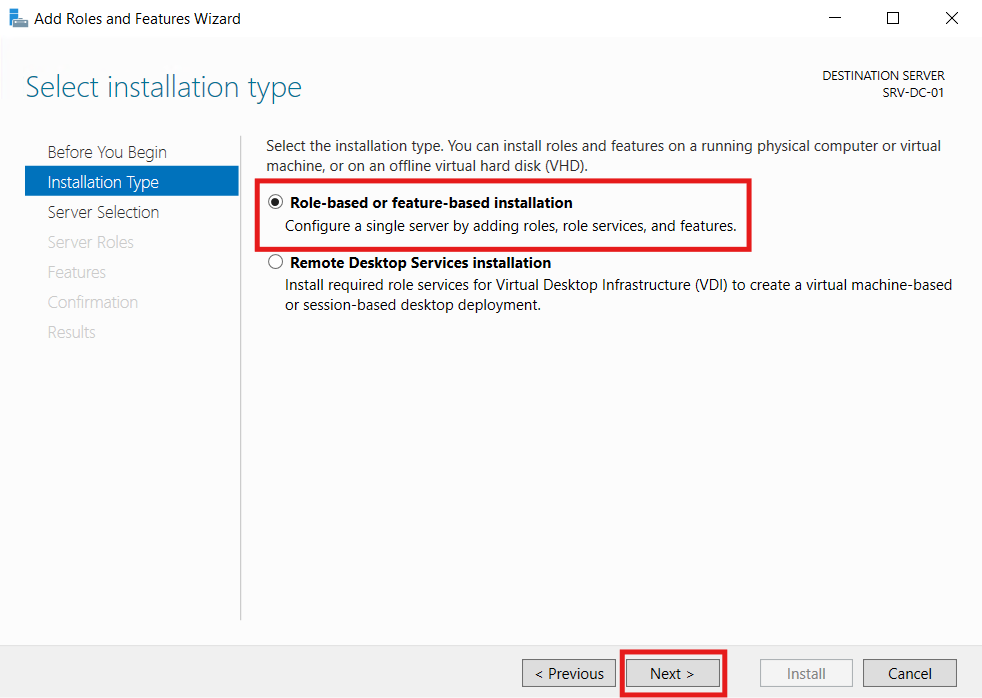
I Chose Role-based or feature-based installation, clicked Next.
I confirmed the local server is selected, and clicked Next.

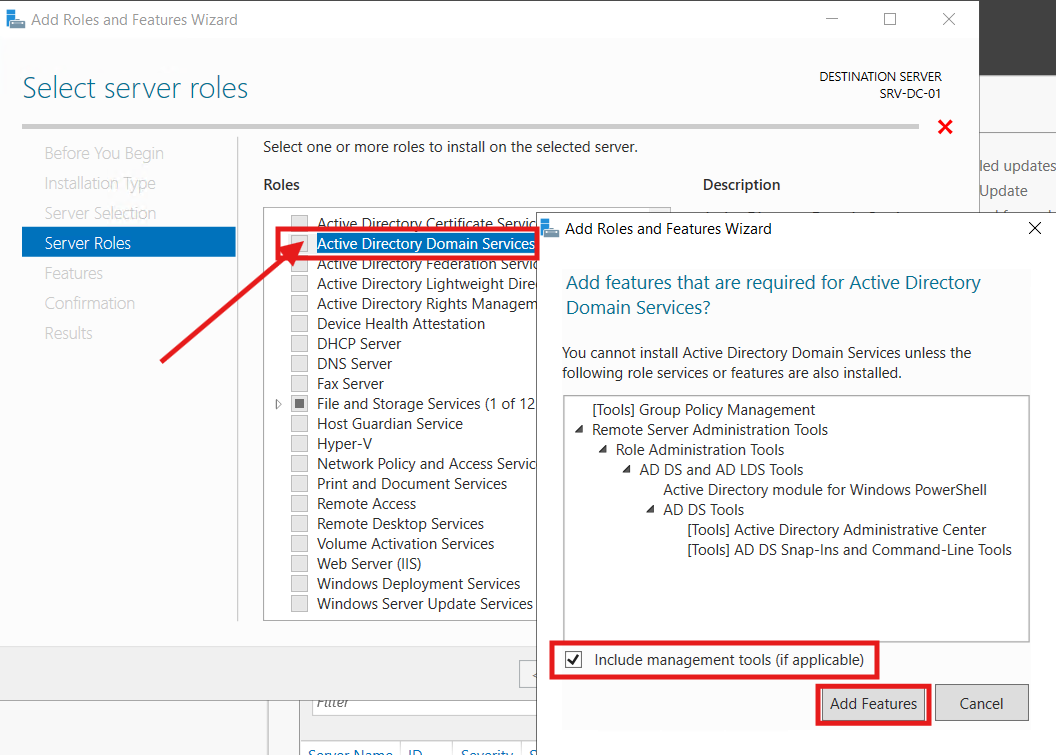
On Server Roles, I checked Active Directory Domain Services. When prompted, I accept the required features and clicked Next.
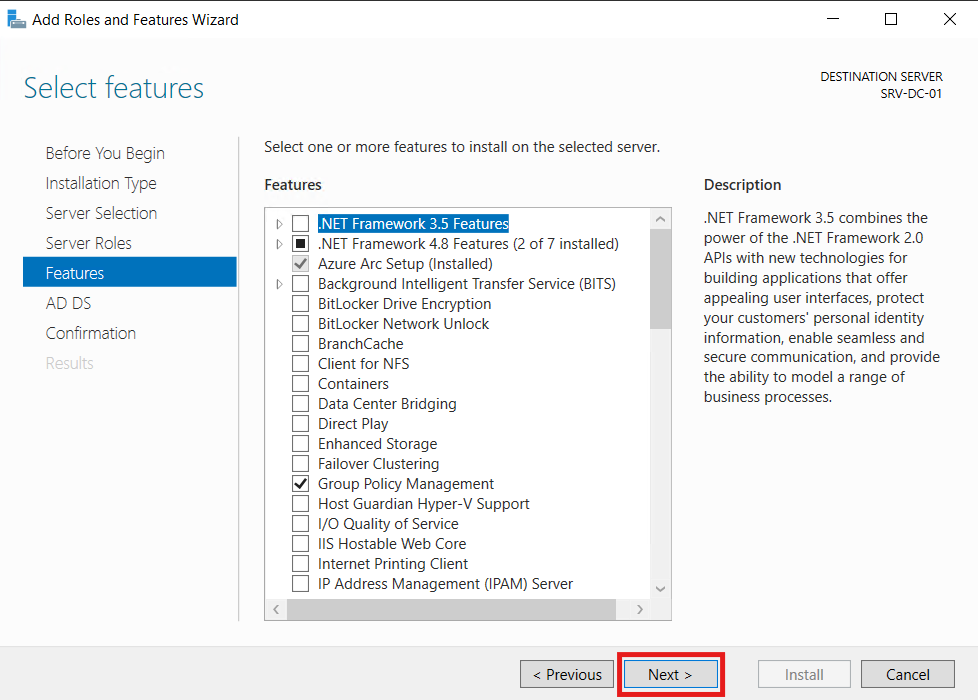
The required additional features were pre-selected on the Features page. I simply clicked Next:
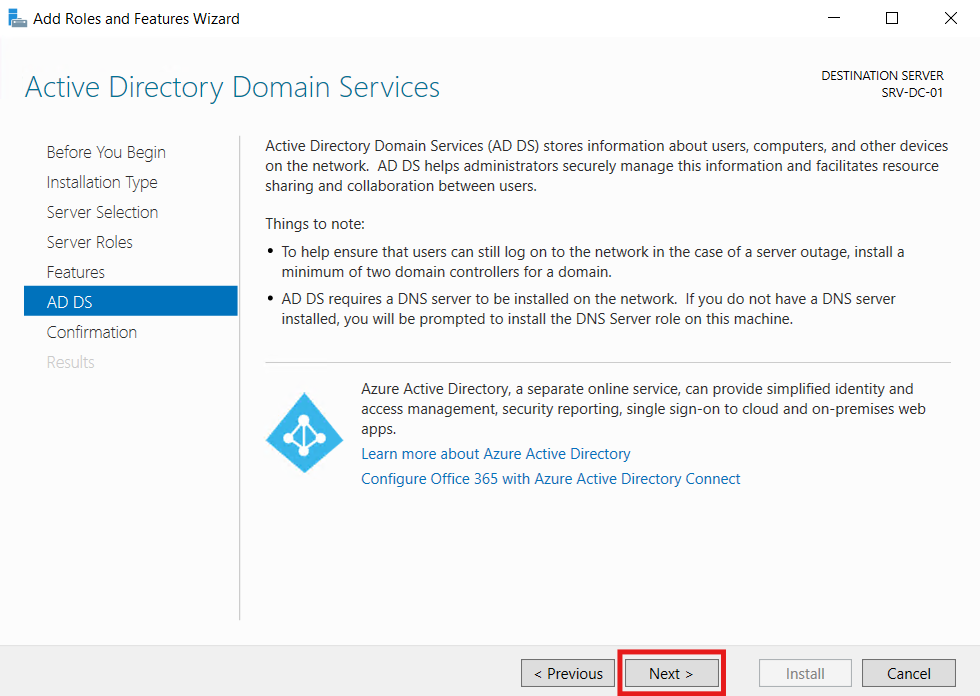
The next page displayed additional AD DS Notes and advice. I simply clicked Next:
The confirmation page appeared, summarizing the Services and Features being installed. I simply clicked Next:
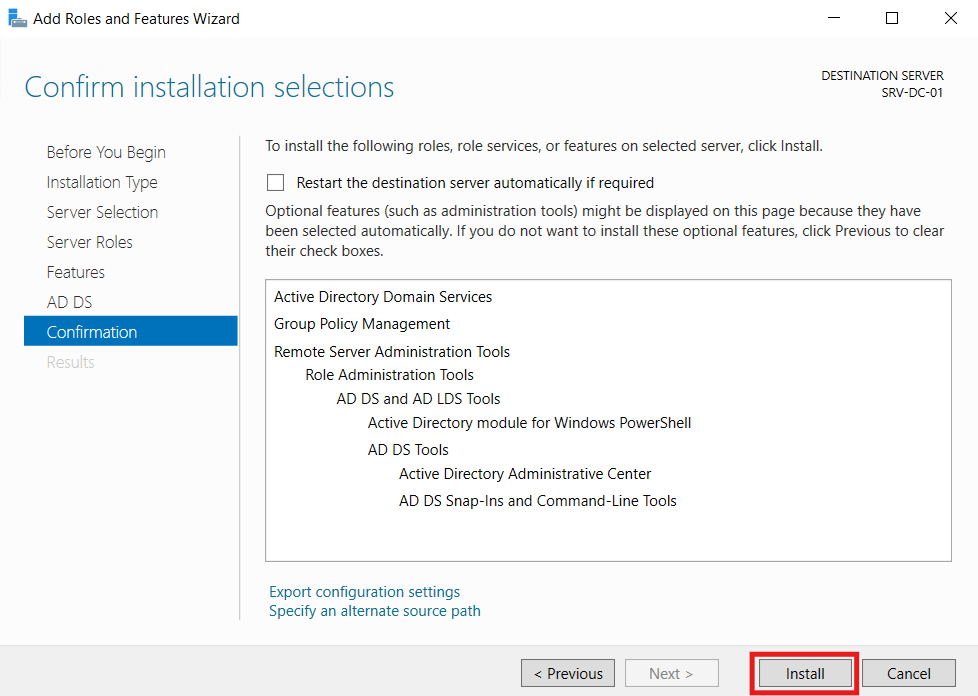
The installation began...
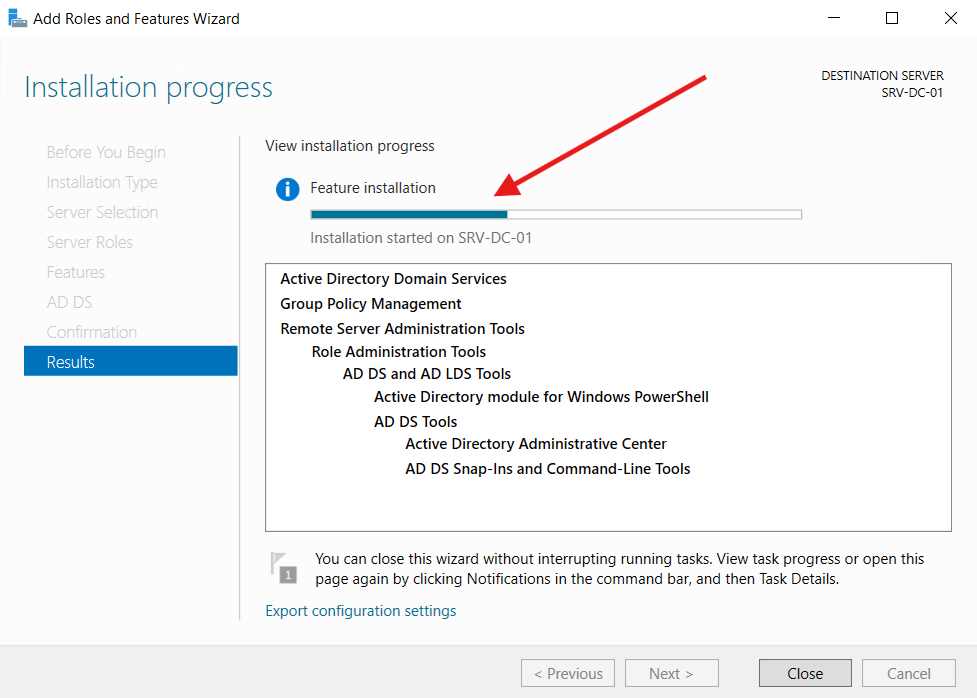
After the installation completed, the additional step of promoting the server to a Domain Controller (in a new Forest) must be completed:
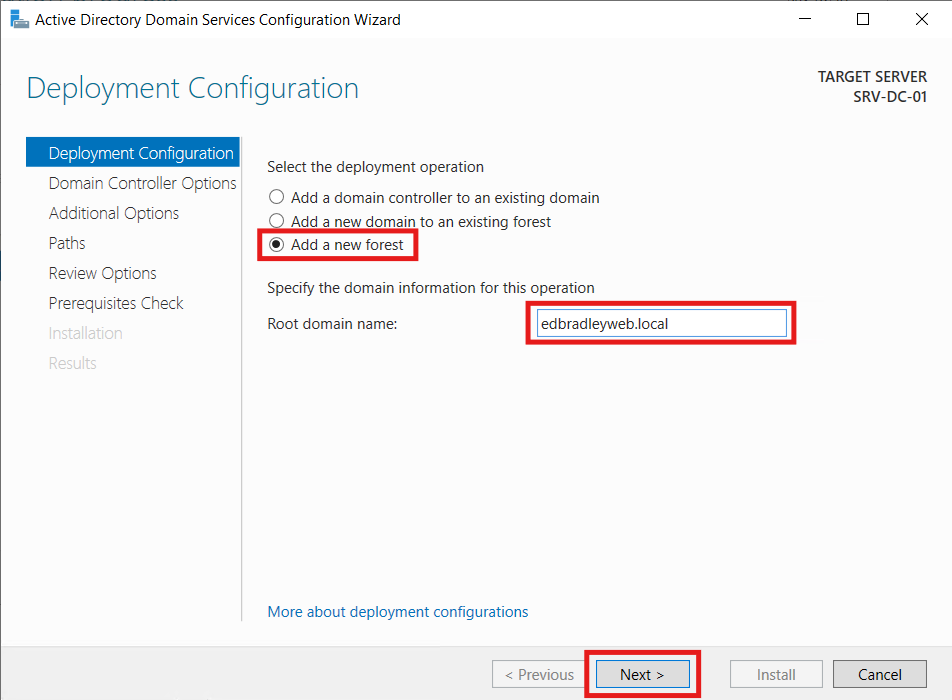
Since this is the first Domain controller, I selected Add a new forest, entered the new Domain Name: edbradleyweb.local, and clicked Next:
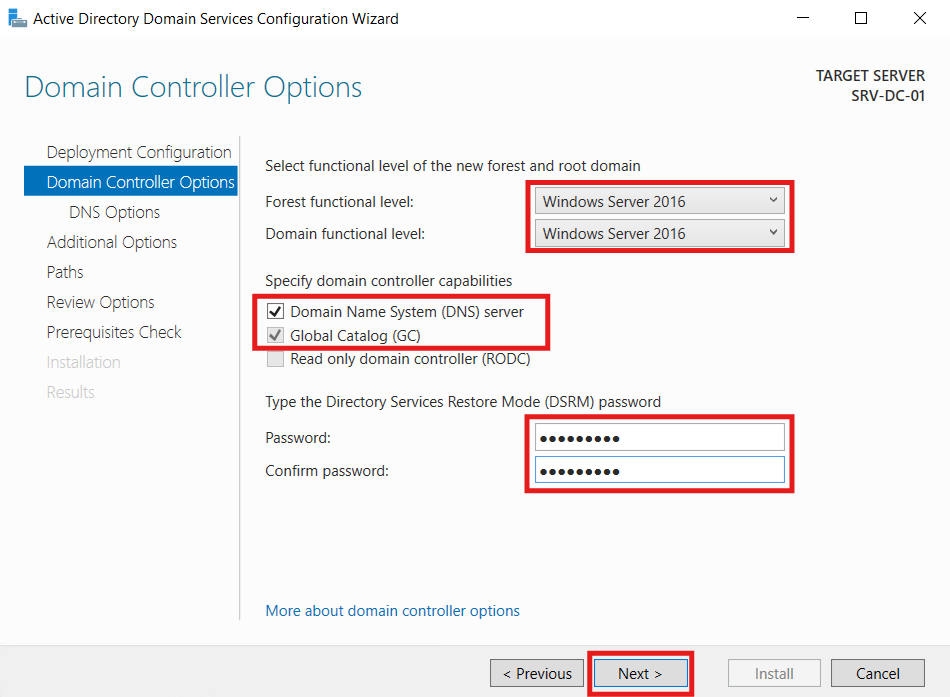
I selected the default function level (Windows Server 2016 - the most current). The server is also the designated DNS Server. I also entered a DRSM password and clicked Next:
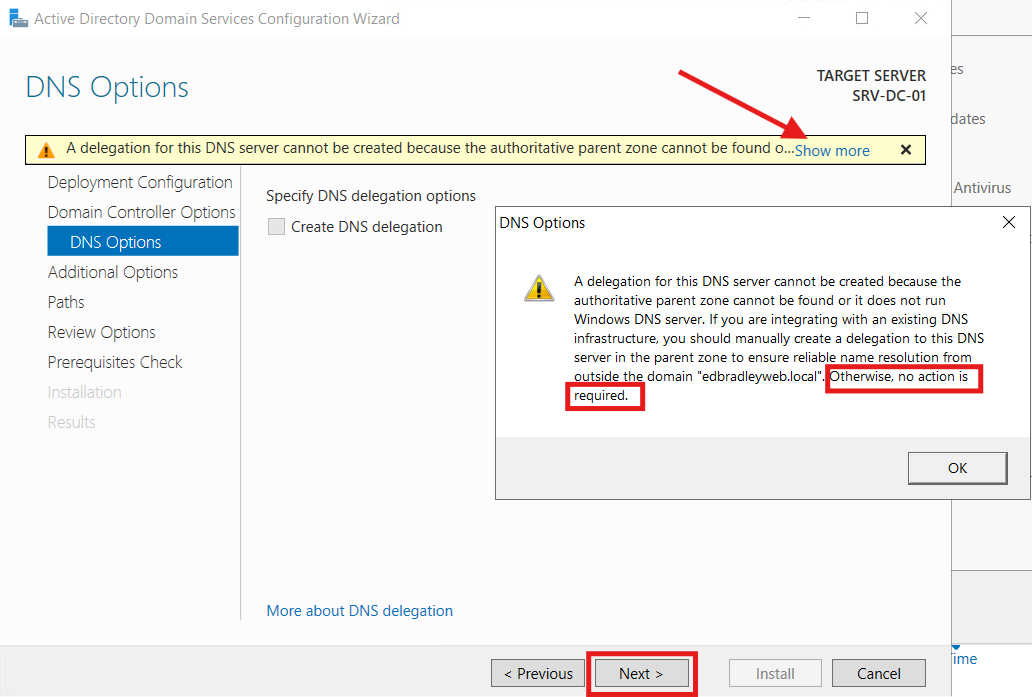
The next page displayed a warning about DNS delegation. Since I don't have an existing DNS infrastructure, this can be ignored. So I clicked Next:
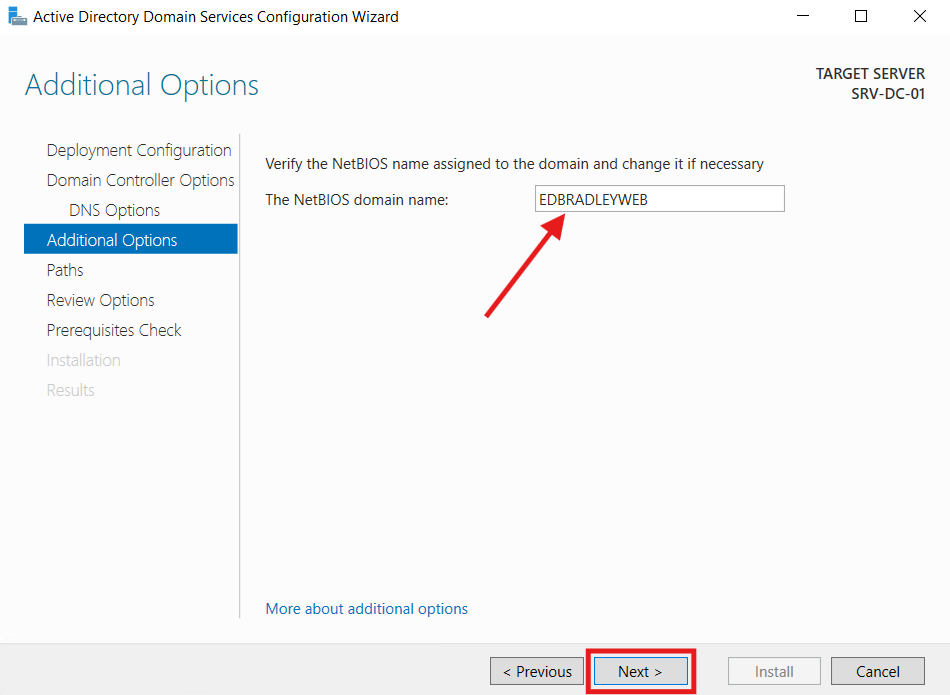
I verified the NETBIOS name and clicked Next:
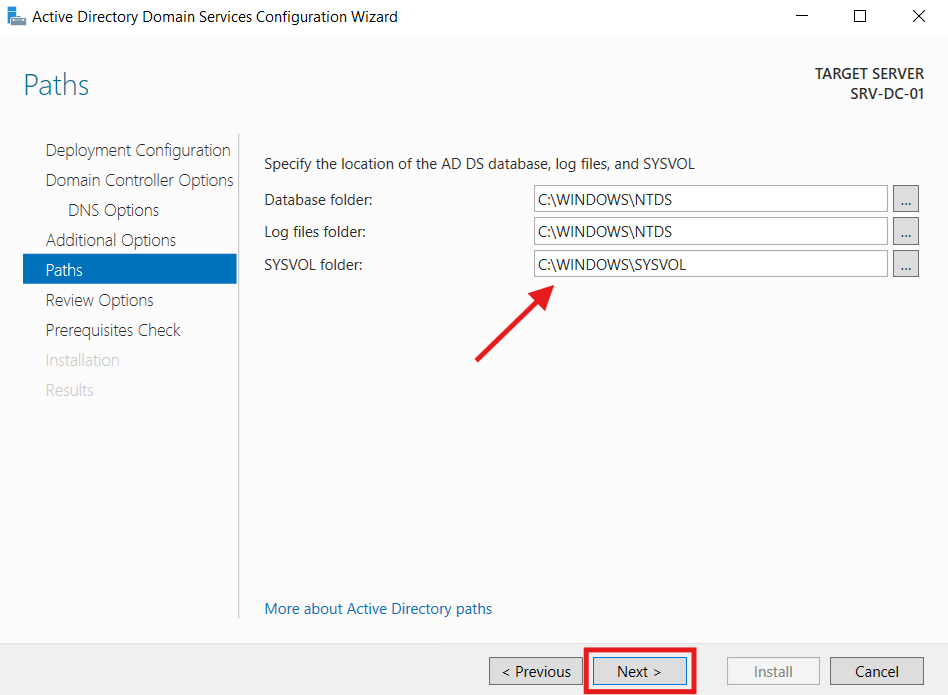
I verified the AD DS database file locations (default) and clicked Next:
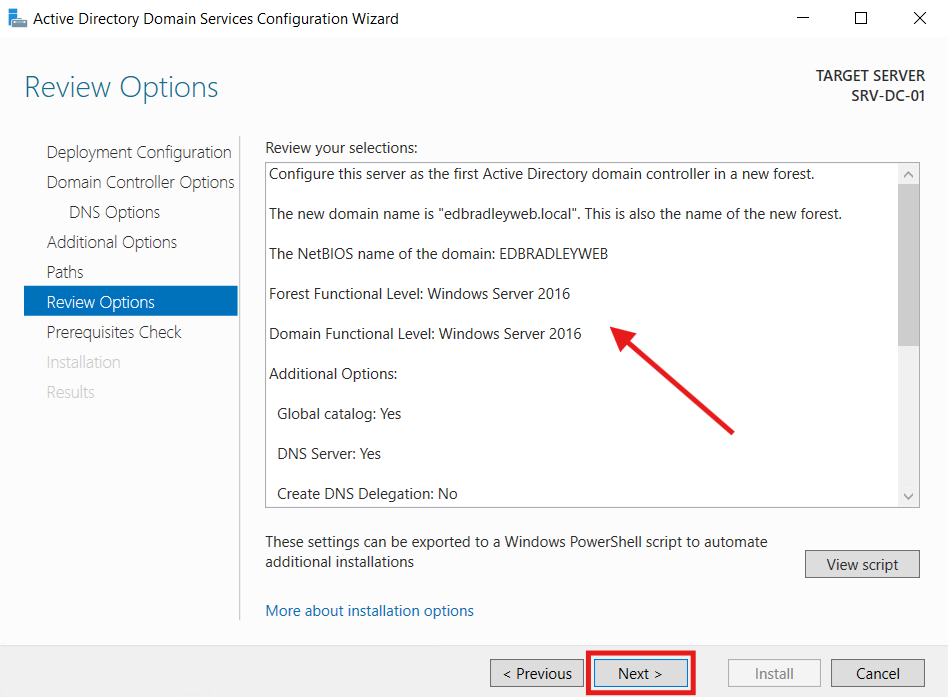
I reviewed the options selected and clicked Next:
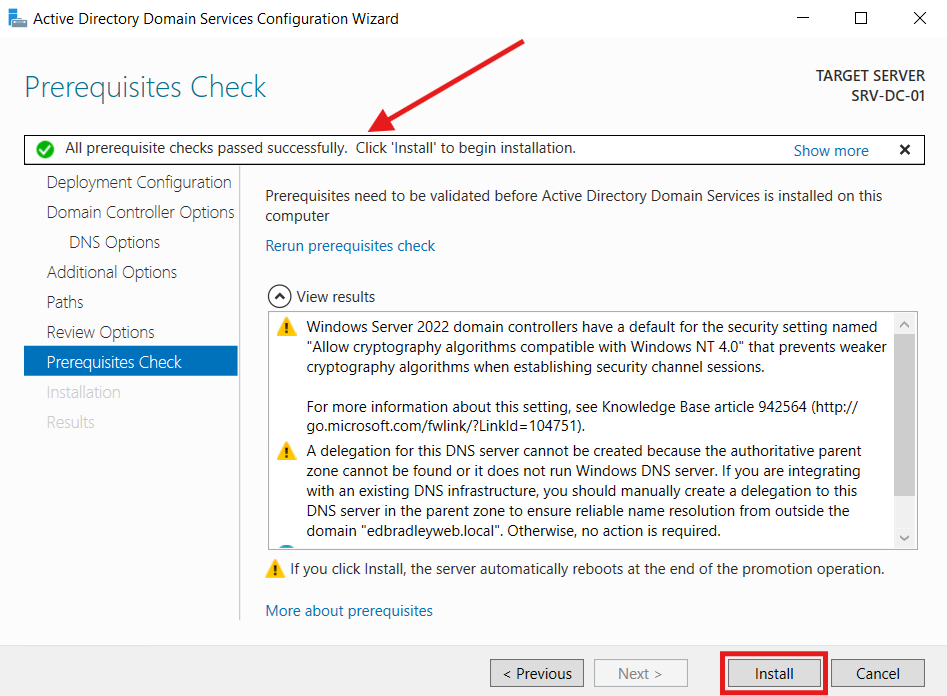
A prerequisite check was performed, based on the selected options. The check passed and I was ready to proceed, by clicking Install:
The promotion completed and the server automatically restarted:
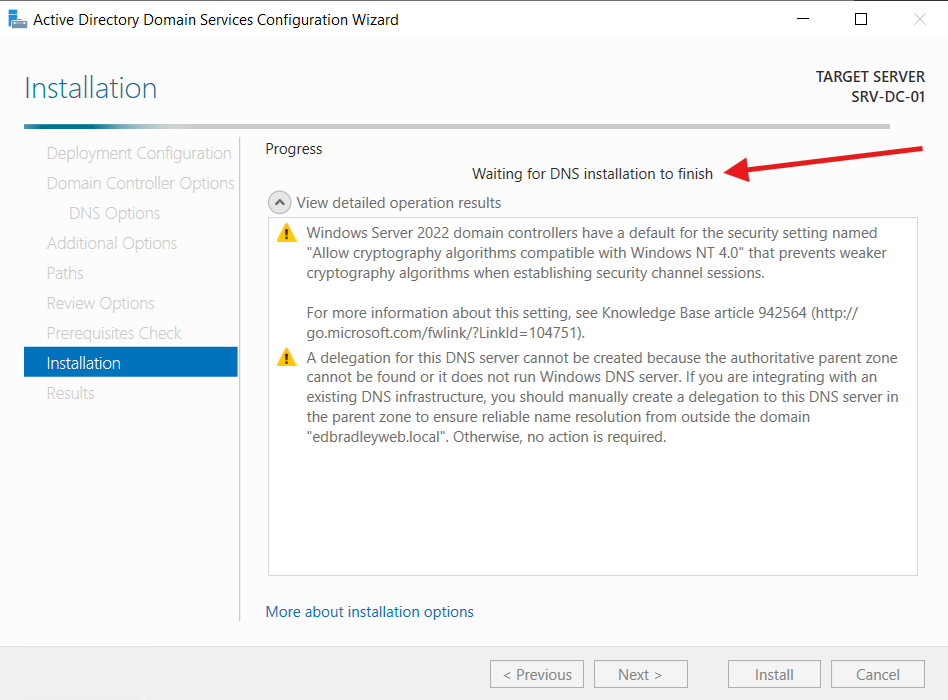
Upon restart, I was required to set the Domain Administrator password. The AD and DNS Services started and were available as expected:

Day-1 Hardening
Now it is time to perform Day-1 Hardening of Active Directory before adding any other resources to the Domain. Day-1 hardening = putting sensible security controls in place before systems/users go live. It’s one of the highest-ROI things that can be done.
Why it’s worth doing up front
- Prevents configuration drift. A secure baseline on day 1 becomes the “normal,” so deviations stand out and are easier to detect and fix.
- Cheaper than retrofitting. Fixing insecure defaults later collides with uptime, change windows, and app dependencies. Doing it once, early, avoids rework.
- Consistency at scale. Bake controls into images, GPOs, and every new server, workstation, and user inherits them automatically.
- Compliance & audit readiness. Aligning to established security standards (e.g. CIS, NIST etc.) from day 1 means fewer gaps when someone asks for proof.
- Limits blast radius. If something does go wrong, least-privilege, segmentation, and logging are already in place.
1.) Sites & Subnets (rename and define the networks)
It’s not “security hardening” per se, but it’s foundational hygiene. Clients can accurately pick nearby DCs and replication topology flows cleanly.
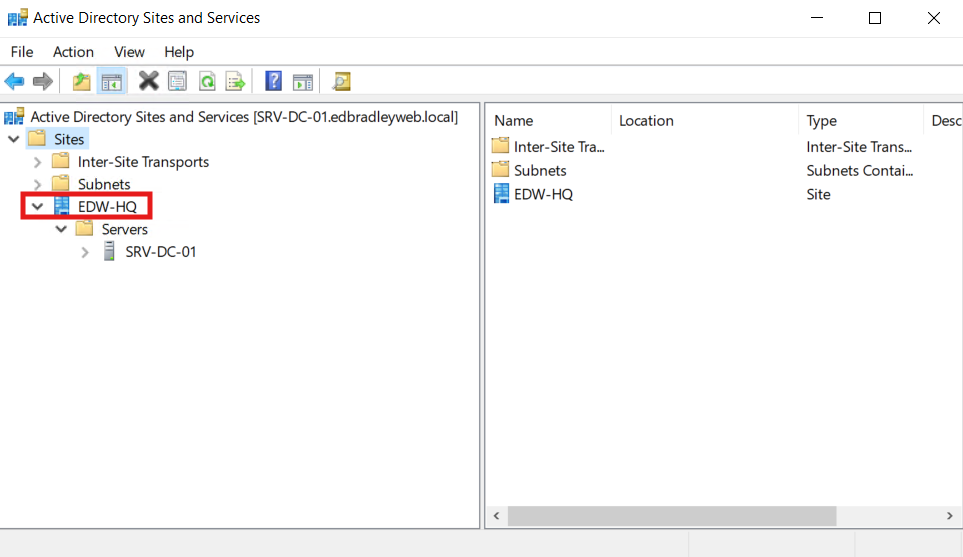
I decided to rename the site to "EDW-HQ" (Ed Bradley's Web - Headquarters). I renamed the site by following the steps below:
- Open Active Directory Sites and Services
Start → rundssite.msc. - In the left pane, expand Sites.
- Right-click Default-First-Site-Name → Rename.
- Type the new name (EDW-HQ) → press Enter.
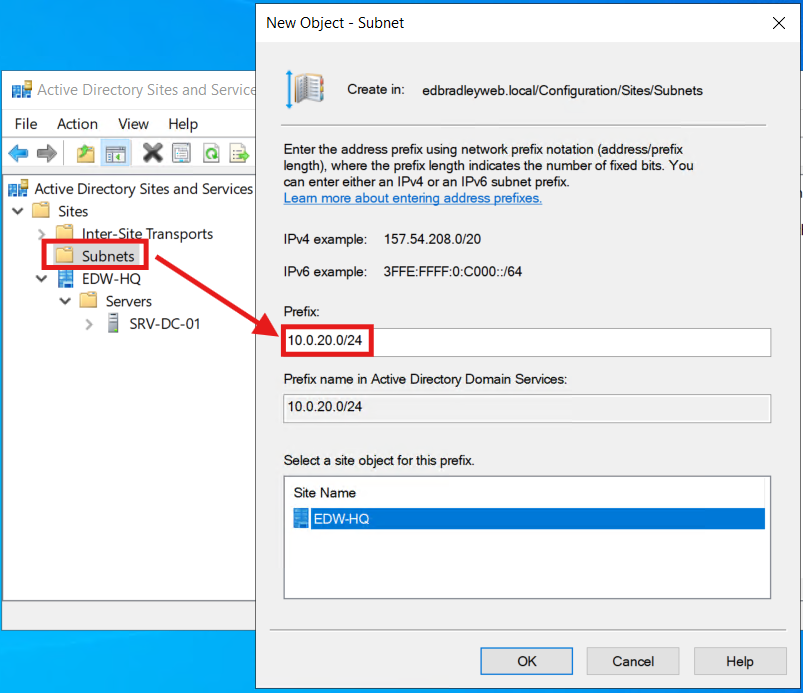
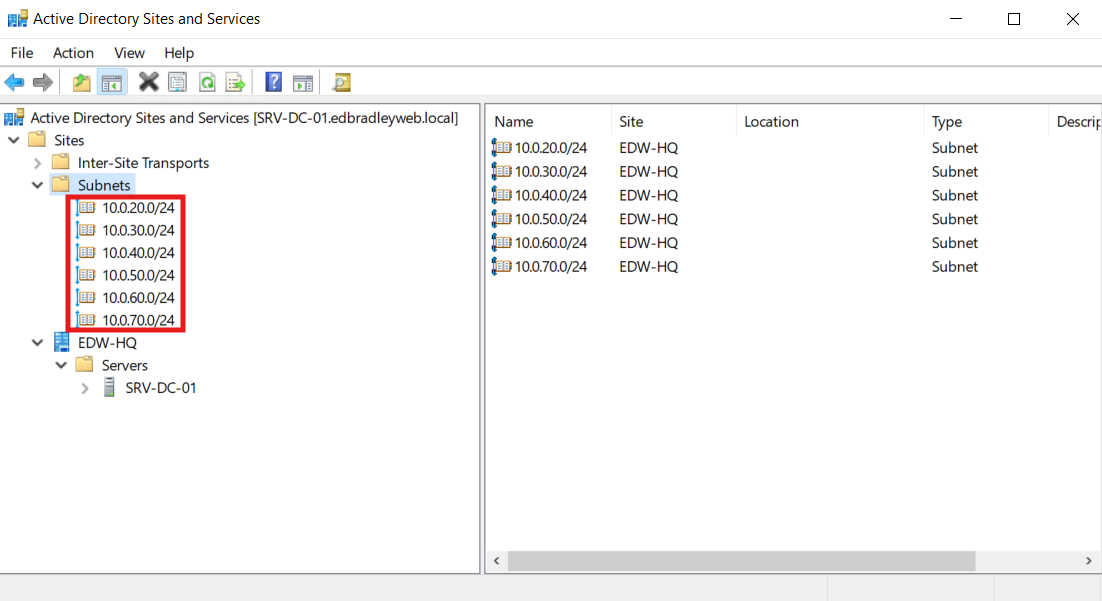
Then Add the subnets that will part of the Domain and bind them to the site:
This is what actually makes clients/DCs “belong” to the site.
- In Active Directory Sites and Services, right-click Subnets → New Subnet…
- Add the Prefixes:
10.0.20.0/2410.0.30.0/2410.0.40.0/2410.0.50.0/2410.0.60.0/2410.0.70.0/24 - Select a site: choose the new site name (EDW-HQ) → OK.
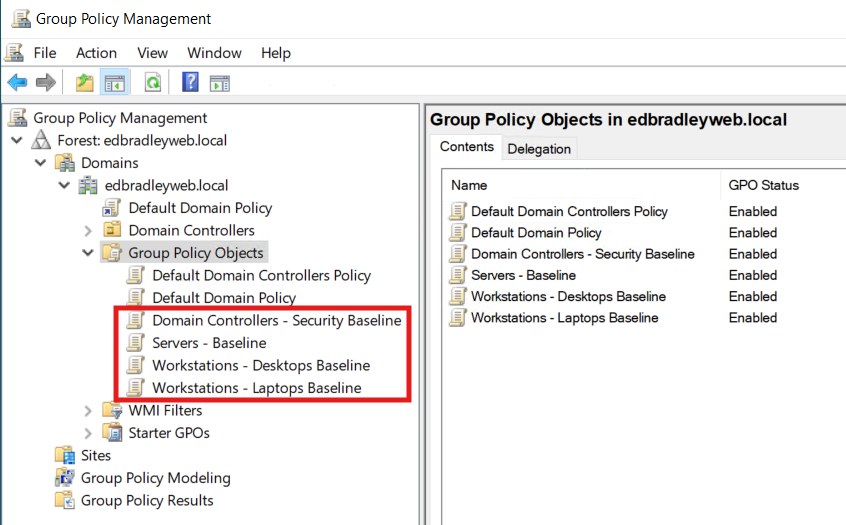
2.) Don’t edit the Default GPOs
What: Leave Default Domain Policy and Default Domain Controllers Policy unchanged.
Why: They’re “plumbing.” Changing them makes audits and rollbacks hard and can be overwritten by role installs or baselines.
Do instead: Create dedicated, clearly named GPOs for each scope and link them at the right OUs:
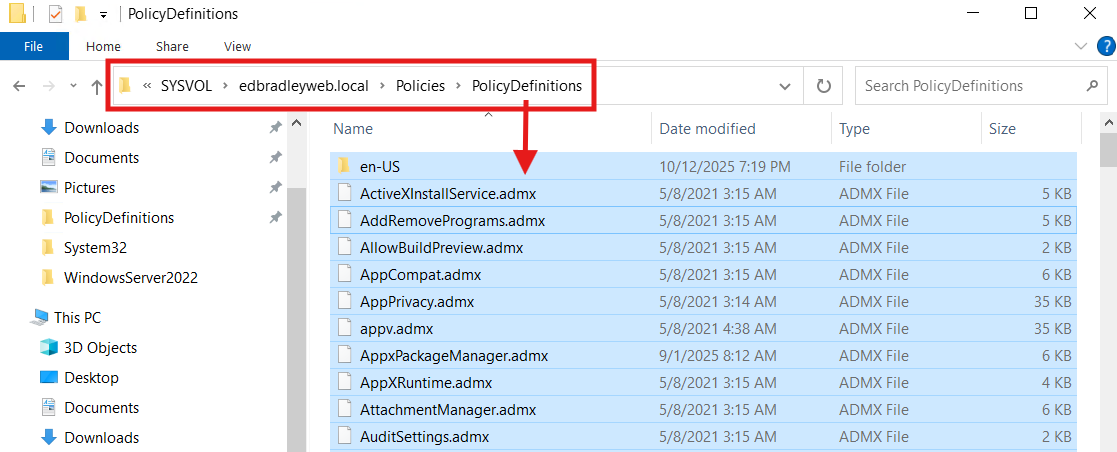
3.) Create the Group Policy Central Store
What: Store the Domain's ADMX/ADML templates in SYSVOL so everyone edits with the same definitions.
Why: Eliminates ADMX version mismatch prompts and makes policy options consistent across consoles.
How:
From a Windows Server 2022 admin box, copy:
From: C:\Windows\PolicyDefinitions\*
To: \\<domain>\SYSVOL\<domain>\Policies\PolicyDefinitions\

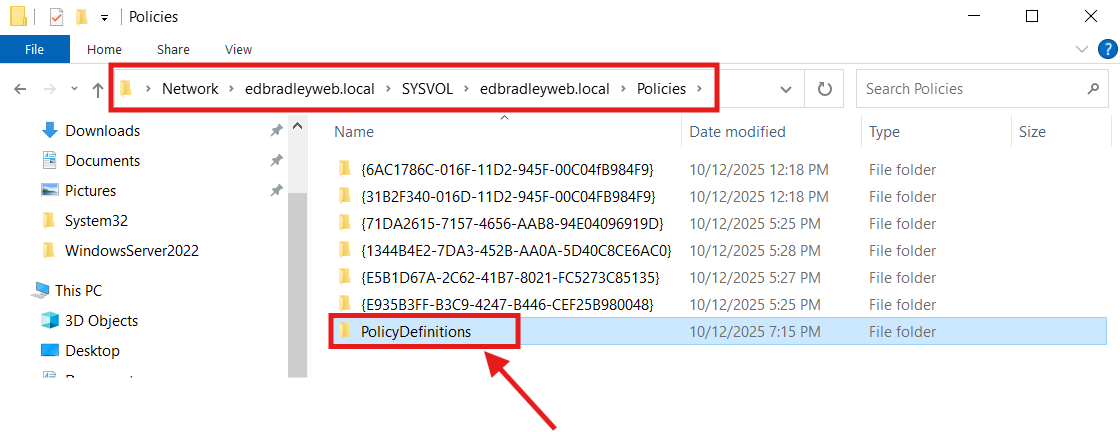
Add vendor ADMX (Edge/Chrome/Firefox/OneDrive) here later as needed.
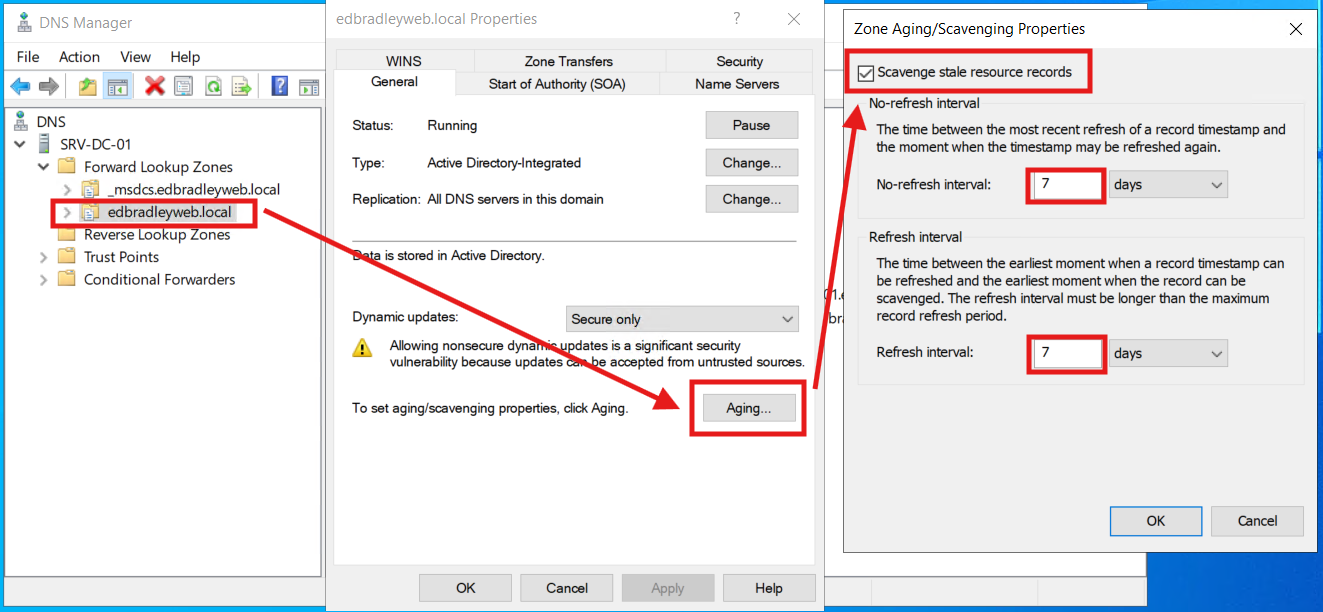
4.) DNS hygiene (aging/scavenging)
What: Enable stale record cleanup (Aging/Scavenging).
Why: Prevents DNS bloat from DHCP churn.
How:
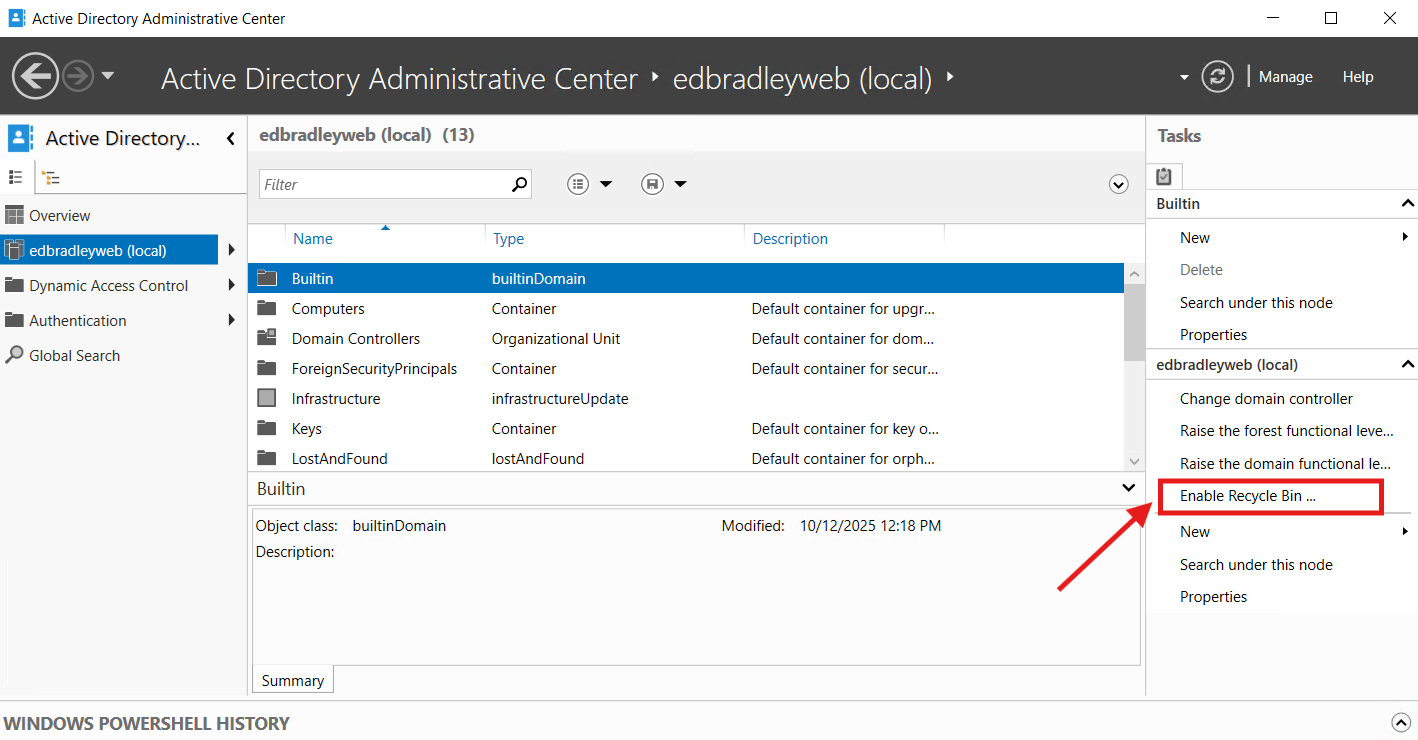
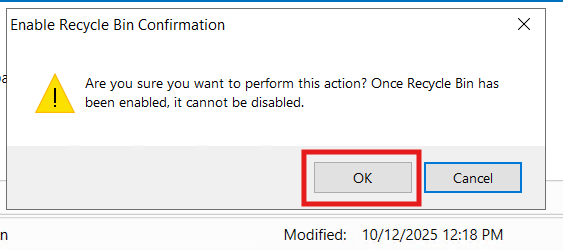
5.) Enable Active Directory Recycle Bin
What: Turn on the forest-wide recycle bin.
Why: Enables deleted users/groups/OUs to be restored — with attributes —without an authoritative restore.
How:
Open the Active Directory Administrative Center and click "Enable Recycle Bin", as shown below (and confirm the irreversible action):
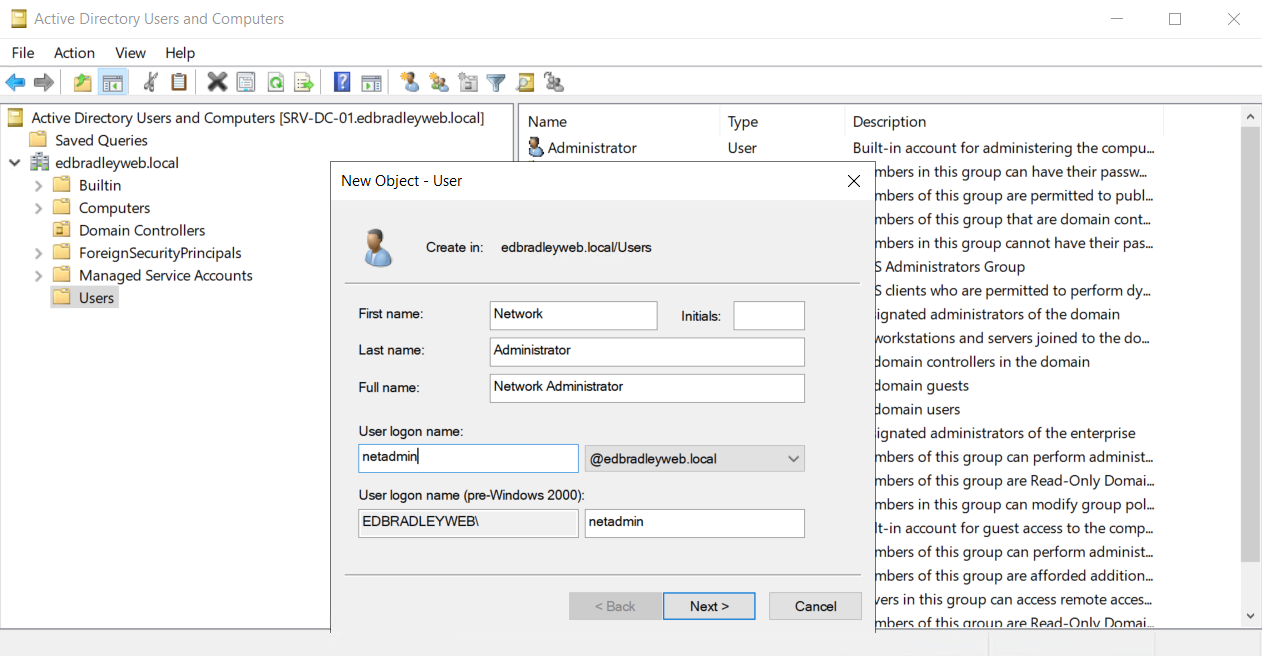
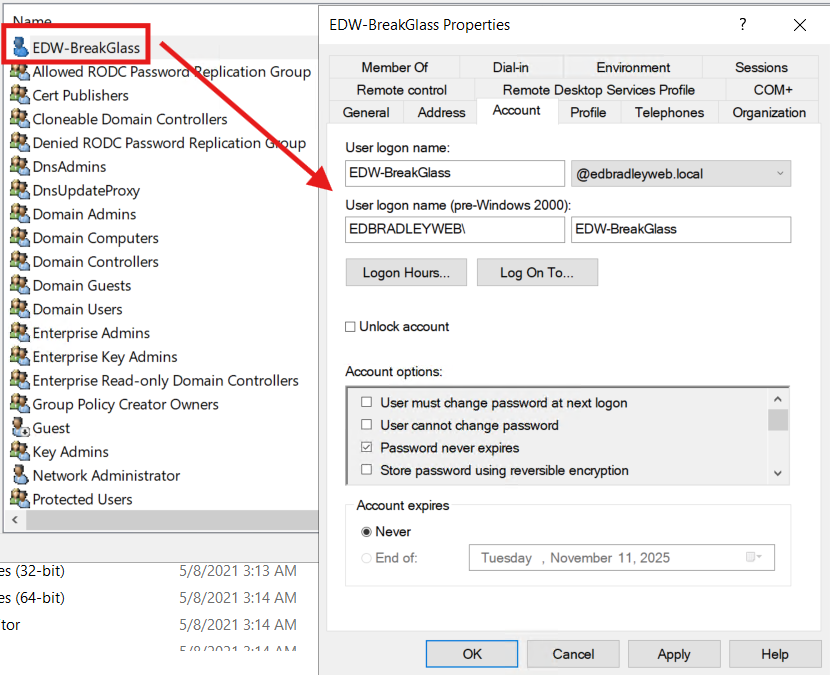
6.) Administrator Account Obfuscation
What: Use a dedicated, named admin account exclusively for elevation, and keep your everyday account standard. I created a new “Network Administrator” account for privileged operations and renamed the built-in Administrator to reduce its visibility. The named admin is used only on secured admin workstations/jump hosts. The built-in administrator account is treated as a "break-glass" credential.
Why: Separating admin and daily identities minimizes credential exposure and blocks common lateral-movement paths. Renaming and restricting the SID-500 account removes a well-known target, while using a purpose-built admin account—under tighter controls and logging—improves accountability, makes detection easier, and reduces the blast radius if a single set of credentials is compromised.
How:
Create the new admin account & rename built-in administrator:
7.) Advanced Logging
What: Enable Advanced Audit Policy at the subcategory level across DCs, servers, and endpoints. Adjust size of Security logs, that will be sent to a SIEM; and focus on high-signal areas:
- Account Logon/Logoff
- Account Management
- Directory Service Access
- Policy Change
- Sensitive Privileged Use
- Process Creation with command lines
- Removable Storage
Why: This gives precise, durable telemetry to see who did what, where, and when; detect brute force and lateral movement; prove and roll back identity or policy changes; catch posture tampering — delivering real investigation data and alerts without drowning in noise.
How:
A. What to enable (subcategories)
Create/edit the right GPO first (don’t touch the Default* GPOs):
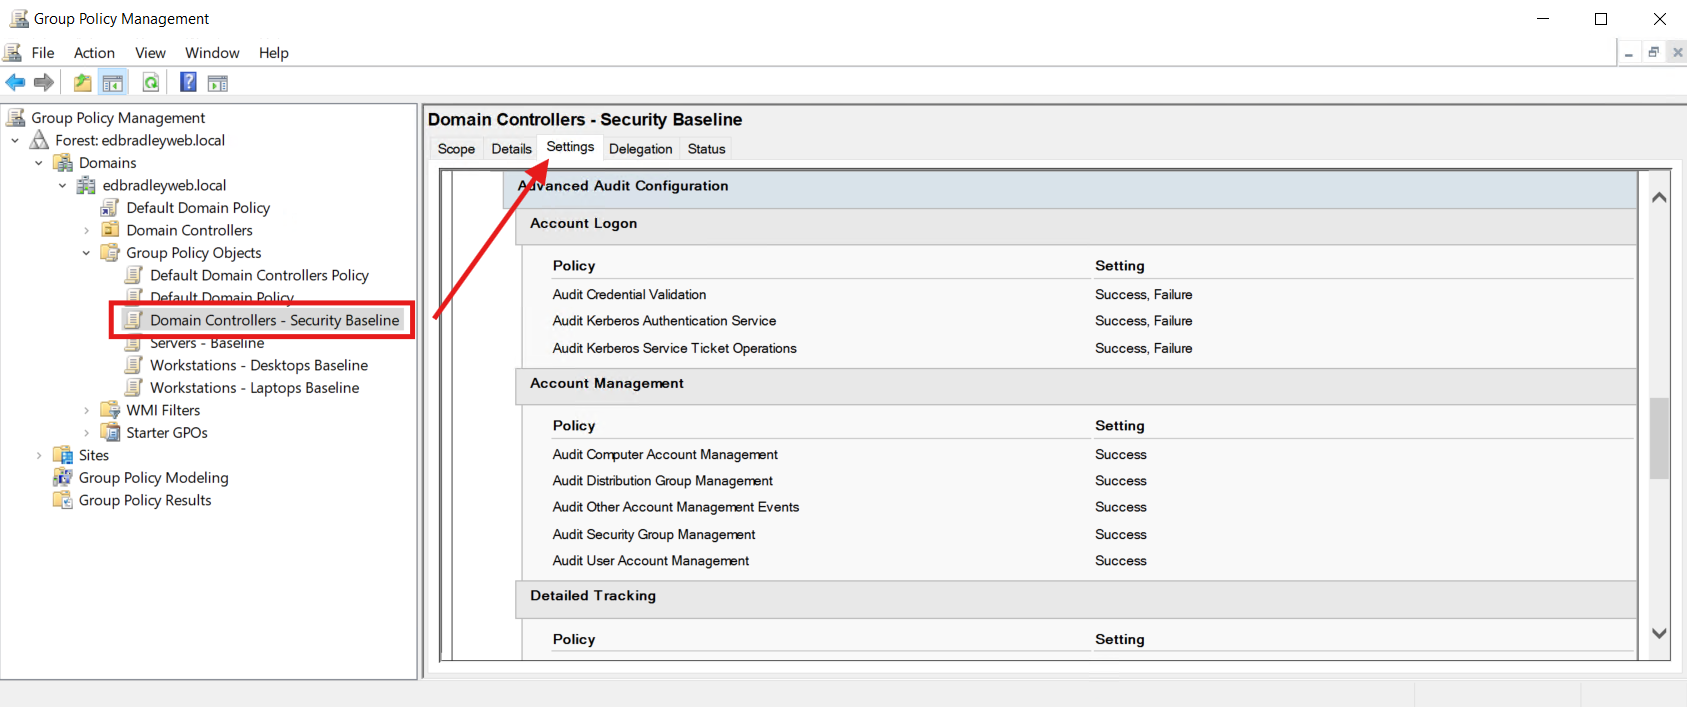
- DCs: “Domain Controllers – Security Baseline”
- Servers/Workstations: “Servers – Baseline”, “Workstations – … Baseline”
B. Advanced Audit Policy (fine-grained auditing)
Domain Controllers (strong)
- Account Logon
- Kerberos Authentication Service — Success, Failure
- Kerberos Service Ticket Operations — Success, Failure
- Credential Validation — Success, Failure
- Logon/Logoff
- Logon — Success, Failure
- Logoff — Success
- Account Lockout — Success
- Special Logon — Success
- Other Logon/Logoff Events — Success, Failure
- Group Membership — Success
- Account Management
- User/Computer/Security Group/Distribution Group/Other Account Management — Success
- DS Access
- Directory Service Access — Success
- Directory Service Changes — Success
- Policy Change
- Audit Policy Change — Success
- Authentication Policy Change — Success
- Authorization Policy Change — Success
- MPSSVC Rule-Level Policy Change — Success, Failure
- Filtering Platform Policy Change — Success, Failure
- Privilege Use
- Sensitive Privilege Use — Success, Failure (others Off)
- Object Access
- Removable Storage — Success, Failure (file/registry only if you also deploy SACLs)
- Detailed Tracking
- Process Creation — Success
Member Servers / Workstations (balanced)
- Account Logon
- Credential Validation — Success, Failure
- Logon/Logoff
- Logon — Success, Failure
- Logoff — Success
- Account Lockout — Success
- Special Logon — Success
- Group Membership — Success
- Account Management
- User/Computer/Security Group/Other Account Management — Success
- Policy Change
- Audit Policy Change — Success
- MPSSVC Rule-Level / Filtering Platform Policy Change — Success, Failure
- Privilege Use
- Sensitive Privilege Use — Success, Failure
- Object Access
- Removable Storage — Success, Failure
- Detailed Tracking
- Process Creation — Success

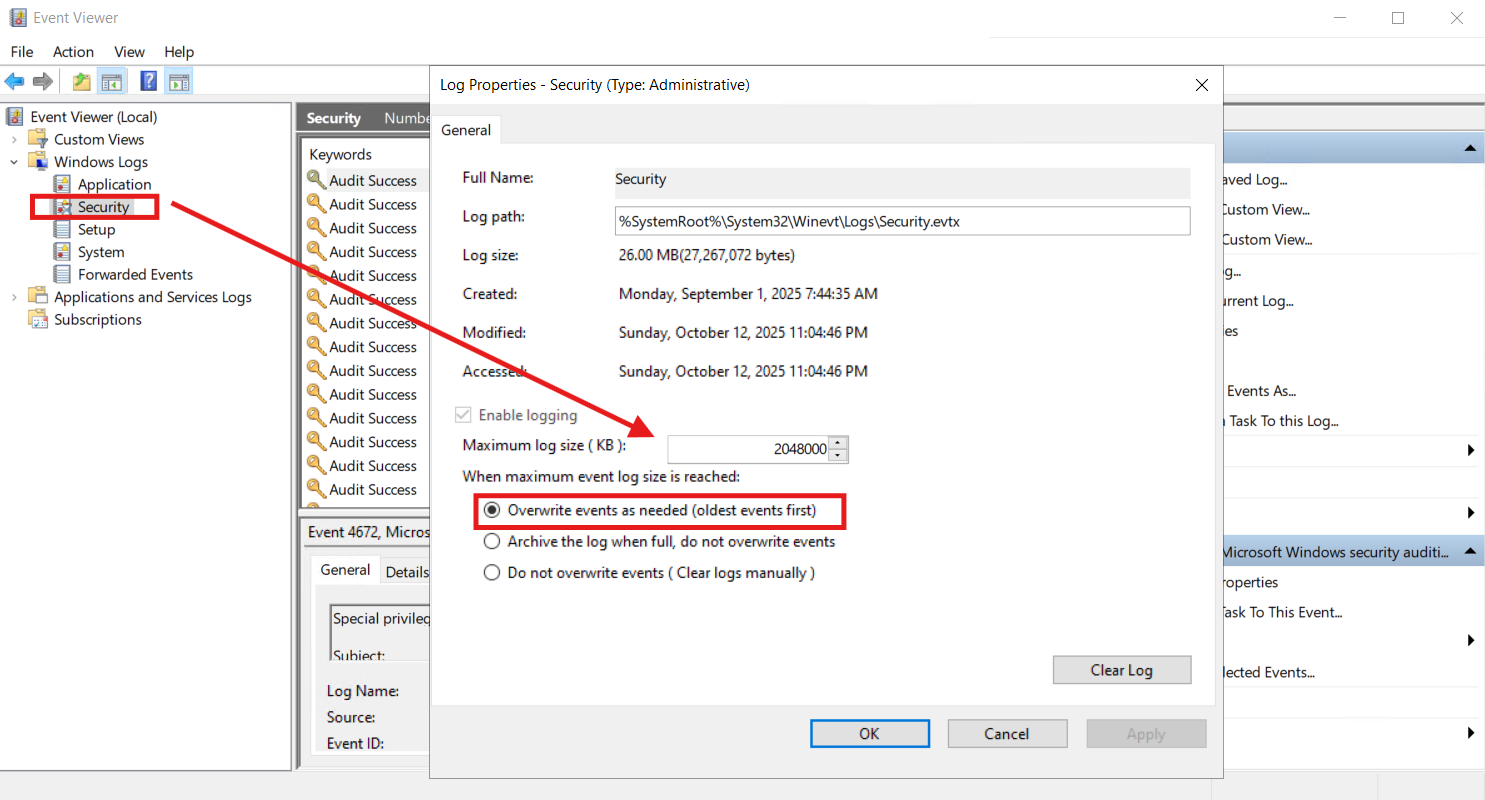
C. Event Log size & retention (Security log)
- Security log maximum size:
- DCs: 1024–2048 MB (or larger if you have storage/forwarding)
- Members: 256–1024 MB
- Retention: Overwrite events as needed.
These measures are a solid start. As the lab evolves, I’ll regularly revisit, audit, and assess the network’s security posture — and continue making changes and enhancements as needed.
🧩 Wrap-Up: Deploying First Active Directory Domain Controller
In this post, I stood up a clean AD foundation and began the hardening process. I put foundational AD Site hygiene in place. I designated a Central Store for ADMX. I created role-based baseline GPOs (without touching the Default GPOs). I created proper Sites & Subnets (renaming the default site). I configured DNS aging/scavenging to prevent bloat. I enabled resilience and recovery with AD Recycle Bin. I implemented a well-configured time source on the PDC Emulator. On the security front, I tightened identity and access by introducing a named admin (while obfuscating and locking down the built-in Administrator). I enabled advanced auditing with a right-sized security log. The net result: a manageable, incrementally more secure lab that mirrors enterprise patterns — ready for iterative tuning, policy implementation, and workload onboarding in future posts.
In my next post, I’ll continue tuning the network and tackling a few outstanding items that aren’t fully addressed yet, including:
- Proper Internet DNS resolution
- Inter-VLAN routing and security
- Adding initial test users, groups, and computers
- Running initial auditing and security assessments
These steps will help ensure the environment is ready for live workloads.