
Ed Bradley’s Web: Weaving Networks, Security, Cloud, and Code.
Introduction
In this post, I’ll be working on "tying up some loose ends" — finalizing configurations to prepare the network for real-world workloads and experimentation.
Specifically, I’ll focus on:
- Refining the DNS infrastructure
- Securing inter-VLAN routing
DNS
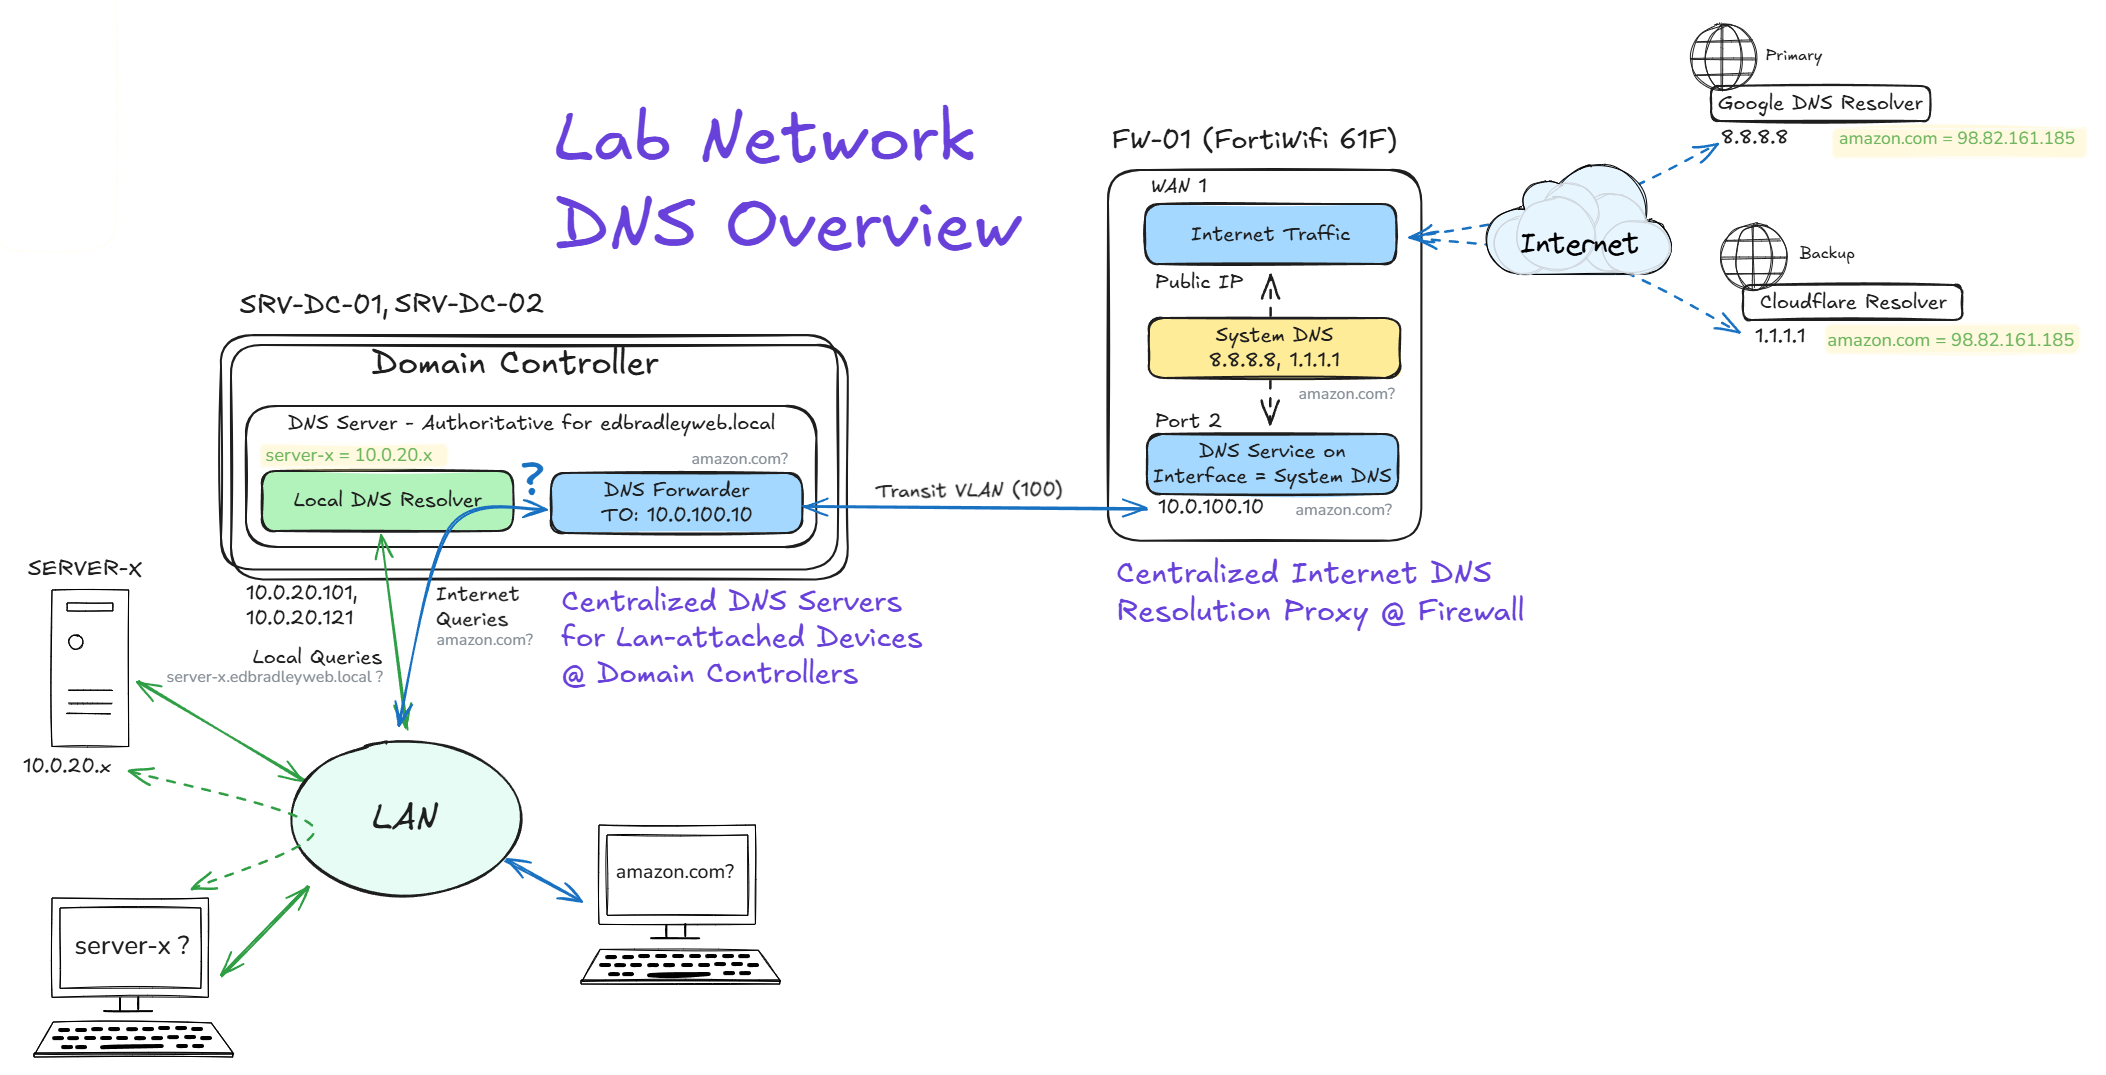
Now that the first domain controller is in place, Active Directory will be the authoritative DNS for internal zones. Any names it isn’t authoritative for (Internet DNS) will be forwarded to the FortiWifi firewall. The Cisco MX68W does not have DNS Resolver or Proxy capabilities. So the FortiWifi will be providing a single, centralized, egress for external resolution. The FortiWifi will use upstream public resolvers (e.g., Google, Cloudflare, etc.) to get IP addresses for public servers.
This highlights a distinct difference between Meraki MX and the FortiGate:
MX68W vs. FortiWiFi — DNS in the Lab
FortiWiFi (FortiGate)
- Runs a DNS forwarder/resolver on LAN interfaces.
- Supports conditional forwarding (e.g.,
edbradleyweb.local → DCs) and edge caching. - Result in the lab: AD DC DNS forwarder and non-domain VLANs point to the FortiWiFi → one chokepoint for policy routing, logging, and filtering.
Cisco Meraki MX68W
- No built-in DNS resolver on LAN; can only hand out DNS via DHCP and enforce L3 rules.
- Optional Umbrella integration for DNS security.
- Result in the lab: Not used for DNS
Previously, endpoints queried public DNS directly (8.8.8.8, 1.1.1.1). That works, but it fragments control and visibility. Centralizing DNS is cleaner: network-attached clients — domain-joined or not — query AD DNS for internal names, and non-authoritative lookups flow to the firewall, which resolves them using the upstream resolvers I choose.
Why this is better:
- Consistent logging & forensics: All Internet lookups pass a single point, simplifying investigation and usage analytics.
- Enables stronger security: Deny rules can be put in place to block direct port 53 use, so endpoints can’t bypass controls and monitoring.
- Easy change management: Swap upstream resolvers once at the edge — no DHCP updates or host changes.
Below is a sketch I created while researching and mapping out the DNS infrastructure for the network:
Configuring DNS on the Domain Controller
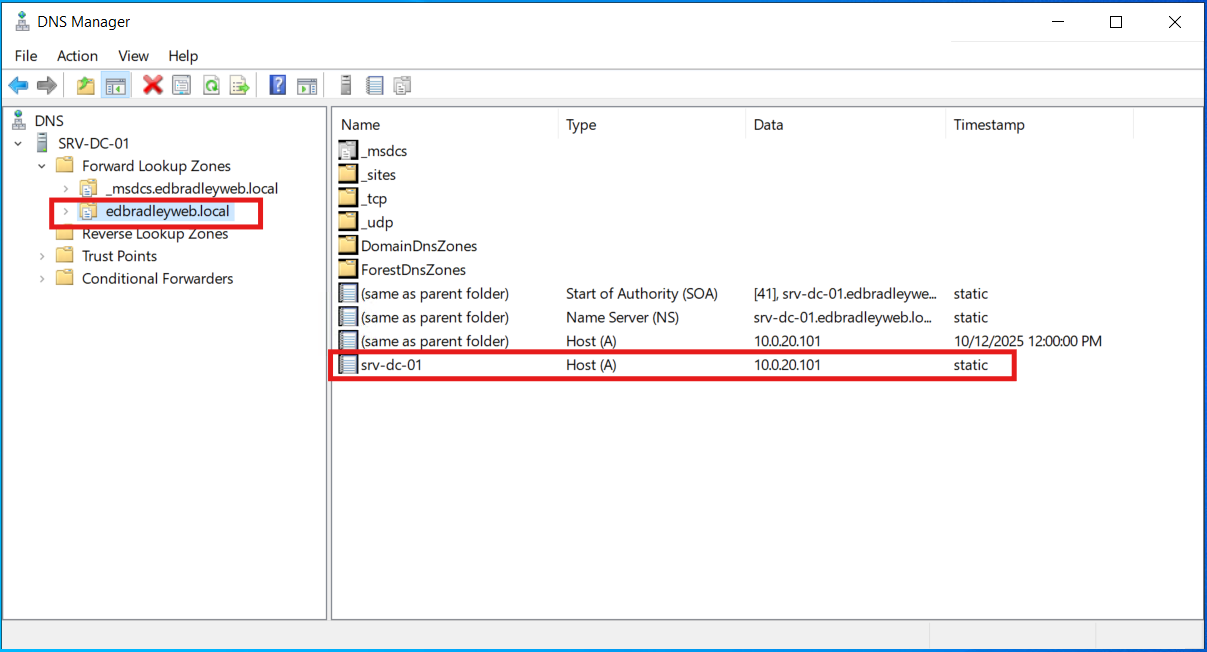
Upon deployment of Active Directory, the Microsoft DNS Server is installed on the Domain Controllers, with a Forward Lookup Zone and initial A (host) record for the server itself (SRV-DC-01), as shown below:
Next, I configured initial Reverse Lookup Zones. Active Directory doesn’t require reverse DNS to function, but creating reverse lookup zones (PTR records) makes administration, security, and troubleshooting much better:
- Human-friendly troubleshooting: Tools like
nslookup,Test-NetConnection,ping -a, and many monitoring agents use reverse lookups to show a name for an IP. Without PTRs you see “Server: UnKnown” and only IPs. - Cleaner logs & SIEM correlation: Event logs, firewall/IDS alerts, and NetFlow records become easier to read and correlate when IPs resolve to hostnames.
- Some tools expect rDNS: Certain SMTP, NTP, monitoring, and inventory systems warn or gate features without working reverse DNS.
- DHCP/DNS hygiene: With secure dynamic updates, your DHCP server can automatically create and delete PTRs with leases—keeping forward (A) and reverse (PTR) in sync.
- Audits & asset management: Reverse lookups help quickly identify “mystery” IPs across subnets.
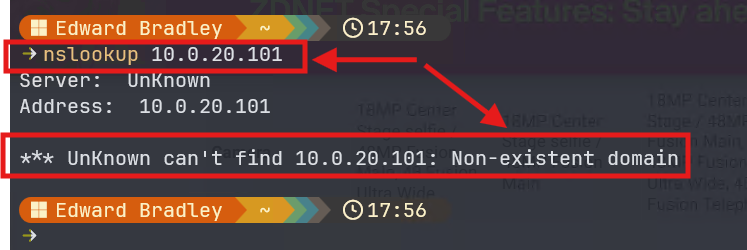
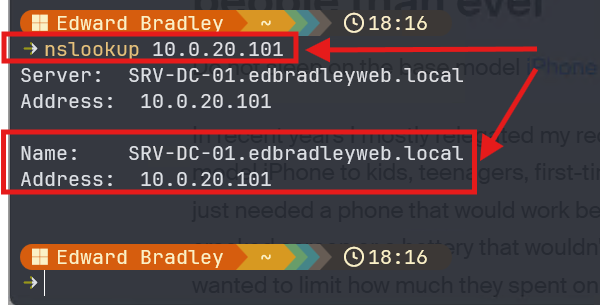
For example, without reverse DNS, if I try to resolve the server name for the IP address of the domain controller, it fails:
To fix this, I set up a Reverse Lookup Zone for the subnet 10.0.20.0/24 (VLAN 20 - Server VLAN):
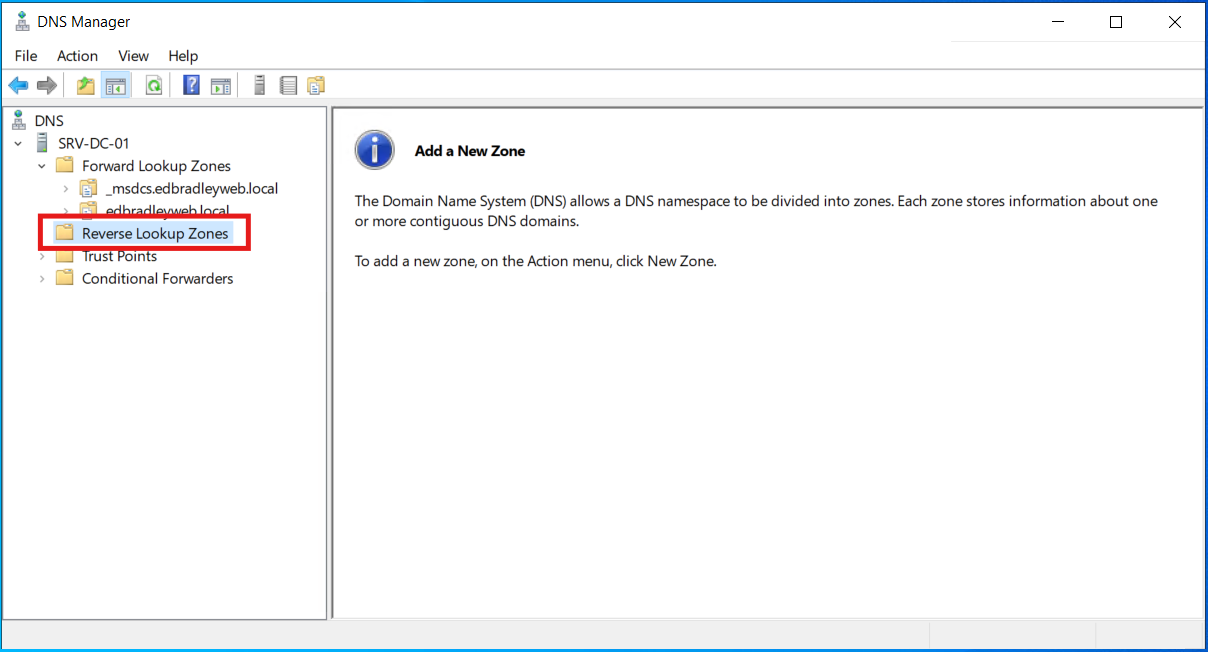
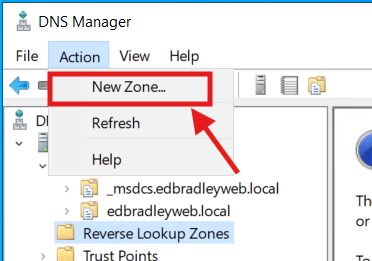
1.) Clicking on the Reverse Lookup Zones, initially shows no configuration:
2.) Create a new Zone:
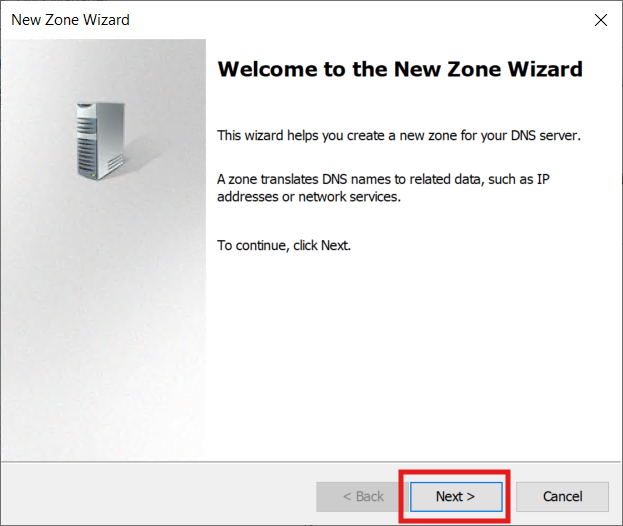
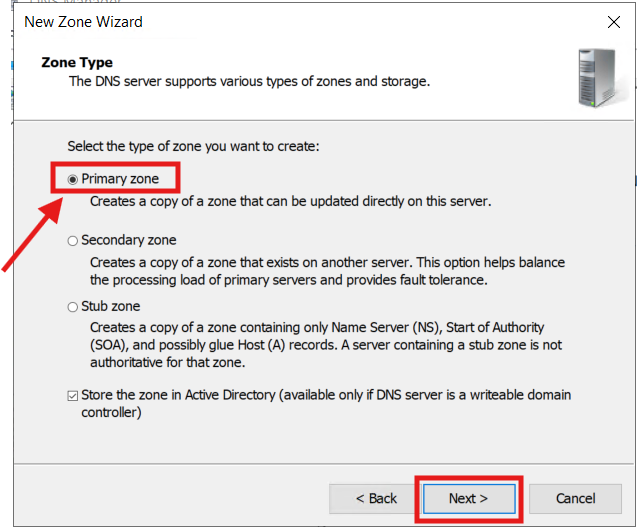
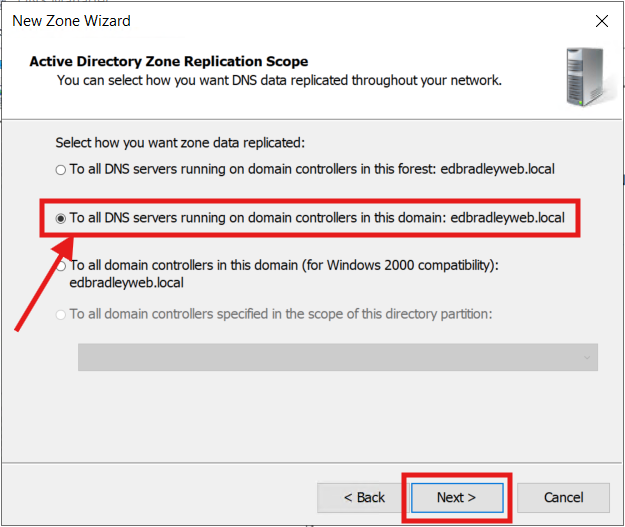
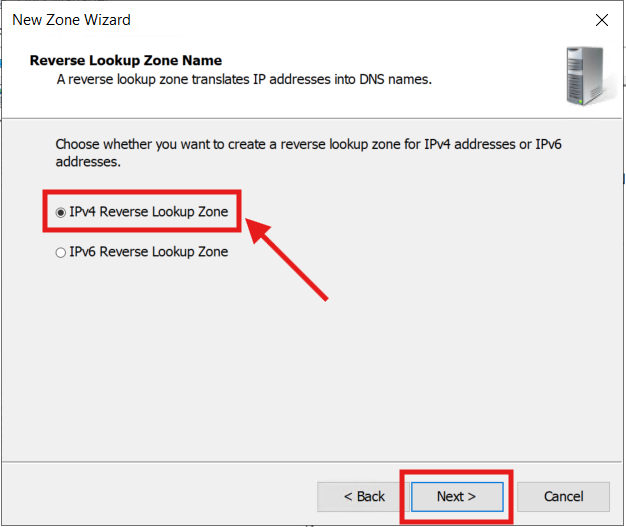
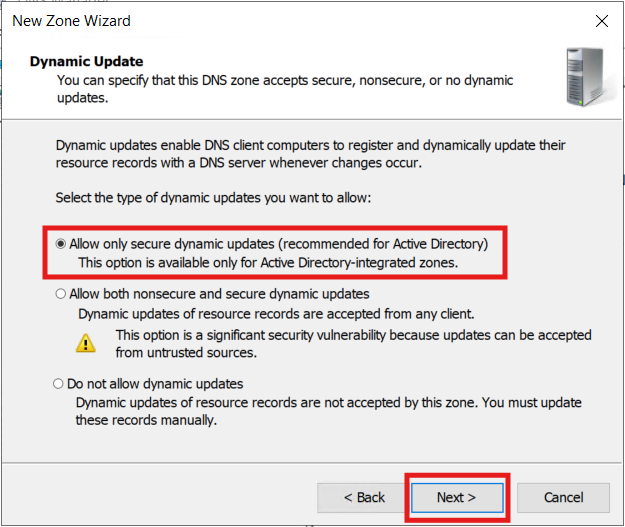
3.) Follow the Wizard to build the new Zone for the Server VLAN:

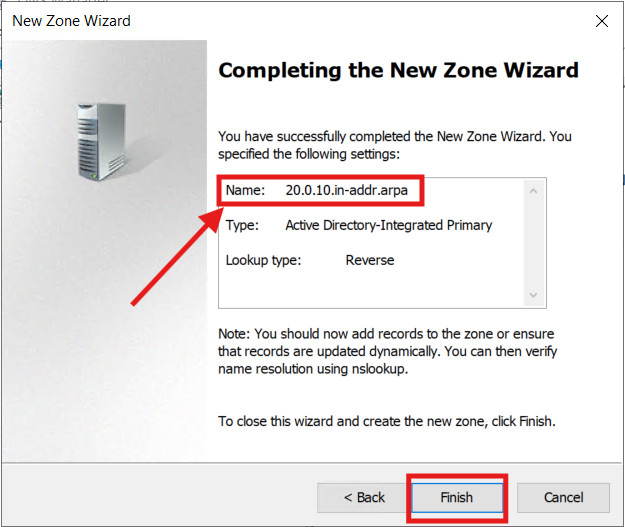
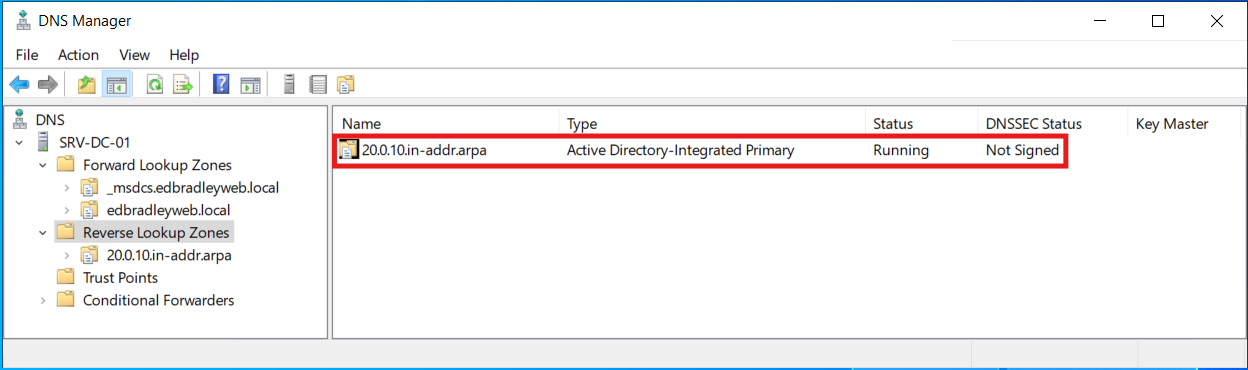
The new Zone is now created (for VLAN 20):
Now, the DNS query of the IP address works! Even the DNS Server name is now displayed:
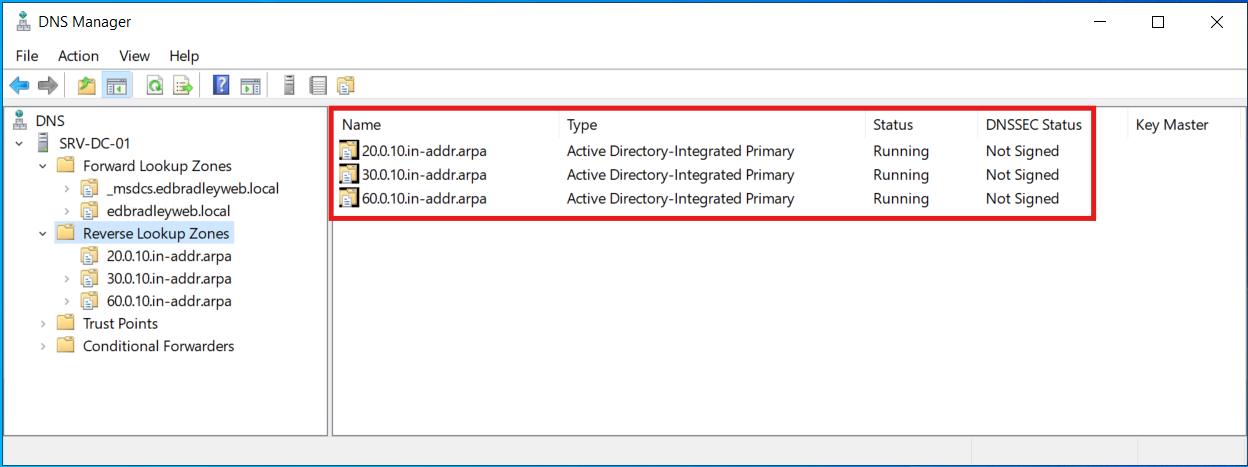
This process is then repeated for each of the VLANs, where appropriate. I went ahead added Zones for the designated Workstation and Secure Wi-Fi VLANs (30 & 60):
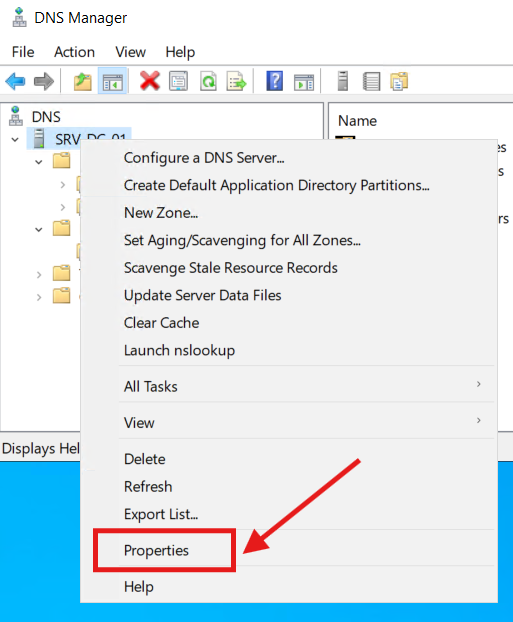
Next, I configured AD DNS Forwarders to direct non-authoritative name lookups to the FortiWiFi Firewall:
1.) Right-click on the DNS Server (SRV-DC-01) and select Properties:
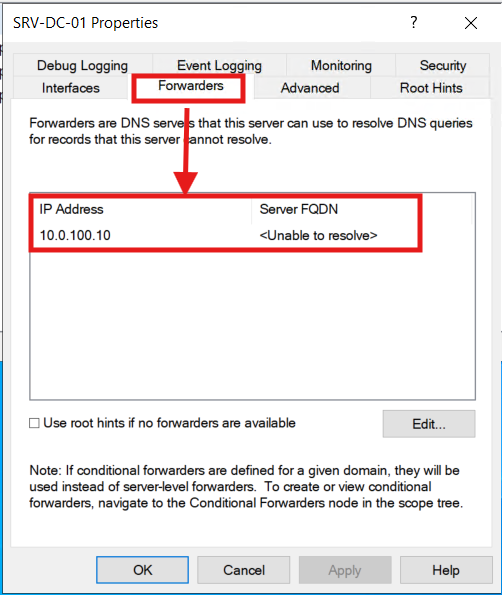
2.) Select the Forwarders Tab and enter the Transit VLAN IP address of the FortiWifi Firewall:
To complete the DNS pipeline, I configured DNS on the Firewall.
FortiWiFi 61F DNS configuration
The DNS configuration is fairly strait-forward, once I figured out that I needed to enable the proper GUI configuration page (Feature Visibility). 😄
1.) I set the global/system DNS resolver addresses to the widely-used Google and Cloudflare servers (8.8.8.8 & 1.1.1.1) by navigating to Network → DNS:

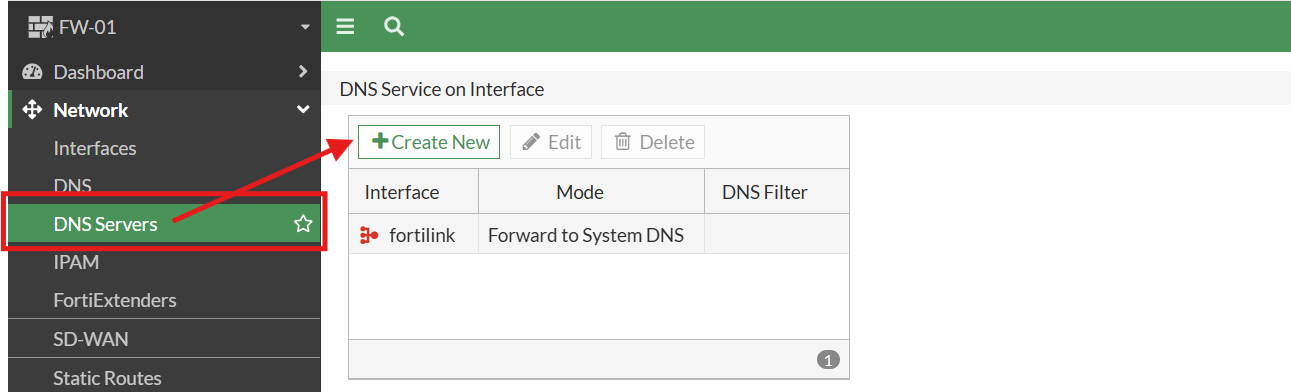
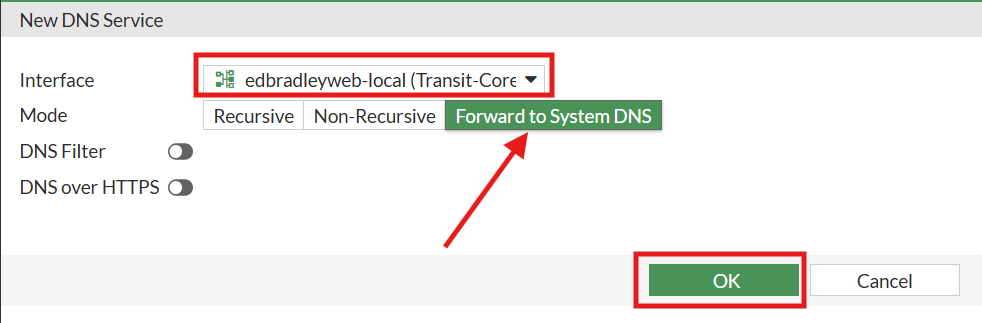
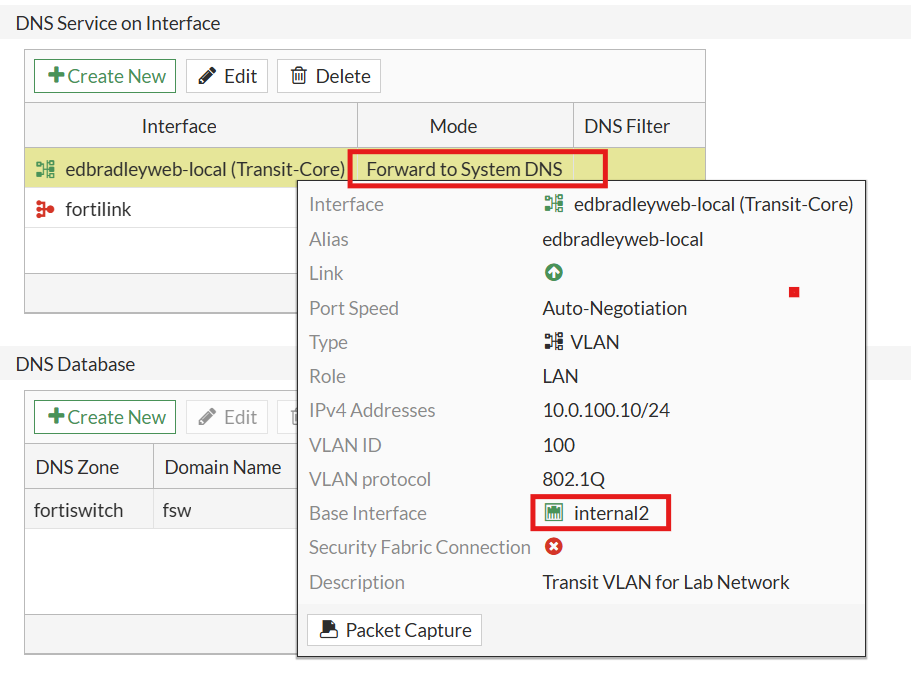
2.) I configured the DNS Service for the Transit VLAN between the firewall and the core switch (VLAN 100). I set it to simply use the global/system DNS resolver addresses:
Cisco SG350XG Core Switch DHCP configuration
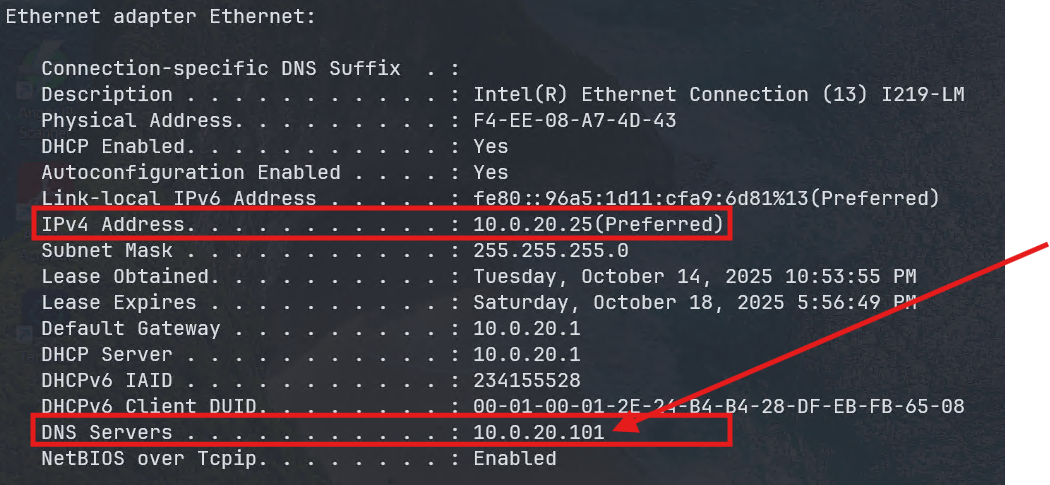
Now, with all DNS going through the AD DNS Server, the DHCP Server running on the Core Switch must be updated to configure clients to use the AD DNS Server.
Below is an example for the Server VLAN (VLAN 20):
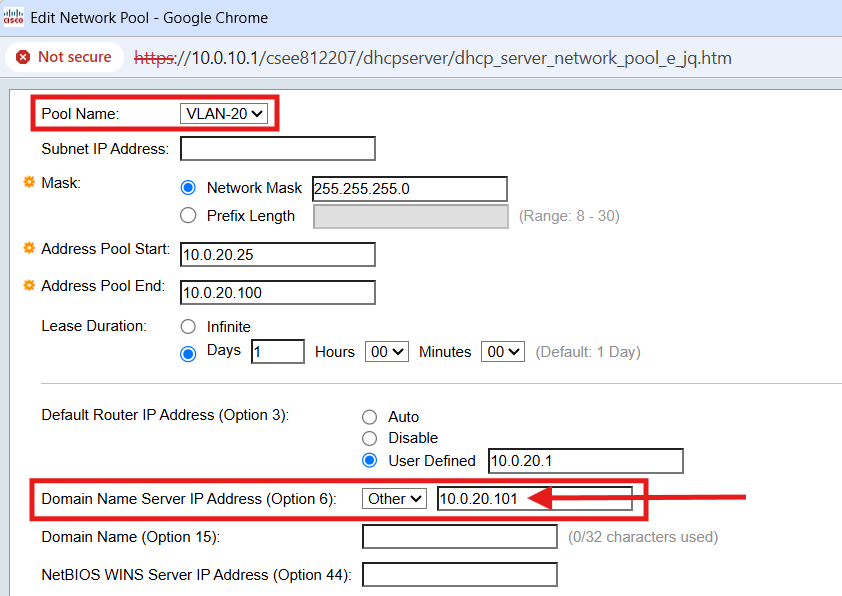
Now the DHCP clients are configured to use the AD DNS. With DNS forwarding in place with the FortiWifi, both local and Internet DNS can be centrally resolved:
Inter-VLAN Routing Security
The lab network's current VLANs, managed on the core L3 switch (Cisco SG350XG), allow unrestricted access between virtual networks — a clear security risk. With basic connectivity verified, it’s time to lock down inter-VLAN traffic and allow only the specific, legitimate, traffic to cross VLAN boundaries.
Special note: The OS on the Cisco SG350 series switch only supports a single input ACL and a single output ACL to be be applied to a given interface (SVI in this case). So, given the number of VLANs and the scope of cross-VLAN communication required, the ACL will grow to be fairly large over time, as more workloads are added and secured.
Securing Unused VLANs
I’m starting by effectively disabling inter-VLAN routing on VLANs that aren’t in use yet (40, 50, 60, 65, 70, and 80). I’ll add workloads to these networks in the future, but I don’t want to leave them exposed in the meantime.
I could just shut down the SVIs for each VLAN, but I’d rather keep them staged and ready. So instead, I created a generic deny-all ACL and applied it to each unused SVI. When a VLAN is ready to go, I simply replace that placeholder with the "master" ACL, which would be updated for that VLAN's requirements.
1.) Create generic ACL with a deny-all rule:
ip access-list extended VLAN_BLOCK_ROUTING
  deny ip any any
exit
2.) Apply the generic ACL to unused VLAN SVIs:
interface vlan 40
 service-acl input VLAN_BLOCK_ROUTING
exit
interface vlan 50
 service-acl input VLAN_BLOCK_ROUTING
exit
interface vlan 60
 service-acl input VLAN_BLOCK_ROUTING
exit
interface vlan 65
 service-acl input VLAN_BLOCK_ROUTING
exit
interface vlan 70
 service-acl input VLAN_BLOCK_ROUTING
exit
interface vlan 80
 service-acl input VLAN_BLOCK_ROUTING
exit
Restrict Inter-VLAN Traffic to and from the Server VLAN
Next, I created the initial "master" input access list (ACL), for enforcing the initial inter-VLAN access policies.
1.) I added baseline controls and then specific VLAN-to-VLAN controls, starting with restricting VLAN 30 (Workstations) access to VLAN 20 (Servers):
ip access-list extended VLAN_ALLOW_ROUTING
  ! === Workstations (VLAN 30) to Domain Controllers (VLAN 20) ===
  !
  ! VLAN 30 to VLAN 20 - DC Ping (SRV-DC-01, SRV-DC-02)
  !
  permit icmp 10.0.30.0 0.0.0.255 10.0.20.101 0.0.0.0 echo-request any
  permit icmp 10.0.30.0 0.0.0.255 10.0.20.121 0.0.0.0 echo-request any
  !
  ! VLAN 30 to VLAN 20 - DC DNS (SRV-DC-01, SRV-DC-02)
  !
  permit udp 10.0.30.0 0.0.0.255 any 10.0.20.101 0.0.0.0 53
  permit tcp 10.0.30.0 0.0.0.255 any 10.0.20.101 0.0.0.0 53
  permit udp 10.0.30.0 0.0.0.255 any 10.0.20.121 0.0.0.0 53
  permit tcp 10.0.30.0 0.0.0.255 any 10.0.20.121 0.0.0.0 53
  !
  ! VLAN 30 to VLAN 20 - DC Time Sync (SRV-DC-01, SRV-DC-02)
  !
  permit udp 10.0.30.0 0.0.0.255 any 10.0.20.101 0.0.0.0 123
  permit udp 10.0.30.0 0.0.0.255 any 10.0.20.121 0.0.0.0 123
  !
  ! VLAN 30 to VLAN 20 - DC Kerberos (SRV-DC-01, SRV-DC-02)
  !
  permit udp 10.0.30.0 0.0.0.255 any 10.0.20.101 0.0.0.0 88
  permit udp 10.0.30.0 0.0.0.255 any 10.0.20.121 0.0.0.0 88
  permit tcp 10.0.30.0 0.0.0.255 any 10.0.20.101 0.0.0.0 88
  permit tcp 10.0.30.0 0.0.0.255 any 10.0.20.121 0.0.0.0 88
  !
  ! VLAN 30 to VLAN 20 - DC LDAP (SRV-DC-01, SRV-DC-02)
  !
  permit tcp 10.0.30.0 0.0.0.255 any 10.0.20.101 0.0.0.0 389
  permit tcp 10.0.30.0 0.0.0.255 any 10.0.20.121 0.0.0.0 389
  !
  ! VLAN 30 to VLAN 20 - DC LDAPS (SRV-DC-01, SRV-DC-02)
  !
  permit tcp 10.0.30.0 0.0.0.255 any 10.0.20.101 0.0.0.0 636
  permit tcp 10.0.30.0 0.0.0.255 any 10.0.20.121 0.0.0.0 636
  !
  ! VLAN 30 to VLAN 20 - DC Global Catalog (LDAP) (SRV-DC-01, SRV-DC-02)
  !
  permit tcp 10.0.30.0 0.0.0.255 any 10.0.20.101 0.0.0.0 3268
  permit tcp 10.0.30.0 0.0.0.255 any 10.0.20.121 0.0.0.0 3268
  !
  ! VLAN 30 to VLAN 20 - DC Global Catalog (LDAPS) (SRV-DC-01, SRV-DC-02)
  !
  permit tcp 10.0.30.0 0.0.0.255 any 10.0.20.101 0.0.0.0 3269
  permit tcp 10.0.30.0 0.0.0.255 any 10.0.20.121 0.0.0.0 3269

  ! === GLOBAL RULES ===
  !
  ! Enforce centralized DNS (block direct DNS except to DCs)
  !
  deny udp 10.0.30.0 0.0.0.255 any any 53
  deny tcp 10.0.30.0 0.0.0.255 any any 53
  !
  ! Block all other inter-vlan access
  !
  deny ip 10.0.30.0 0.0.0.255 10.0.20.0 0.0.0.255
  !
  ! Allow everything else (e.g., to upstream/Internet)
  !
  permit ip any any
exit
2.) I then applied the ACL to VLAN 30:
interface vlan 30
 service-acl input VLAN_ALLOW_ROUTING
exit
ISSUE: When I attempted to apply the service-acl to the SVI for VLAN 30, I received an error indicating that a Policy-Based Route (PBR) and an ACL cannot coexist on the same interface.
PBR was originally being used to steer Internet-bound traffic by VLAN through either of the two firewalls (FortiWiFi or MX68W). After investigating, I discovered this is a limitation of the Cisco SG350 L3 switch's operating system.
This throws a wrench in my plan to dynamically leverage both firewalls in the lab. To prioritize inter-VLAN security, I’ve opted to remove PBR and instead use a single default route on the switch. As a result, all VLANs will now route through one firewall at a time — which limits flexibility but simplifies enforcement.

As a work-around, I followed the steps below:
1.) I decided to use the FortiWifi as the default firewall for now. So I set it as the default route for the core switch:
config t
ip route 0.0.0.0 0.0.0.0 10.0.100.10
2.) I removed the PBR (for VLAN 30):
interface vlan 30
 no ip policy route-map
exit
I then verified that the VLAN 30 Internet traffic was now going through the FortiWiFi, via the transit VLAN (10.0.100.10):

3.) I then successfully applied the "master" inter-VLAN routing ACL to VLAN 30
interface vlan 30
 service-acl input VLAN_ALLOW_ROUTING
exit
I then ran some tests, from VLAN 30, to verify that the initial ACL was working as expected:
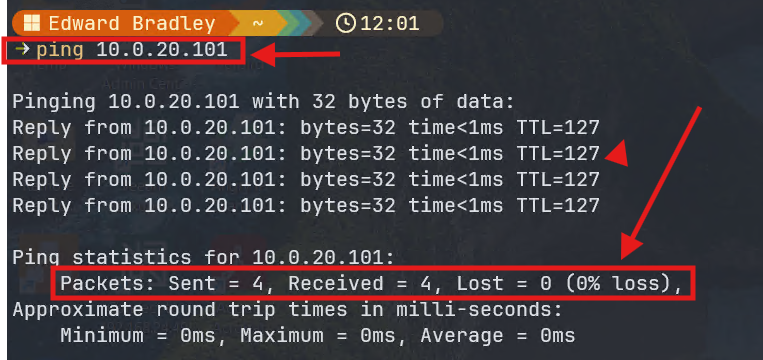
1.) Ping the Domain Controller (in VLAN 20):
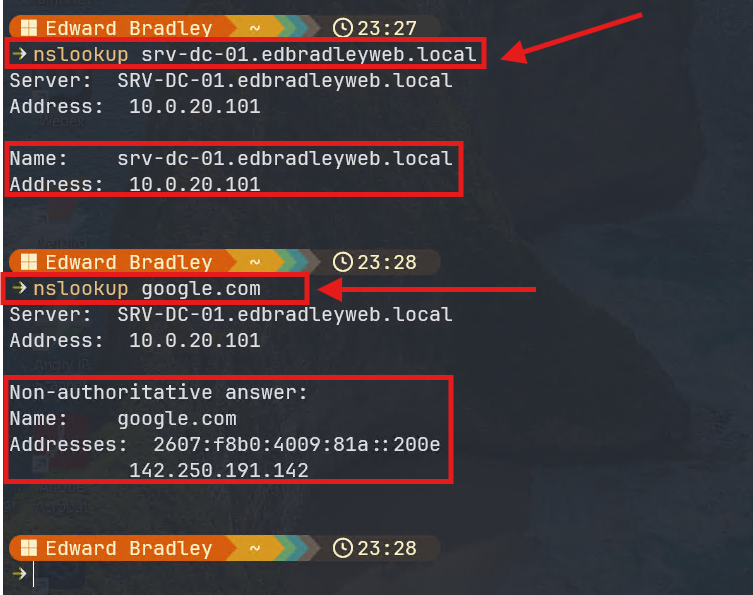
2.) Perform a DNS lookup via the Domain Controller:
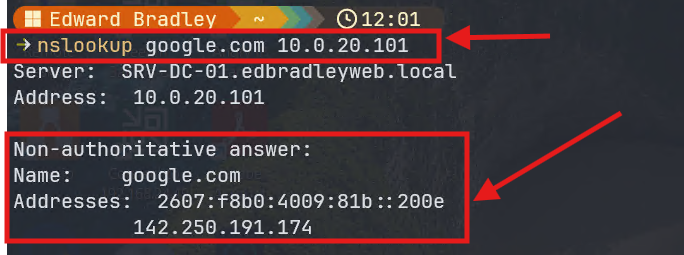
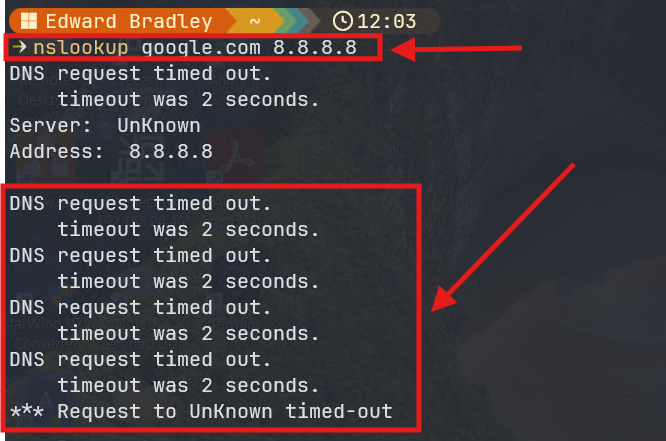
3.) Confirmed direct DNS queries are blocked:
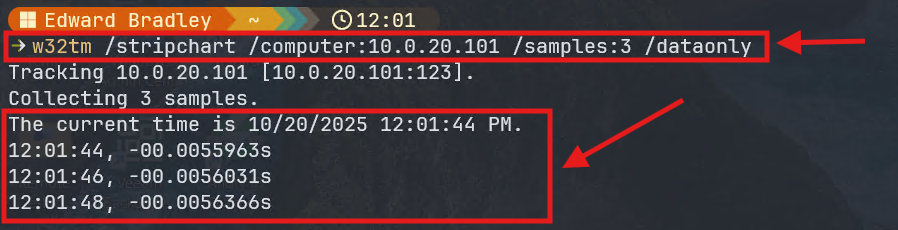
4.) Confirmed that Network time is available (NTP):
This work took a lot longer than expected, given the SG350XG switch CLI syntax and ACL/PBR incompatibility issue. So, I'm going to end the Post here. Ahead of the next post, I will update, apply and test the ACL for the other active VLANs
🧩 Wrap Up
With DNS infrastructure centralized and inter-VLAN routing now under control, the lab network has taken a major step toward production readiness. Moving Internet resolution behind the firewall simplifies security, logging, and management — while reinforcing the Domain Controller as the core DNS authority brings clarity and consistency to internal name resolution.
On the segmentation front, tightening inter-VLAN access lays the foundation for least privilege networking. Starting with VLAN 30’s access to domain services, and locking down unused VLANs, the lab is now much better positioned to grow securely.
Although the SG350XG’s PBR and ACL limitations threw a wrench in the dual-firewall setup, pivoting to a simplified default route was the right call to prioritize East-West access control. These growing pains are what home labs are for — testing, learning, and refining the architecture.
Next up: I’ll begin onboarding test users and systems, and start introducing baseline auditing and security assessments.
Stay tuned — the lab is coming to life!