
Introduction
With the Mini SOC now in place, the next logical step is to introduce an automation layer to streamline the day-to-day operation, monitoring, and maintenance of the network. This includes tasks such as configuration backups, health checks, alert handling, API integrations, and workflow orchestration across disparate systems. In this space, n8n (n8n.io) has rapidly emerged as a leading automation platform due to its flexibility, extensibility, and strong open-source community. Most importantly, the Community Edition is fully functional, free to use, and can be completely self-hosted, making it an ideal choice for on-premises and lab-based automation without vendor lock-in or cloud dependency.
🔹 What Does “n8n” Mean?
The name n8n is short for “nodemation”—a blend of “node” and “automation.” It reflects the platform’s core design philosophy: building automation workflows from individual nodes, where each node performs a specific task such as an API call, data transformation, trigger, or conditional check. By visually chaining these nodes together, users can create powerful, event-driven automations without being locked into rigid, pre-built recipes.
The stylized name n8n follows the same naming convention seen in technologies like k8s (Kubernetes) and i18n (internationalization), where the number represents the count of omitted letters between the first and last characters. In this case, “n8n” compresses “nodemation” into a short, memorable, developer-friendly name that aligns with modern infrastructure and automation tooling culture.
In this post, I will walk through the deployment of n8n as a dedicated guest virtual machine on my Proxmox server, followed by the creation of an initial automation designed to regularly back up the running configurations of my core and access switches to a designated GitHub repository created specifically for the lab network. This approach establishes a version-controlled, off-device record of critical network configurations, enabling rapid restoration in the event of hardware failure, accidental changes, or catastrophic misconfiguration, while also providing full auditability of when and how changes occur over time.
n8n Server Deployment
The n8n instance runs inside a Docker container on Linux, providing a flexible and portable deployment model that aligns well with modern infrastructure practices. To support this, I provisioned a dedicated virtual machine on my Proxmox server running Ubuntu 24.04 LTS, which serves as the host operating system for the container runtime. From a resource standpoint, n8n is relatively lightweight and does not demand significant compute or storage to operate efficiently. The configuration used here is: 2 vCPUs, 4 GB of RAM, and 100 GB of disk space. This is more than adequate for the vast majority of automation workloads in a lab or small enterprise environment:
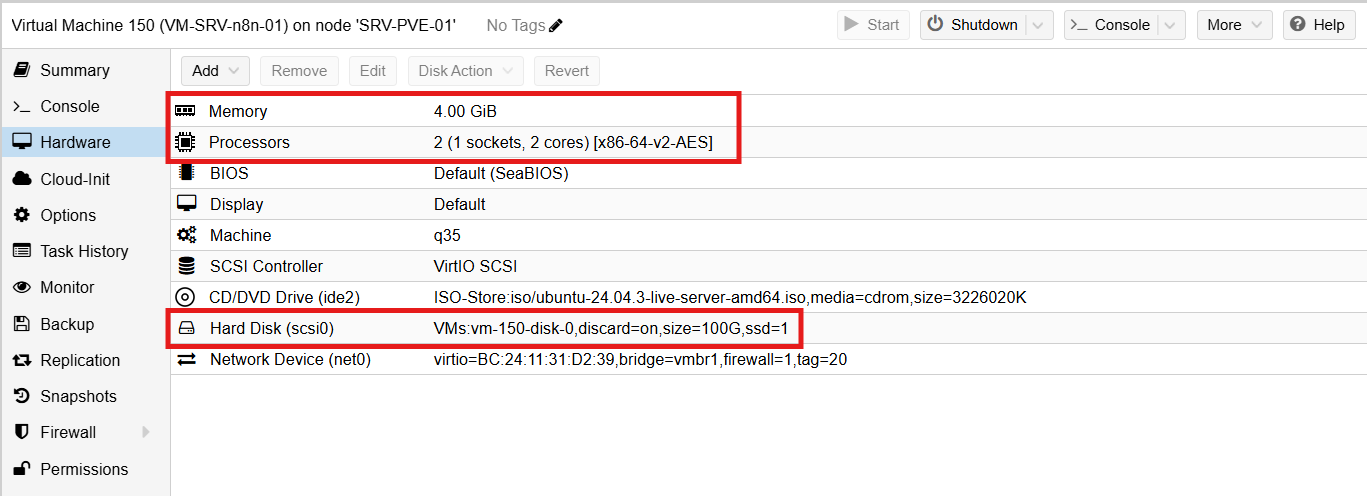
The virtual machine resides within the designated Server VLAN (VLAN 20) and has fully routed outbound access to the Internet for communicating with external services and APIs, such as GitHub. In addition, I selectively enabled inbound Internet access to the n8n instance by leveraging one of the static public IP addresses provided by my ISP. While external access is not required for the initial switch configuration backup automation workflow, it becomes necessary for more advanced use cases, such as OAuth-based authentication flows, inbound webhooks, and other integrations that rely on external callbacks into the n8n service, which I plan to explore in future iterations of the lab.
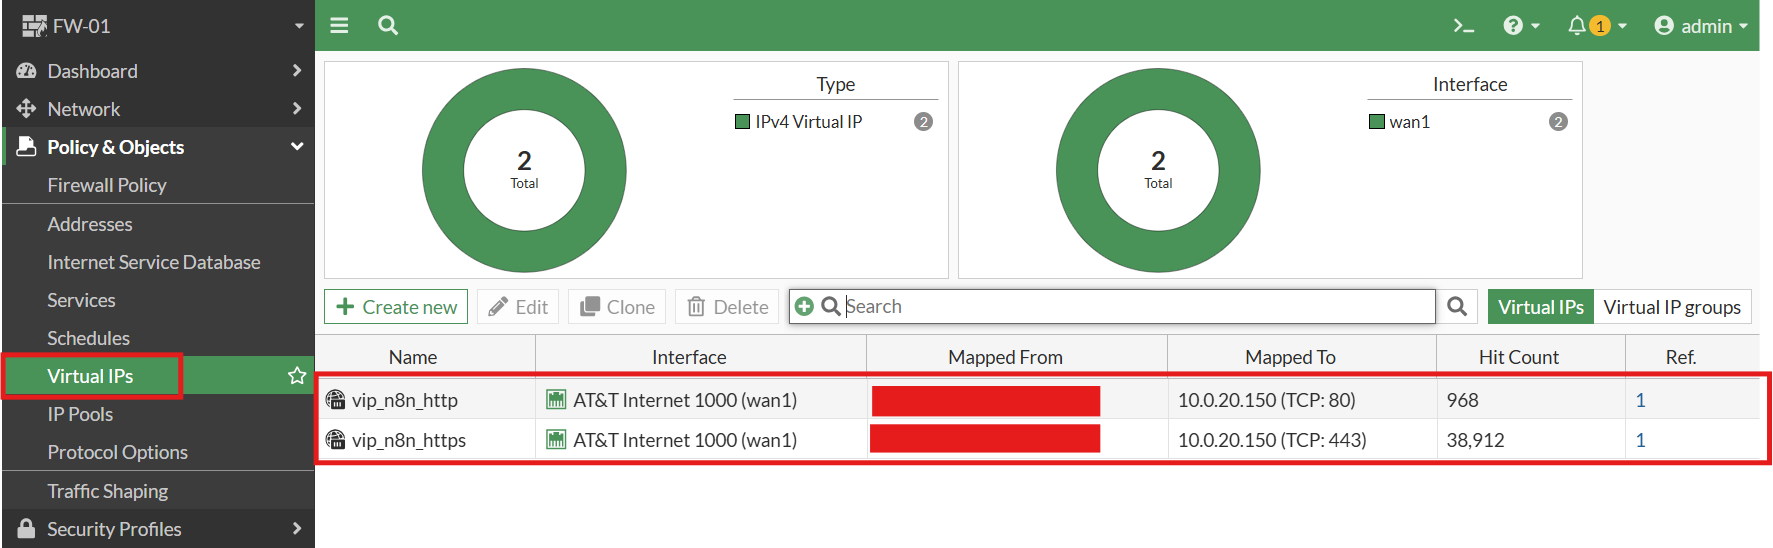
Public access to the instance is implemented on the FortiWiFi firewall using a combination of Virtual IP (VIP) and Network Address Translation (NAT) to map the public IP address to the internal private IP of the n8n virtual machine. A dedicated firewall policy restricts access to only the required services, specifically HTTP and HTTPS, ensuring that external exposure is tightly controlled and aligned with security best practices.
Virtual IP mapping:

Firewall rule:

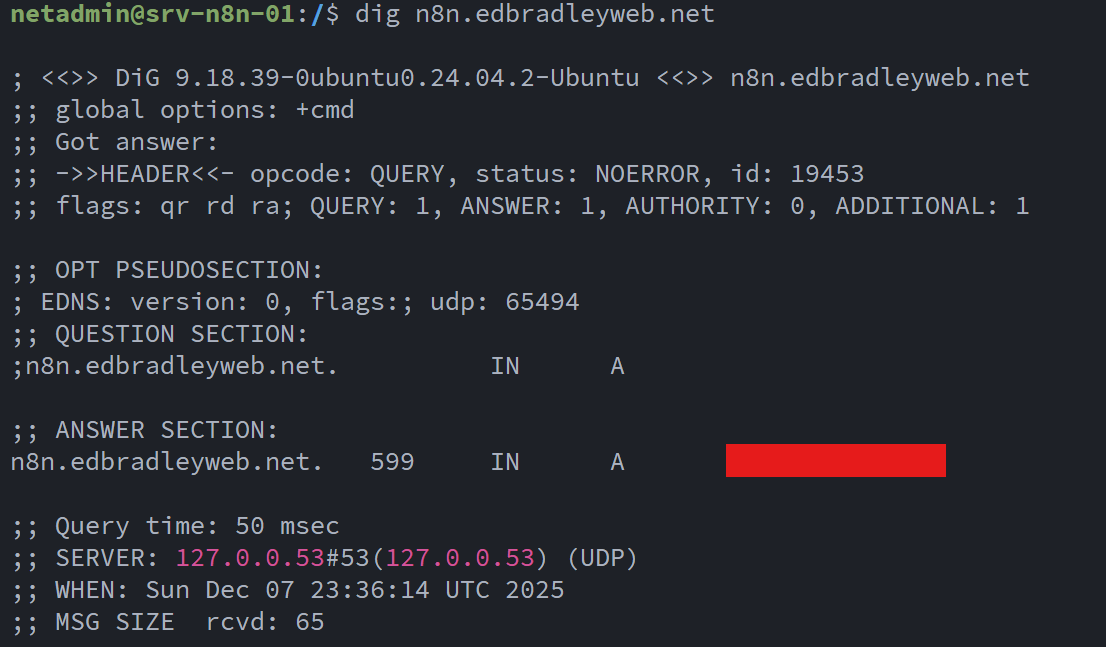
To complete external access from the Internet, I updated the public DNS zone for edbradleyweb.net. I currently use GoDaddy as the authoritative DNS provider, and within that zone I created a new A (Address) record for n8n:


This record maps the public hostname directly to the static public IP address assigned by my ISP.
To verify that DNS resolution was working correctly, I performed a simple lookup test, confirming that n8n.edbradleyweb.net resolved to the expected public IP address:
After applying the latest operating system updates to the Ubuntu 24.04 LTS virtual machine, I installed Docker using Docker’s official repository and GPG signing keys:
mkdir -p /etc/apt/keyrings

curl -fsSL https://download.docker.com/linux/ubuntu/gpg \
  | gpg --dearmor -o /etc/apt/keyrings/docker.gpg

echo \
  "deb [arch=$(dpkg --print-architecture) signed-by=/etc/apt/keyrings/docker.gpg] \
  https://download.docker.com/linux/ubuntu \
  $(lsb_release -cs) stable" \
  > /etc/apt/sources.list.d/docker.list

apt update

apt install -y docker-ce docker-ce-cli containerd.io docker-buildx-plugin docker-compose-plugin
This installs:
- Docker Engine
- Docker CLI
- containerd
- Buildx
- Docker Compose (plugin-based)
With Docker installed, I created a dedicated directory for the n8n deployment using the standard Linux convention under /opt:
mkdir -p /opt/n8n
cd /opt/n8n
I then downloaded and customized the n8n-provided Docker Compose template, which defines two services:
- n8n – the workflow automation engine
- Caddy – the web server and reverse proxy that securely exposes the n8n web interface
Caddy (https://caddyserver.com/) is a modern, security-focused web server known for its native, automatic TLS support, which allows it to:
- Seamlessly obtain Let’s Encrypt certificates (and automatically renew them)
- Enforce modern HTTPS security best practices by default
services:
  n8n:
    image: n8nio/n8n:latest
    restart: unless-stopped
    ports:
      - "127.0.0.1:5678:5678"
    environment:
      N8N_HOST: n8n.edbradleyweb.net
      N8N_PORT: 5678
      N8N_PROTOCOL: https
      WEBHOOK_URL: https://n8n.edbradleyweb.net/
      GENERIC_TIMEZONE: "America/Chicago"

      # Optional pre-auth
      N8N_BASIC_AUTH_ACTIVE: "true"
      N8N_BASIC_AUTH_USER: "admin"
      N8N_BASIC_AUTH_PASSWORD: "************"

    volumes:
      - ./n8n_data:/home/node/.n8n

  caddy:
    image: caddy:latest
    restart: unless-stopped
    ports:
      - "80:80"
      - "443:443"
    volumes:
      - ./Caddyfile:/etc/caddy/Caddyfile
      - ./caddy_data:/data
      - ./caddy_config:/config
    depends_on:
      - n8n
In this configuration:
- n8n listens only on localhost (127.0.0.1:5678) for security.
- Caddy handles all public-facing HTTP and HTTPS traffic.
- Credentials and workflow data are persisted via a local volume mount.
Next, I downloaded and edited the Caddy configuration file template, updating it for my domain:
n8n.edbradleyweb.net {
    encode gzip
    reverse_proxy n8n:5678

    header {
        Strict-Transport-Security "max-age=31536000; includeSubDomains; preload"
        X-Content-Type-Options "nosniff"
        X-Frame-Options "DENY"
        Referrer-Policy "strict-origin-when-cross-origin"
    }
}
With this configuration, Caddy:
- Proxies all inbound traffic to the n8n container
- Enforces modern browser security headers
- Enables transparent HTTPS encryption
Using Docker Compose, I successfully downloaded and started the n8n services:

I then verified that the services were up and running:

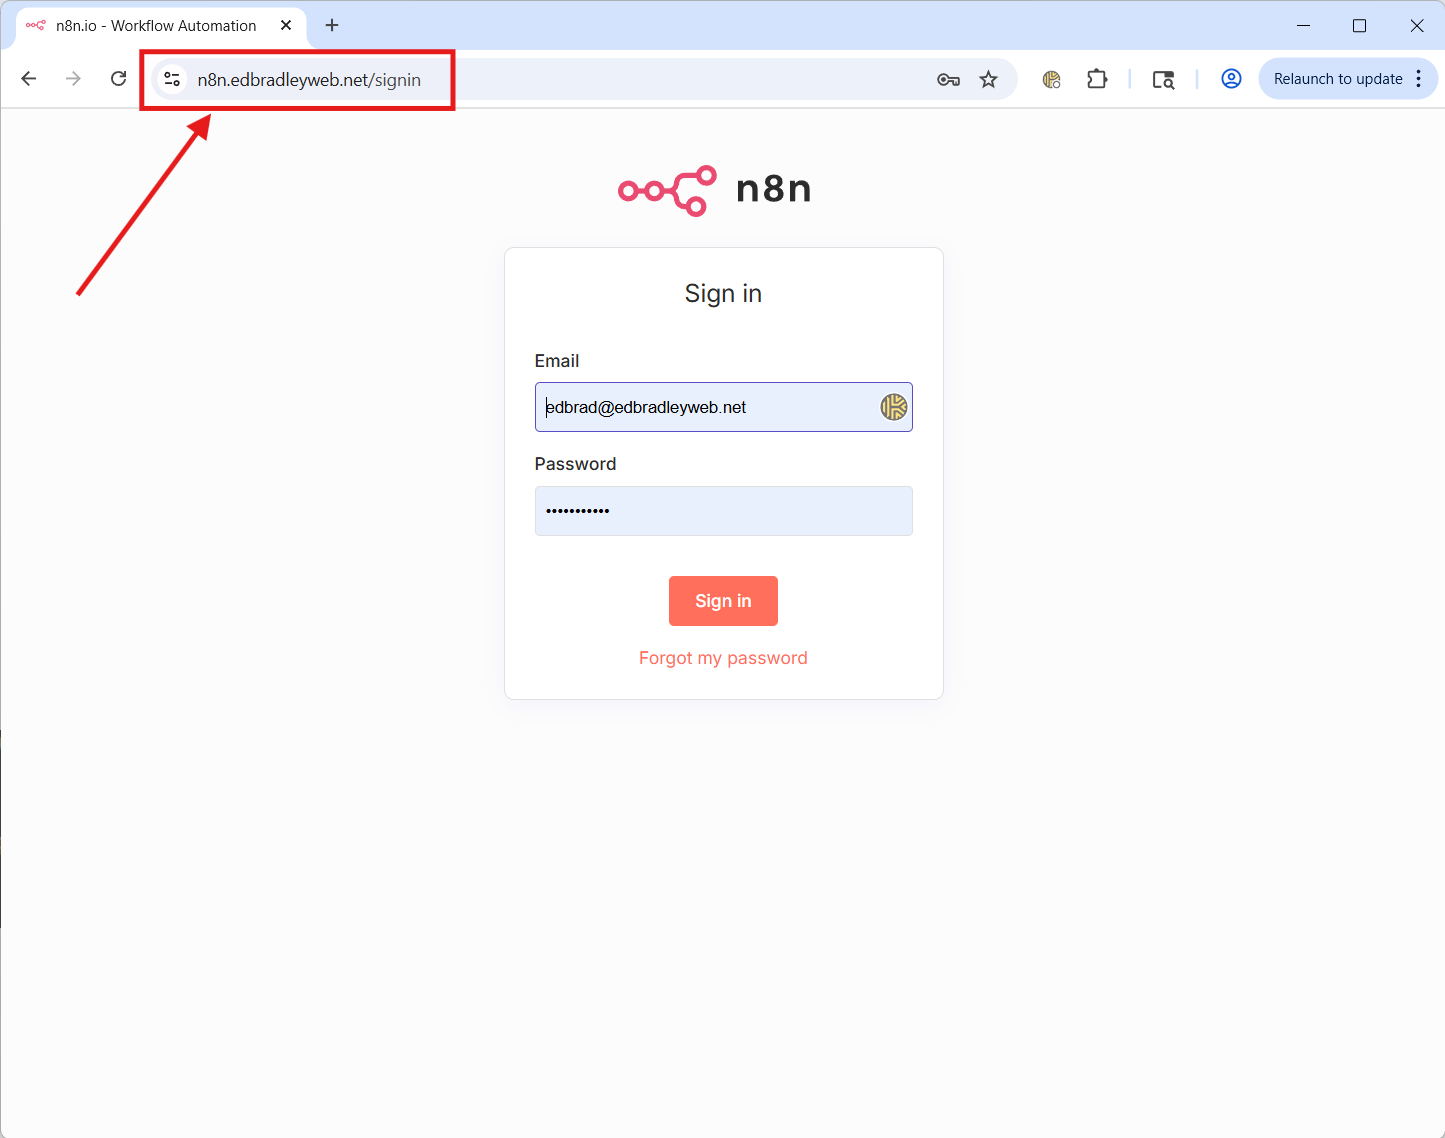
Once the services were confirmed operational and public DNS resolution was in place, I successfully accessed the n8n web interface from the Internet using http://n8n.edbradleyweb.net:
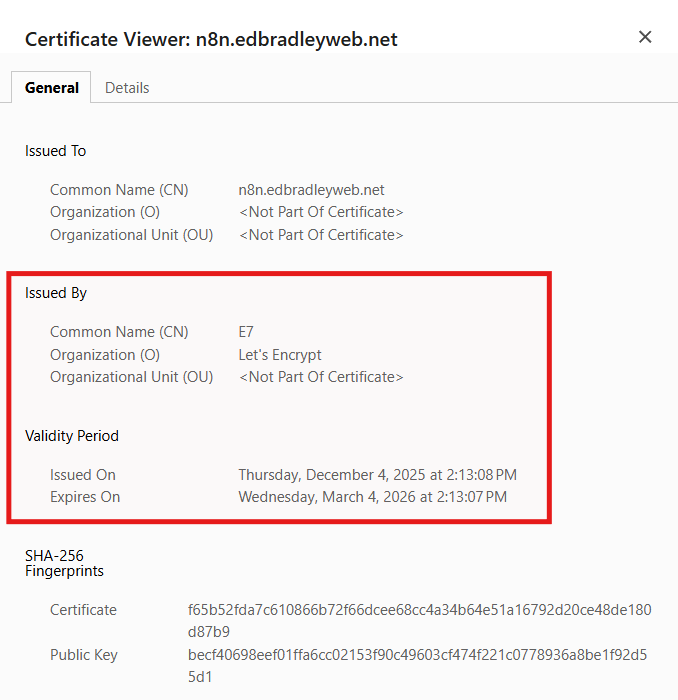
What's really cool is that Caddy automatically provisioned TLS certificate, in the background, upon the initial HTTP connection, without any manual intervention!:
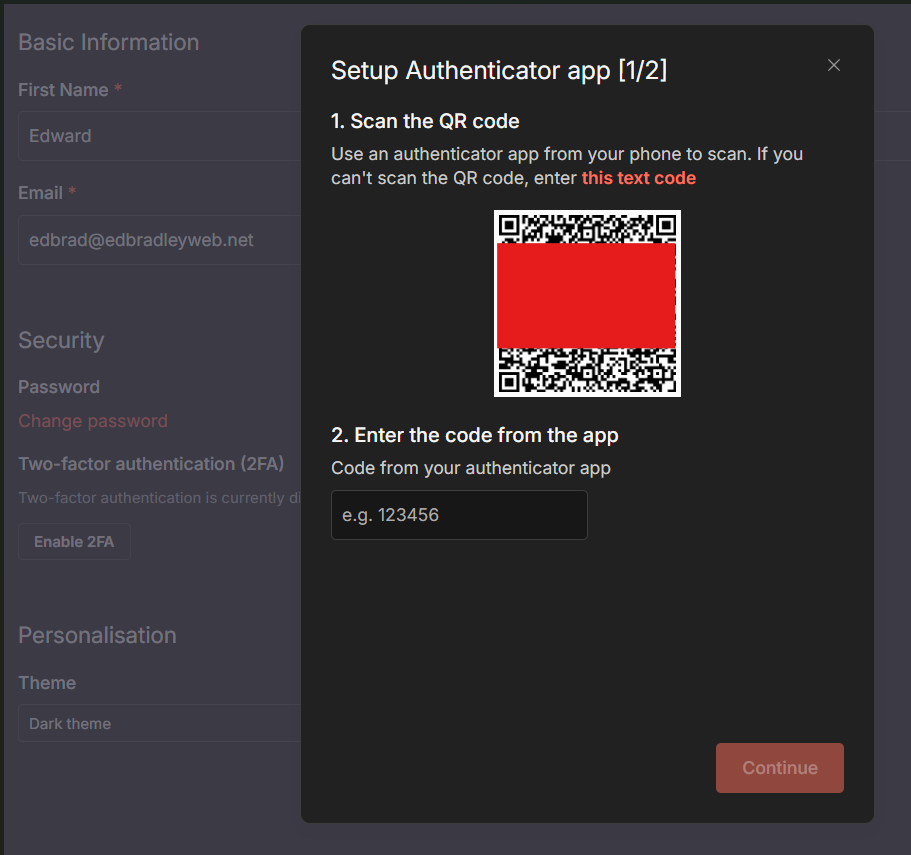
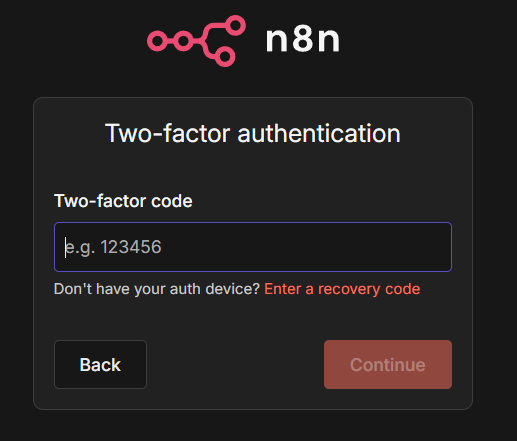
As an added level of security, I enabled 2FA on the Web GUI:
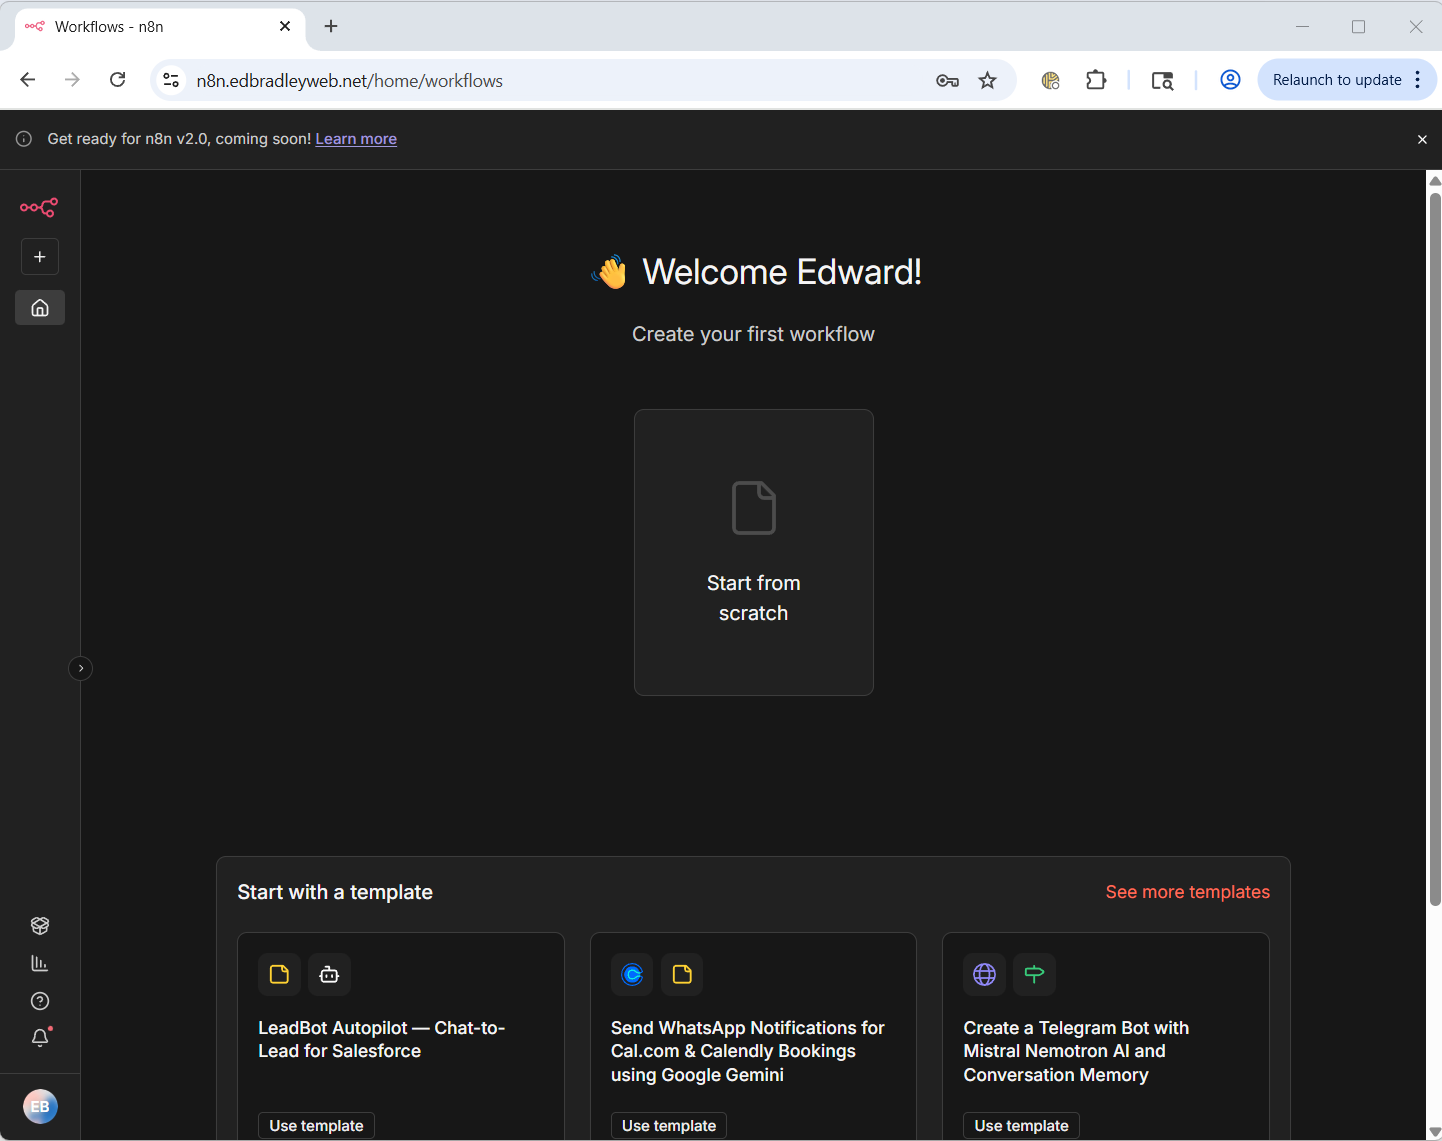
With this complete, the n8n instance ready for creating the first automation workflow:
Building the Network Switch Configuration Backup Automation Workflow
Overview:
Automating configuration backups for my lab switches ended up being more involved than expected. The Cisco and FS devices I use rely on legacy SSH Key Exchange (KEX) algorithms that modern tools, including n8n’s built-in SSH node, no longer support. Because of this, n8n could not communicate with the switches directly:

To overcome this, I moved the device-interaction layer to the Ubuntu host running n8n. There, I built Bash + Expect scripts capable of negotiating the older SSH algorithms, logging into each switch, collecting the running configuration, and storing it in a Git repository. Git then becomes the source of truth: it automatically detects whether the configuration has changed, and when it has, commits and pushes the update to GitHub.
n8n sits on top as the workflow orchestrator. It runs the backup script on a nightly schedule, branches based on whether the configuration changed, and when it does, generates an email containing a clean, readable diff of the new configuration. Bash handles the switch, Git handles the versioning and diffing, and n8n coordinates the entire process: scheduling, execution, logic, and notifications.
This architecture mirrors how configuration management is performed in enterprise networks. Tools like SolarWinds NCM, BackBox, Oxidized, and RANCID all follow the same principles: automate the retrieval of device configurations, store them in version control, detect drift, and alert when changes occur. My workflow applies those enterprise patterns to a home lab environment in a lightweight, modular, and highly reliable manner:
In this post, I will be focusing on the Core, Layer-3, Switch (SW-CORE-01).
Backing up the Switch:
As noted earlier, because of the age and class of the switch, the device-interaction layer had to be shifted down to the host server. To support this, I prepared the n8n Docker container so it could communicate with the switch, retrieve the running configuration, store it in a local Git repository, detect any configuration drift, and push updates to a designated GitHub repository.
I started by generating a SSH Key Pair for access to the GitHub (cloud) repository:
cd /opt/n8n
mkdir -p ssh
chmod 700 ssh
cd ssh

# Create a keypair just for the n8n instance
ssh-keygen -t ed25519 -f id_ed25519_n8n -C "n8n@edbradleyweb-lab"
# Press Enter for no passphrase (non-interactive use)
I then logged into my GitHub account and added the public key:

This allows the automation to log into the private repository and push any updated configurations:
To complete the process, I added GitHub (github.com) to the local (n8n) list of known hosts:
ssh-keyscan github.com >> /opt/n8n/ssh/known_hosts
chmod 644 /opt/n8n/ssh/known_hosts
Since the new ssh directory is external to the n8n Docker container, I added a mapping to the folder in the Docker Compose file and restarted the container:
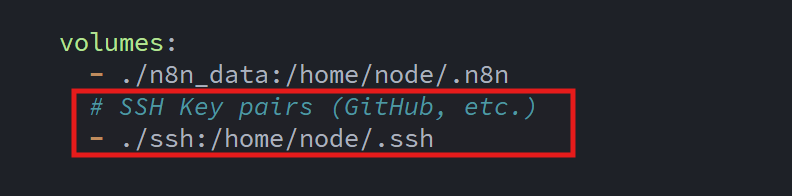
This allows the n8n container to reference the keys when establishing the SSH connection with GitHub.
The next step was to install Git within the n8n instance (Docker Container). I established a terminal session within the n8n container:
sudo docker exec -it n8n-n8n-1 bash
Then, I installed the Git package, set the required configuration parameters, and performed a clone of the existing GitHub repository:
# Install git (if not already present)
apt-get update
apt-get install -y git

cd /home/node/.n8n

# Tell git who we are for commits
git config --global user.name "n8n Automation"
git config --global user.email "n8n@edbradleyweb.local"

# Clone your lab repo over SSH
git clone git@github.com:ed-bradley/edbradleyweb-lab.git

cd edbradleyweb-lab

# Make sure you're on main
git checkout main
When performing the initial cloning of the repository, I ran into a DNS resolution error when attempting to log into my GitHub account from the n8n container:

To fix this, I updated the Docker Compose file with DNS configuration for the container (to resolve public domain names):

With this in place, I restarted the containers and n8n was able to resolve the public domain name (github.com) and download the repository.
To automate switch configuration backups, the workflow relies on two cooperating scripts: one written in Expect and the other in Bash. Each handles a different layer of automation, and together they form a complete, Git-integrated backup pipeline. What sounded simple at first turned into a surprisingly deep technical challenge, requiring a lot of trial-and-error (and plenty of help from ChatGPT) before everything finally worked smoothly.
🔧 What Is Expect?
Expect is a scripting tool designed to automate interactive command-line programs. When a program normally waits for user input, like a username, password, or CLI prompt, Expect can “watch” for those prompts and automatically respond with pre-defined inputs.
This makes it ideal for automating systems that cannot be controlled with standard non-interactive tools, such as legacy network devices, routers, and switches that require step-by-step CLI interaction.
The Expect script handles the interactive SSH session with the switch. Because these SMB-class devices still use older SSH key-exchange algorithms, n8n cannot connect to them directly. Expect bridges the gap by managing the login prompts, issuing the necessary commands (terminal datadump and show run), and outputting the raw running configuration.
The Bash script sits above that layer and performs the higher-level logic. It calls the Expect script, strips off banners and prompts, saves a clean version of the configuration into a local Git repository, checks for any changes, commits updates, and pushes them to GitHub. It then returns either CONFIG_CHANGED or NO_CHANGE, which n8n uses to decide what happens next.
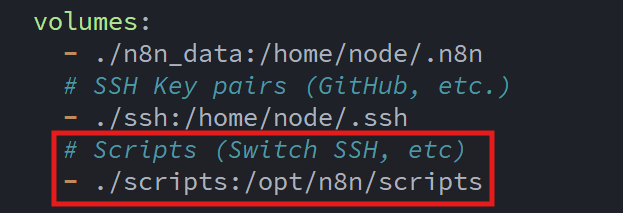
To make the scripts accessible from the n8n container, I added another volume mapping to the docker compose file:
n8n orchestrates the entire workflow: it runs the automation on a nightly schedule, executes the Bash script. And when a change is detected, generates and sends an email containing a readable diff of exactly what changed.
This modular approach allows a containerized n8n instance to trigger external scripts on the host while still using Git/GitHub as the authoritative source of truth. The end result is very similar to how enterprise tools such as RANCID, Oxidized, Auvik, and SolarWinds NCM detect and track network-device configuration drift.
Here is the working Expect script (dump_sw_core_01.expect):
#!/usr/bin/expect -f
#
# Usage: dump_sw_core_01.expect <IP> <USERNAME> <PASSWORD>
#

set timeout 20

set IP       [lindex $argv 0]
set USER     [lindex $argv 1]
set PASS     [lindex $argv 2]

# Launch SSH with legacy algorithms required by SG/Sx350 switches
spawn ssh \
    -oKexAlgorithms=+diffie-hellman-group1-sha1,diffie-hellman-group14-sha1 \
    -oHostKeyAlgorithms=+ssh-rsa \
    -oPubkeyAcceptedKeyTypes=+ssh-rsa \
    -oStrictHostKeyChecking=no \
    $IP

# Handle username prompt
expect {
    -re "(?i)User Name:" {
        send "$USER\r"
    }
}

# Handle password prompt
expect {
    -re "(?i)Password:" {
        send "$PASS\r"
    }
}

# Wait for privilege EXEC prompt
expect {
    -re {#} {}
}

# Disable paging
send "terminal datadump\r"
expect { -re {#} {} }

# Dump the running configuration
send "show run\r"

# Capture output until prompt returns
expect {
    -re {#} {}
}

# Print everything collected
# (The Bash script downstream will trim banners and prompts)
puts $expect_out(buffer)

# Exit cleanly
send "exit\r"
expect eof
Here is the working Bash script (backup_sw_core_01.sh):
#!/bin/sh
set -e
# Switch Details
SW_NAME="SW-CORE-01"
SW_IP="10.0.10.1"
SW_USER="***********"
SW_PASS="***********"
# Paths
SCRIPTS_DIR="/opt/n8n/scripts"
REPO_DIR="/home/node/.n8n/edbradleyweb-lab"
OUT_DIR="$REPO_DIR/Config/Switches/$SW_NAME"
OUT_FILE="$OUT_DIR/${SW_NAME}_running.cfg"
mkdir -p "$OUT_DIR"
echo "[$SW_NAME] Writing config to: $OUT_FILE"
# Dump config via Expect → strip everything ABOVE 'config-file-header'
"$SCRIPTS_DIR/dump_sw_core_01.expect" "$SW_IP" "$SW_USER" "$SW_PASS" \
| awk 'found {print} /config-file-header/ {found=1}' > "$OUT_FILE"
# --- Git Processing ---
cd "$REPO_DIR"
git add "$OUT_FILE"
if git diff --cached --quiet; then
echo "[$SW_NAME] No configuration changes; nothing to commit."
git reset HEAD "$OUT_FILE" >/dev/null 2>&1 || true
echo "NO_CHANGE"
else
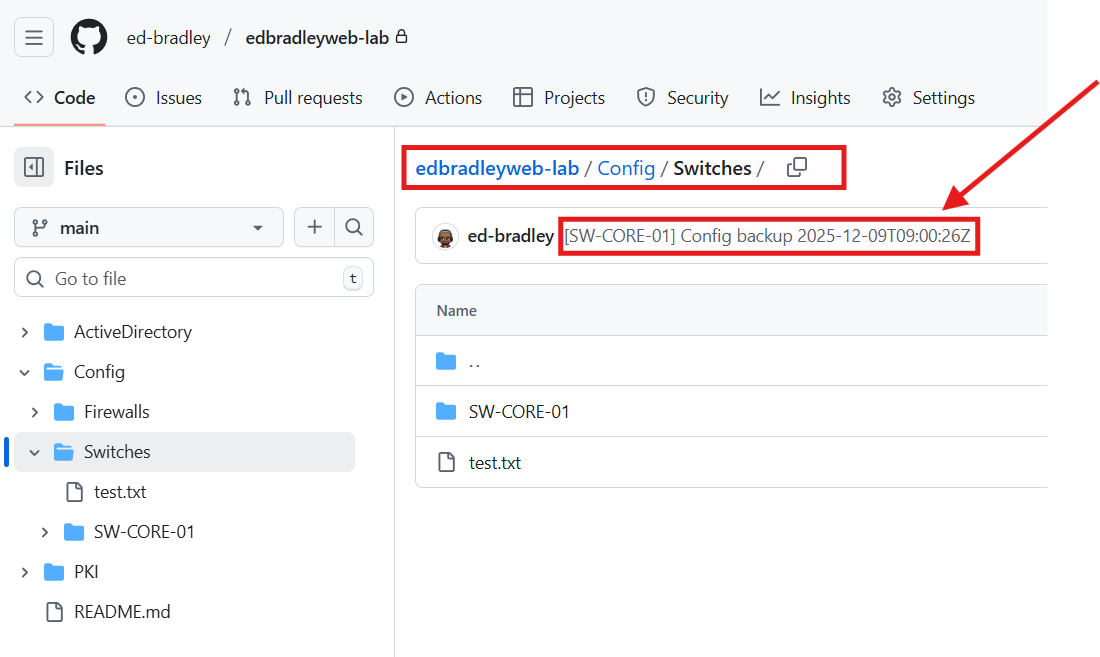
COMMIT_MSG="[$SW_NAME] Config backup $(date -u +'%Y-%m-%dT%H:%M:%SZ')"
git commit -m "$COMMIT_MSG"
echo "[$SW_NAME] New configuration committed:"
git show --stat HEAD
# Attempt GitHub push (non-fatal failure)
if git push origin main; then
echo "[$SW_NAME] Pushed to origin/main."
else
echo "[$SW_NAME] WARNING: git push FAILED."
fi
echo "CONFIG_CHANGED"
fi
Until this project, I had never worked with Expect. One of the things I love about tackling projects like this is how they expose me to new tools and techniques I might never have encountered otherwise. Another solid tool added to the IT toolbelt!
With the scripted configuration backup fully in place, it was time to jump into the n8n GUI and orchestrate the full end-to-end automation, from scheduling the workflow to executing the backup and handling notifications!
Building the n8n Automation Workflow
With the tedious prep work completed, I was finally ready to start working with the n8n UI. As noted earlier, n8n is a "node" based automation tool, meaning a sequence of processing nodes are connected (with inputs and outputs) to form a workflow:
| Class | Purpose | Example Nodes |
|---|---|---|
| Trigger | Start workflows | Schedule, Webhook, IMAP, RSS |
| Action | Perform external actions | HTTP Request, Email Send, Execute Command |
| Data Transformation | Modify or restructure data | Set, Code, Merge |
| Flow Control | Guide execution | IF, Switch, Wait, Split in Batches |
| Utility | Provide helper operations | Crypto, Markdown, HTML Extract |
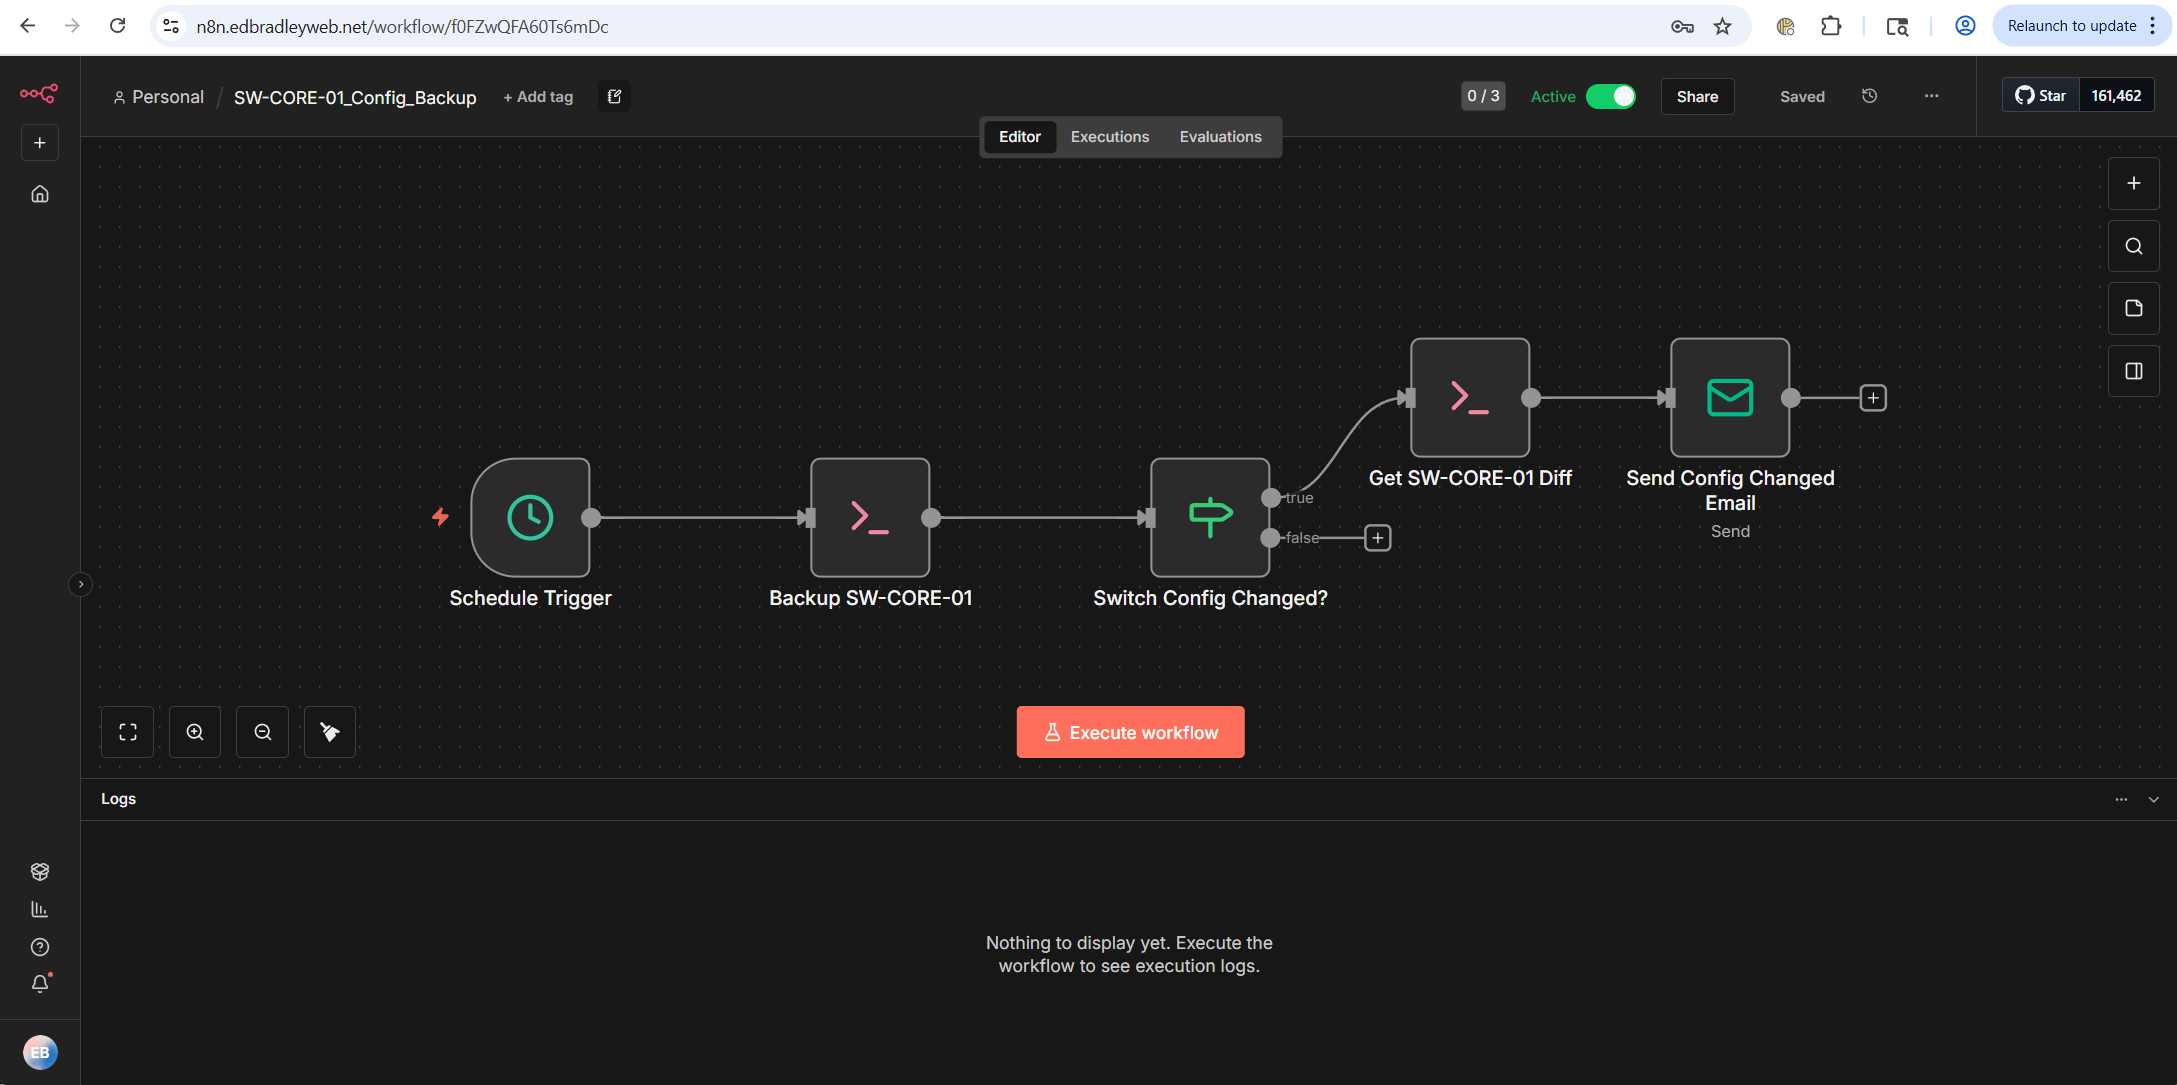
The n8n Web GUI allows you to visually build, test, and troubleshoot automation workflows. For the switch-backup workflow, I configured a series of interconnected nodes that together orchestrate the nightly backup, detect changes, generate a diff report, and send a notification email. Below is an overview of each step:
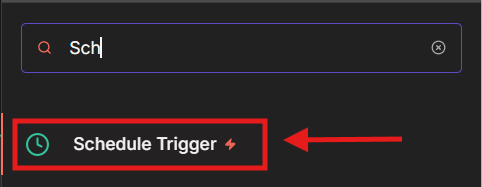
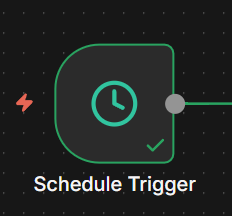
Schedule the backup:
On the blank canvas, I added a Schedule Trigger Node:
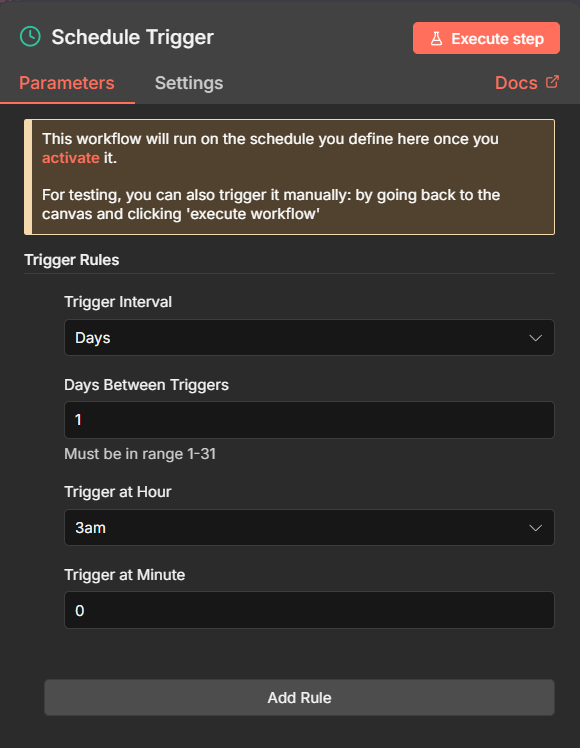
I configured the node to trigger (kick off) the workflow every night at 3:00 AM:
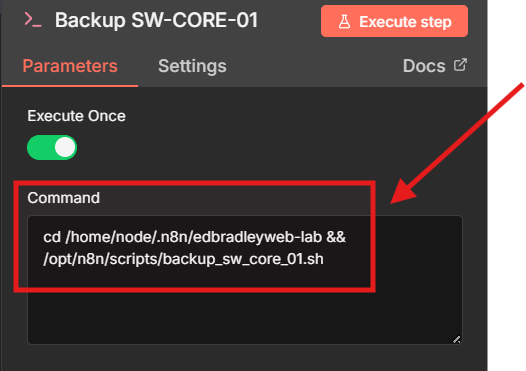
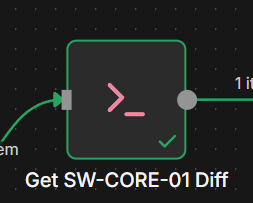
Run the switch backup:
To run the local backup scripts, I added an Execute Command Node:
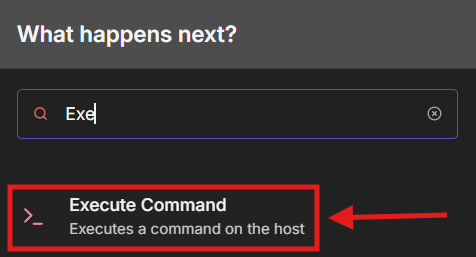
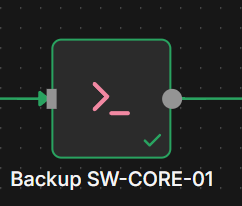
I configured the Node to navigate to the local Git repository folder and (&&) execute the switch backup scripts I created earlier:
Check if the configuration changed (true/false):
To route processing based on running switch configuration status (changed/unchanged), I added a IF Node:
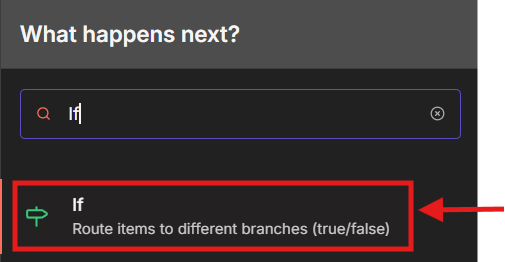
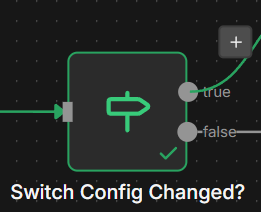
The IF Node scans the output from the backup script for the "CONFIG_CHANGED" status string. If found, it routes the output to the True branch, which extracts the Diff report from the output to be used in an Email notification:
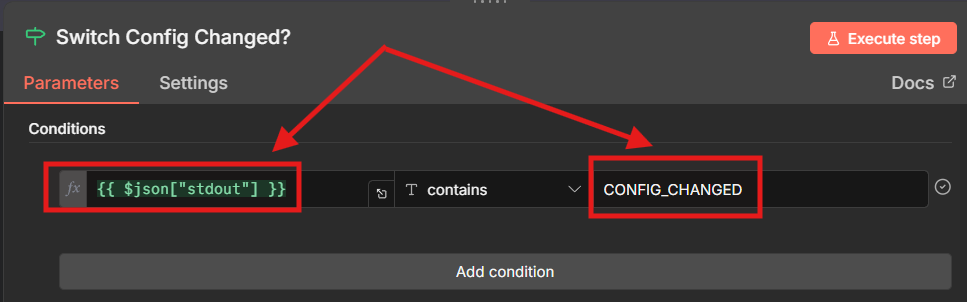
If no change was detected after the backup (when a git diff is executed), the automation workflow ends.
If changed, generate a Git Diff report:
To handle the "CONFIG_CHANGED" condition (True), I added another Execute Command Node:
On the True branch, I added another Execute Command node.
This node runs a git diff command, that is formatted so that only the meaningful configuration changes (added, removed, or modified lines) appear. This keeps the diff readable and email-friendly:

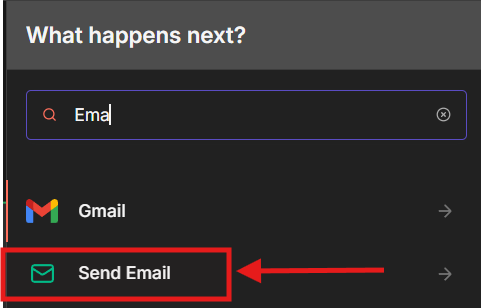
Send a notification Email (when configuration change detected):
Continuing on the same branch, I added the Send Email Node:
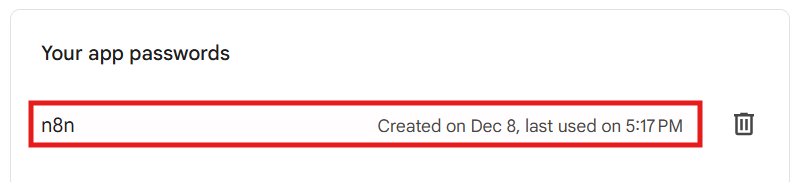
To support this Node, I first had to create SMTP Credentials to allow n8n to send Emails via a provider. I opted to utilize my Gmail account for this:
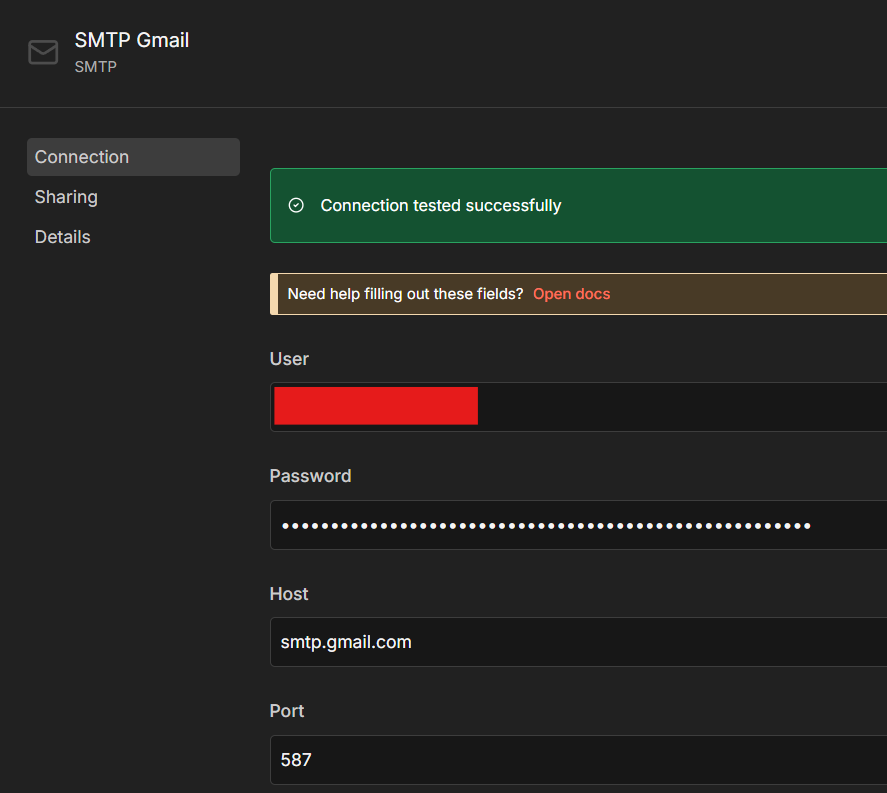
Please note: I chose to use my Gmail account, which required creating a Gmail App Password (a special password intended for external apps that need SMTP access). Once configured, n8n was able to send clean, human-readable emails whenever a switch configuration changed:
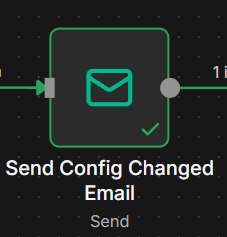
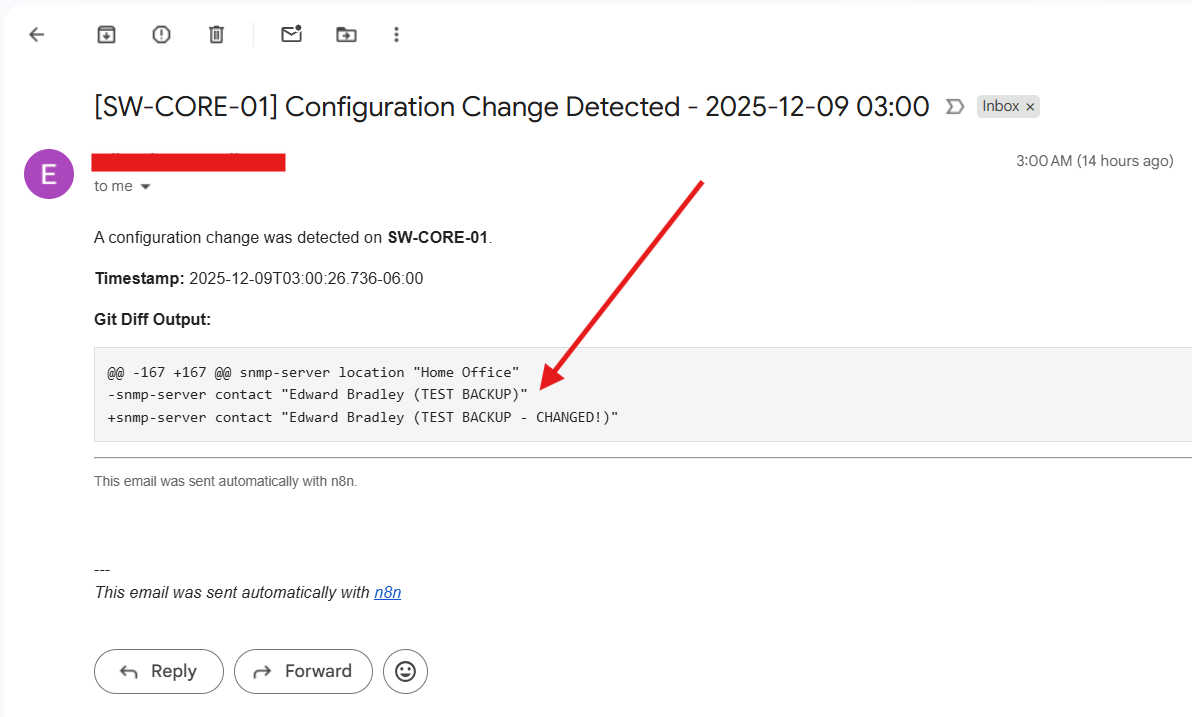
I then configured the Email Node to send a formatted Email, notifying me that a configuration change was detected and include the corresponding Diff Report.
To validate the workflow, I manually made a small, harmless change to the switch configuration. On the next scheduled execution, n8n:
- Pulled the new config,
- Detected the change,
- Generated the diff,
- And sent the notification email exactly as expected.
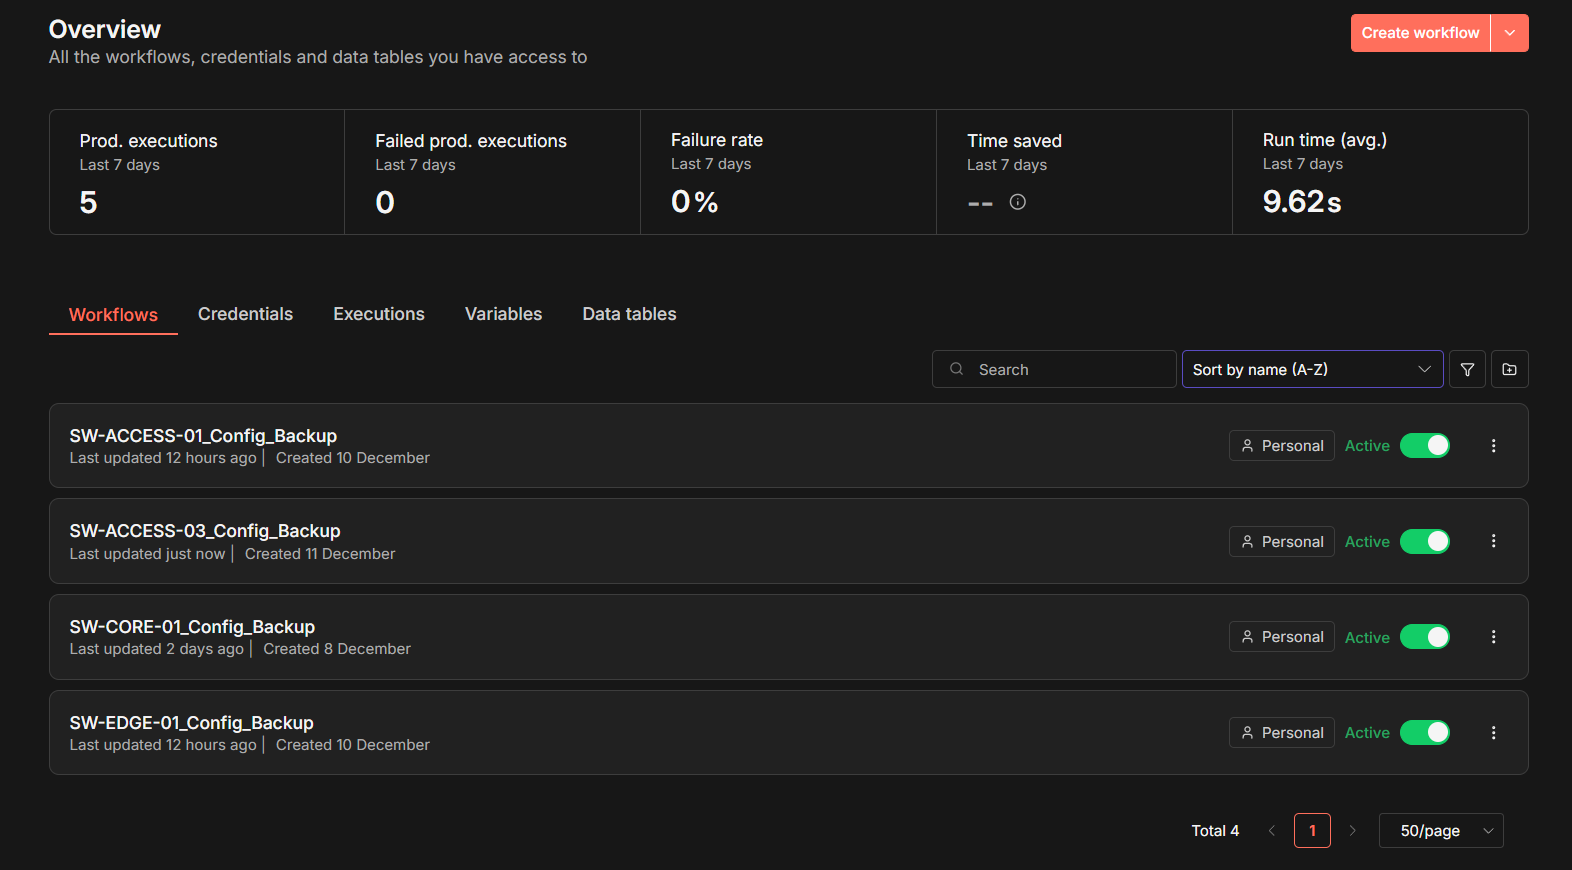
I then repeated this pattern for each switch in the lab. The result is a fully automated, Git-backed configuration-tracking system, very similar to the type of workflow used in enterprise environments to detect configuration drift and provide audit-ready change history:
Wrap-Up
With n8n deployed and fully integrated into the lab environment, the automated switch-configuration backup workflow is now running end-to-end - hands-off, and Git-driven! By pairing Expect for legacy SSH interaction with Bash for version control logic, and letting n8n orchestrate everything from scheduling to email notifications, the entire process now behaves like a lightweight, home-lab version of enterprise-grade config-management platforms. The result is a clean, modular automation pipeline that tracks configuration drift, commits changes to GitHub, and alerts me with a clear diff whenever something changes. It's a perfect example of how open-source tooling, clever scripting, and a bit of workflow automation can bring real network-operations discipline into a home lab.
I’ve only scratched the surface of what n8n can automate, and this project has made it clear just how powerful, and fun, this platform can be. With the switch-backup workflow now running smoothly, I’m excited to explore even more automation opportunities across my lab. Whether it’s tying deeper into my SOC stack, orchestrating cloud and on-prem workflows, auto-generating reports, or reacting to real-time events, n8n opens the door to an entirely new level of integrated, intelligent lab automation. This is just the beginning, and I can already see my home lab becoming an increasingly automated, self-monitoring ecosystem.